PC/104 Peripheral Module PFM-C42C Notice This guide is designed for experienced users to setup the system in the shortest time. Safety Precautions Always completely disconnect the power cord from your board whenever you are working on it. Do not make connections while the power is on, because a sudden rush of power can damage sensitive electronic components. Always ground yourself to remove any static charge before touching the board.
PC/104 Peripheral Module PFM-C42C A Message to the Customer First of all, thank you for purchasing PFM-C42C PCI-104 4/8-port RS-232 Module. This Quick Installation Guide will help you on the process of the installation. Please read it thoroughly before you start to install it. The product comes with a sheet of warranty for two years assurances except for improper use. Therefore, we strongly suggest you to read and refer to the Quick Installation Guide before any installation.
PC/104 Peripheral Module PFM-C42C Product Warranty AAEON Customer Services All products in AAEON are designed as the strictest specifications to ensure that the products will own the reliable performance in the typical industrial environments. Whether your purchase from AAEON is made to the purpose of the laboratory or the factory facility, you can be assured that every purchase in AAEON will provide the reliability and stability of operation. Your satisfaction is our primary concern.
PC/104 Peripheral Module PFM-C42C easily solved over the phone. In addition, free-charged technical support is available from AAEON engineers in the office time. We are always pleased to give advice regarding to any installation and operation for AAEON products.
PC/104 Peripheral Module PFM-C42C Ordering Information TF-PFM-C42C-A10 PCI/104+ Board, 8 COM ports, Oxford (OXuPCI954), PC/104+, Rev. A2.3 TF-PFM-C42C-A10-02 PCI/104+ Board, 4 COM ports, Oxford (OXuPCI954), PC/104+, Rev. A2.3 Packing List Product CD (including Quick Installation Guide in pdf format and driver) PFM-C42C Optional Accessories 1701090150 Flat Cable, D-sub 9P 1.
PC/104 Peripheral Module PFM-C42C Content A Message to the Customer...................................................1-2 Product Warranty ...................................................................1-3 Ordering Information ..............................................................1-5 Packing List............................................................................1-5 Optional Accessories .............................................................1-5 1.1 Features ......................
PC/104 Peripheral Module PFM-C42C 1.15 RS-232 Serial Port Connector (COM1) (For 4/8-port) .1-18 1.16 RS-232 Serial Port Connector (COM2) (For 4/8-port) .1-18 1.17 RS-232 Serial Port Connector (COM3) (For 4/8-port) .1-18 1.18 RS-232 Serial Port Connector (COM4) (For 4/8-port) .1-18 1.19 RS-232 Serial Port Connector (COM5) (For 8-port only) .............................................................................................1-19 1.20 RS-232 Serial Port Connector (COM6) (For 8-port only) ............
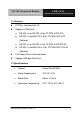
PC/104 Peripheral Module PFM-C42C 1.1 Features PC/104+ Interface Rev.2.3 Supports COM Ports: a. RS-232 x 4 or RS-232 x 8 for TF-PFM-C42C-A10 b. RS-232 x 4 and RS-232 x 8 for TF-PFM-C42C-A10 (Optional) c. RS-232 x 2 or RS-232 x 4 for TF-PFM-C42C-A10-02 d. RS-232 x 2 and RS-232 x 4 for TF-PFM-C42C-A10-02 (Optional) Full Duplex Serial Communication Supports Window And Linux 1.2 Specifications Chipset Oxford OXuPCI954 Power Requirement 12V, 5V, 3.
PC/104 Peripheral Module PFM-C42C 1.
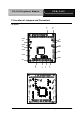
PC/104 Peripheral Module PFM-C42C PC2 PC1 For 4-port COM1 JP1 JP2 COM2 JP3 JP4 COM3 COM4 PFM-C42C Quick Installation Guide 1-10 CN1 S2 S1 SW1 JP5
PC/104 Peripheral Module PFM-C42C 1.
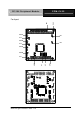
PC/104 Peripheral Module For 4-port PFM-C42C Quick Installation Guide 1-12 PFM-C42C
PC/104 Peripheral Module PFM-C42C 1.5 List of Jumpers The board has a number of jumpers that allow you to configure your system to suit your application.
PC/104 Peripheral Module PFM-C42C 1.6 List of Connectors The board has a number of connectors that allow you to configure your system to suit your application.
PC/104 Peripheral Module PFM-C42C 1.7 Setting Jumpers You configure your card to match the needs of your application by setting jumpers. A jumper is the simplest kind of electric switch. It consists of two metal pins and a small metal clip (often protected by a plastic cover) that slides over the pins to connect them. To “close” a jumper you connect the pins with the clip. To “open” a jumper you remove the clip. Sometimes a jumper will have three pins, labeled 1, 2 and 3.
PC/104 Peripheral Module PFM-C42C 1.8 COM5 Ring/+5V/+12V Selection (JP1) (For 8-port only) JP1 Function 1-2 +12V 3-4 Ring (Default) 5-6 +5V 1.9 COM1 Ring/+5V/+12V Selection (JP2) (For 4/8-port) JP2 Function 1-2 +12V 3-4 Ring (Default) 5-6 +5V 1.10 COM6 Ring/+5V/+12V Selection (JP3) (For 8-port only) JP3 Function 1-2 +12V 3-4 Ring (Default) 5-6 +5V 1.
PC/104 Peripheral Module PFM-C42C 1.12 PCI Routing setting Selection (SW1) (For 4/8-port) OXuPCI954 for COM1~4 OXuPCI954 for COM5~8 1=ON,2=ON PIRQ#A , IDSEL0 PIRQ#B , IDSEL1 1=ON,2=OFF PIRQ#B , IDSEL1 PIRQ#A , IDSEL0 1=OFF,2=ON PIRQ#C , IDSEL2 PIRQ#D , IDSEL3 1=OFF,2=OFF PIRQ#D , IDSEL3 PIRQ#C , IDSEL2 Note: The line with Bold letters is the default setting. 1.
PC/104 Peripheral Module PFM-C42C 1.15 RS-232 Serial Port Connector (COM1) (For 4/8-port) Pin Signal Pin Signal 1 DCD#1(485D- / 422TXD-) 2 RXD1(422RXD+) 3 TXD1(485D+ / 422TXD+) 4 DTR#1(422RXD-) 5 GND 6 DSR#1 7 RTS#1 8 CTS#1 9 RI#1 10 N.C 1.16 RS-232 Serial Port Connector (COM2) (For 4/8-port) Pin Signal Pin Signal 1 DCD#2(485D- / 422TXD-) 2 RXD2(422RXD+) 3 TXD2(485D+ / 422TXD+) 4 DTR#2(422RXD-) 5 GND 6 DSR#2 7 RTS#2 8 CTS#2 9 RI#2 10 N.C 1.
PC/104 Peripheral Module PFM-C42C 3 TXD4 4 DTR#4 5 GND 6 DSR#4 7 RTS#4 8 CTS#4 9 RI#4 10 N.C 1.19 RS-232 Serial Port Connector (COM5) (For 8-port only) Pin Signal Pin Signal 1 DCD#5(485D- / 422TXD-) 2 RXD5(422RXD+) 3 TXD5(485D+ / 422TXD+) 4 DTR#5(422RXD-) 5 GND 6 DSR#5 7 RTS#5 8 CTS#5 9 RI#5 10 N.C 1.
PC/104 Peripheral Module PFM-C42C 1.22 RS-232 Serial Port Connector (COM8) (For 8-port only) Pin Signal Pin Signal 1 DCD#8 2 RXD8 3 TXD8 4 DTR#8 5 GND 6 DSR#8 7 RTS#8 8 CTS#8 9 RI#8 10 N.C 1.23 Driver Installation The PFM-C42C supports Linux and Windows XP platforms. It comes with a CD-ROM that contains all drivers and utilities that meet your needs.
PC/104 Peripheral Module PFM-C42C Figure 1 2. Select “Search for the best driver in these locations.”, next select “Include this location in this search:” and then click “Browse” to open the “CD-ROM/Driver/PFM-C42C Mini PCI RS-232 Module driver V1.0 for Windows” file as shown in figure 2 . Click “Next.” Figure 2 3. Windows has found an updated driver for this device as shown in figure 3. Click “Next.
PC/104 Peripheral Module PFM-C42C Figure 3 4. The “Completing the Found New Hardware Wizard” dialog Appears as shown in figure 3, click “Finish.” 5. Repeat the above process for the second, third, fourth, fifth AAEON PCI Communications Port. 6. Please re-start your Windows.
PC/104 Peripheral Module PFM-C42C AAEON PCI Communications Port as the figure 4 shows 4 ports Mini PCI module Figure 4 Mini-PCI RS-232 module set up in Linux If the module is a 4-port Mini PCI, you don’t need to proceed with the set up process, you can use it directly. 2-port Mini PCI module please use following the sequence below to set up the module. 1. Open the Terminal screen and make a cat /proc/tty6/driver/serial command to check your COM port settings.
PC/104 Peripheral Module PFM-C42C As the screen showing, use 16550A to be UART prefix is the system COM ports, and we can see this system have 2 COM ports, leave each other ttyS0, ttyS1. 2. Make lspci -v command to find OXmPCI952 IRQ and I/O address As the screen showing, we can find ”Serial controller: Oxford Semiconductor Ltd:” this alphabetic string then to see the next line have IRQ number and the next have I/O address 3. Open the file: /etc/rc.
PC/104 Peripheral Module PFM-C42C setserial /dev/ttyS5 port 0xe100 irq 9 uart 16950 baud_base 115200 4. Please re-start your computer. 5. Make cat /proc/tty/driver/serial command to see if the display is as following, if yes you already set it up.