
Instruction Manual


ENGLISH
RM2004 User Instrucon Manual Version 1.0 12
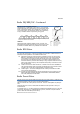
Mounting Notes
Fitting the Radio
Fit the mounting cage (sleeve) into the vehicles’ ISO / DIN slot and bend the fixing tangs to lock
it in place.
Connect the wiring to the rear of the radio.
Slide the radio into the cage until it “clicks” into place on the locking clips.
Fit the bezel (trim ring) on the front of the radio.
Check correct operation of the radio.
Removing the Radio
Slide the Release Keys centrally along the two sides of the radio to release the locking clips.
Slide the radio out, keeping the Release Keys in place.
Once the radio is out disconnect all the wiring and remove the radio completely.
If necessary bend the fixing tangs inward to remove the mounting cage as well.
Fitting the External Microphone
The Bluetooth radio models may be supplied with an external microphone this will be either a
panel mounted unit with a M8 stud or a visor clip.
Panel mounted M8 stud:
Find a suitable location as close to the front of the user as possible (30
to 45cm).
Drill a 8.5 to 9mm hole for the mounting stud, run the cable through this and route it to
the radio.
Fit the star washer and the M8 nut to hold the microphone in place.
Visor mounted:
Find a suitable location as close to the front of the user as possible
(30 to 45cm).
Clip, or use an adhesive pad to mount the microphone, and route the cable to the rear of
the radio.
When routing the cable back to the radio be careful of sharp edges and pinch points that may
damage the cable.
Make sure the cable and microphone do not interfere with any control operation or compromise
the drivers view.