C10ps C12ps HT10ps HT12ps owner's manual analog and digital systems
table of contents introduction . . . . . . . . . . . . . . . . . . . . . . . . . . . . . . . . . . . . . . . . . . . . . . . . . . . . .3 cautions . . . . . . . . . . . . . . . . . . . . . . . . . . . . . . . . . . . . . . . . . . . . . . . . . . . . . . . .3 about the a/d/s/ subwoofers . . . . . . . . . . . . . . . . . . . . . . . . . . . . . . . . . . . . . . . . .5 unpacking . . . . . . . . . . . . . . . . . . . . . . . . . . . . . . . . . . . . . . . . . . . . . . . . . . . . . .5 placement . . . . . .
about the a/d/s/ subwoofers This manual covers four a/d/s/ powered subwoofer models. The C10ps and the C12ps use 10 and 12-inch subwoofers in sealed enclosures. The HT10ps and the HT12ps also use 10 and 12-inch drivers respectively, and feature precision-tuned bandpass enclosures for enhanced low-frequency performance. The C-series subwoofers have an attractive black matte finish that blends well into most decors. The HT-series subwoofers feature a black wood grain furniture grade finish.
placement Unlike higher frequency sound, our ears have difficulty locating the source of deep bass sound. Consequently, you have a fair amount of flexibility in where you place the subwoofer in your listening room. We recommend placing the subwoofer at the same end of the room as the main speakers. Avoid placing the subwoofer close to the main listening area or behind it.
system connection There are two ways the subwoofer can be connected to the other components in the system. If the electronics in the system consists of a separate preamp and power amp or integrated electronics that have preamp/power amp jumpers, use the low level (preamp level) inputs and outputs of the subwoofer (See below). Low-level connection: In this configuration the subwoofer is connected to the system between the preamp and power amp sections of the electronics.
power connection and power switch operation Note: Read and follow all of the cautions, warnings and notes listed on page 1. CAUTION The power switch must be in the off position prior to plugging in the power cable. The amplifier in the subwoofer can draw a great deal of power. The power cable must be plugged directly into a wall outlet. Do not plug it into an accessory outlet or another component in the system. The power switch on the subwoofer has two positions, on and off.
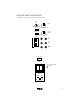
controls and connections Input/Output Control Panel and Connection Detail (back panel) bass EQ volume +6dB -6dB 0 phase 180 max min power mode standby on speaker level input crossover frequency 180Hz 40Hz R L line input + L - LFE out/in R + hi-pass output class 2 wiring AC input voltage off power on power on/status/protection LED indicator AC Power Connection 9
There are four controls that affect the quality of sound produced by the system, the volume control, the crossover frequency control, the bass EQ control and the phase switch. These controls are all somewhat interactive so it may be necessary to go through these settings more than once to get the best overall sound. Generally, the controls should be set in the order listed. Then further minor adjustments can be made as needed.
AC power connection: Power cable connection. maintenance Normal maintenance of the subwoofer consists of keeping the unit clean and dust-free. Use a soft cloth or brush to remove dust without scratching or marring the finish. Do not use strong cleaner or solvents of any kind. Avoid spray cleaners or waxes. They can produce spotty glossy areas. Keep moisture away from the subwoofer. Avoid the temptation to place a plant that needs watering on top of the subwoofer.
With some program material it may be difficult to hear the subwoofer, especially at low volume levels. Turn up the volume control or the bass tone control to make the deep bass sound more obvious. Popular, electronically produced music has more bass energy than acoustic music and will make the sound of the subwoofer more prominent. Buzzes and rattles: Locate the source of the noise and secure it. Place pads under loose objects that rattle or vibrate.
typical wiring diagrams The diagrams depicted in this section represent typical connections from receivers and other equipment to the ads subwoofer. The owner should refer to the manuals provided by the other equipment manufacture regarding connections.
specifications Model C10ps C12ps HT10ps HT12ps Driver size 10” 12” 10” 12” Cabinet design Sealed Sealed Single-reflex bandpass Amplifier power 200W 500W 500W 500W Frequency response 25–250 Hz 20–250 Hz 20–180 Hz 15–180 Hz Maximum output (@ 1M) 107 dB 110 dB 110 dB 112 dB Weight 39 lbs (17.6 Kg) 47 lbs (21.5 Kg) 67 lbs (19 Kg) 81 lbs (24.
warranty information LIMITED FIVE YEAR CONSUMER WARRANTY FOR PRODUCT INSTALLED BY AN AUTHORIZED LICENSED DEALER Directed Electronics, Inc. promises to the original purchaser, to replace this product should it prove to be defective in workmanship or material under normal use, for a period of five years from the date of purchase from the dealer as indicated by the date code marking of the product PROVIDED the product was sold by an authorized Directed dealer.
© 2004 Directed Electronics, Inc.