
User guide


58
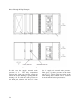
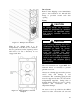
drains. Remove the two bolts by each coil
connection. When replacing the cover, take
care not to over-tighten the bolts as this
could cause the rivet-nut to come loose.
Vents and drains are sealed with half inch
plugs.
All coils should be piped in a counter-flow
arrangement. The water entering connection
should be on the air leaving side of the coil.
Figure 33 - Hydronic Coil Connections
Operation
Before starting up the equipment, building
construction should be complete. Startup
personnel should:
• Have a working knowledge of general
HVAC and mechanical commissioning
procedures and practices.
• Be familiar with unit functions, features,
optional unit accessories, and all control
sequences.
• Have appropriate literature on hand for
consultation.
Startup Checklist
• Check all electrical connections for
tightness.
• Inspect all sections. Remove any shipping
restraints and check for loose debris.
• Check fan set screws for tightness, turn
fan to assure free rotation.
• Ensure electrical supply matches unit
nameplate.
• Ensure condensate lines are connected,
glued, and sloped towards building drain.
• Manually fill any trapped drains.
(Condensate drains will fill automatically)
Improper installation, adjustment,
alteration, service or maintenance
can cause property damage,
personal injury or loss of life. Startup
and service must be done by a
Factory Trained Service Technician.
A copy of this IOM should be kept
with the unit.
WARNING
Equipment operation during
construction will void all
manufacturer’s warranties.
CAUTION