Tablet PC Brand Name: AOC Model Name:D70A15-2N FCC ID: 2AAQHD70A1
English User Manual Thanks for buying this Tablet PC. This manual will introduce you to the functions of your device and make you aware of anything requiring attention. Please read this manual carefully before using the device.
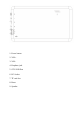
⑨ ① ④ ⑤ ⑥ ② ③ ⑦ ⑧ 1. Power button 2. VOL+ 3. VOL4. Earphone jack 5. OTG USB Port 6. DC Socket 7. TF card slot 8. Reset 9.
Content 1. Notifications ………………………………………………………………1 2. Introduction ……………………………………………………………………2 2.1 Key Functions………………………………………………………………………..2 2.2 Features Overview. ……………………………………………………………………2 2.3 Technical Specifications……………………………………………………………………..3 3. Quick Guide …………………………………………………………………3 3.1 About the Touch screen……………………………………………………………….......3 3.2 Switch On/Off. ………………………………………………………………........................3 3.3 Power Save Modes and lock screen…………………………………………………3 3.
1. Important information Please protect the device from moisture and dust. Do not leave the device in a high-temperature environment, especially in a closed car in hot weather. Do not drop or strike the device. Do not shake the device violently, particularly the LCD screen, as this may cause the display to malfunction. Please make sure to carefully adjust the earphone volume; excessive volume may be harmful to your hearing.
2. Introduction 2.
Video Music RM, AVI, MOV, WMV, MP4, ASF, 3GP, TS, MKV, MPEG, etc. All videos support HD 1080P. MP3, WMA, WAV, APE, FLAC, AAC, OGG, etc. Pictures JPG, BMP, PNG, TIFF, etc. E-books TXT, PDF, CHM, HTML, PDB, UMD, FB2, LRC, EPUB. Office Files PC Connection Battery Supported files: Word, Excel, PDF, etc. Micro USB2.0 x 1 Built-in Lithium Battery: 2500 mAh.
3. Quick Guide 3.1 About the Touch Screen The screen is a capacitive touch screen; you can use five fingers to touch the screen at the same time. 3.2 Switch On/Off Switch On and Unlock: When the device is in the OFF mode, press and hold the ‘POWER’ key for 3 seconds to enter the Android start-up progress bar; it takes approx. 20 seconds to display the system desktop.
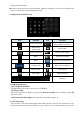
battery power remaining. In order to keep the battery in good condition, make sure to charge it once every two weeks if the device is not used for an extended period of time. 3.5 Explanation of function icons 1 Icon Function Icon Function Back to main menu Notification when the system finds new devices Show current power status Set the alarm Current system time Decrease the volume Back Increase the volume Menu Menu for Function Block.
and it will pop out. 3.7.1 Insert the TF into the card slot on the right side of the device. 3.7.2 Do not eject the card when operating (reading, copying) as this may cause data errors. 3.7.3 Do not use the TF card in high-temperature conditions. 3.7.4 Protect the TF card from liquids and corrosive materials.
4. Network Access The device supports a Wi-Fi network and external 3G network. 4.1 Wi-Fi Network Access 4.1.1 Turn on Wi-Fi and access Wi-Fi settings. The device will scan automatically for available Wi-Fi networks. 4.1.2 Choose the Wi-Fi network that you want to connect to. 4.1.3 Press Connect. Some networks may require you to enter a password. 4.1.4 On the Wi-Fi settings screen, press the Menu key and touch Advanced; this will display more Wi-Fi settings. 4.2 3G Network Access 4.2.
5. Copying Storage Files A) Connect the device to a computer using a USB cable; the status bar will show USB connected. B) Select USB Connected C) Select USB Connected, then, Turn on USB storage. The left picture shows that the device storage content can be viewed and modified from the computer. The right picture means that device storage content can NOT be viewed or modified from the computer.
6. Main Functions 6.1 Audio Function To access the music player: in music player mode, double-select the item in the playlist you wish to play, as shown in the following picture Drag the music progress bar to adjust the progress of the audio item.
6.2 Video Function Press the Video player icon to enter the video player interface and open the video files The device supports the following video file formats: MKV, AVI, RM, RMVB,MP4, MOV、 VOB, DAT, FLV, 3GP, etc. If there are no music files in the video player playlist, the system will automatically upload the video files from the card to the video player playlist after the video player is turned on. Drag the playback progress bar to adjust video playback progress. 6.
Press the IE Browser icon to enter the IE interface, press the address bar and type in the website you wish to access, followed by Go. Press the icon to view bookmarks and history. Press the menu icon to access settings The device also supports other Internet browsers; please see the instructions for the Internet browsers in question. 6.8 E-mail Function Before you use the e-mail function, make sure your network is connected. See the network access section of this manual.
titles to access options. Press the menu icon to access settings Refresh: Check for new emails. Compose: Write new emails. Folders: Manage/Move emails to different folders. Accounts: View accounts in the device, add new accounts, delete accounts, set main account. Accounts settings: More options for e-mail accounts. 6.9 Calendar Press the Calendar icon to enter the calendar interface. In calendar mode, press and drag the screen up/down to move between months or to turn the pages.
6.12.1 Install: Press Install to enter the app installer interface. Internal Memory means built-in Flash memory, SD card means inserted T-Flash; After entering, select the app format setting program on the right side, select the application to install, return to the main interface when this operation has been completed; the installation will be finished and you will see the app icon in your application list. 6.12.
Press the button to start or stop the recording. The photos or video can be previewed in the preview window. If you want play the video you have recorded, go into the video player and select the video you want to play. If you want to view photos, select the picture viewer and choose which photos you want to see.
7. System Settings Press the Settings icon to enter system settings. Here you can change wireless & networks, sound, display, location & security, applications, accounts & sync, privacy, storage, language & keyboard, voice input & output, and date & time. 7.1 Wireless & Network Setting, See item 4. 7.2 Sound Setting. You can adjust Silent mode, Volume, Notification ringtone, Audible selection, Screen lock sounds, and Haptic responsiveness. 7.3 Display Setting.
(3) Tap 'Configure input methods.' The following options will appear: (4) Tap the icon. The following options will appear: (5) Select 'Input language' (6) Tick the 'Use system language' box The default keyboard will be set to the selected language. For example, when 'French (French)' is set as the default language the default keyboard will be French. 7.10 Date & Time Setting: In this setting, you can adjust the date and time. 7.11 About device. Check device information.
8. FAQ 1) How can I change languages if I mistakenly choose an unknown language? Find the Then select the Settings icon in the Menu Page to enter Settings. icon to enter the language & keyboard setting; the first option is the language setting. 2) How can I change the input when I am typing? Press and hold the blank where you want to type and you will see a popup to choose inputs.
FCC statement This device complies with Part 15 of the FCC Rules: Operation is subject to the following two conditions: 1. This device may not cause harmful interference and 2. This device must accept any interference that is received, including any interfer ence that may cause undesired operation. *RF warning for Portable device: The device has been evaluated to meet general RF exposure requirement. The device can be used in portable exposure condition without restriction.