Aastra Communications Systems Aastra 5360 / Aastra 5360ip User's Guide A150 A300 2025 2045 2065
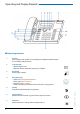
Operating and Display Elements Operating and Display Elements 2 1 Display Status display with symbols, current displays on telephone traffic, displays the available Foxkey functions. 2 Indicator LED • Left LED flashes: Call. • Right LED flashes: Voice Mail, message, or callback. 3 Key block Enters digits or letters. 4 Navigation key • Upward: Resetting activated features. • To the right: Opens the menu. • Downward: Opens settings. • General: Scrolls forwards/backwards in the menu, navigates lists.
Operating and Display Elements Absence key with LED Preconfigured as call forwarding. The Absence key can be configured as a function key or digit key. 9 Phone book key Opens phone books. 10 Redialkey Selects the phone numbers last dialled. 11 Microphone key Switches handset microphone off/on. 12 Loudspeaker key Open listening mode on/off. 13 Volume/cursor keys Adjustsvolume. 14 Call key Set up / answer a call. 15 End key • Ends a call.
Operating and Display Elements ■ Display symbols More text information available Foxmenu: Access to the menu or the available Foxkey functions Other menu entries available Loudspeaker activated Text mode activated Function activated Entries on the call list Search mode Microphone deactivated Activate discreet ringing Forwarding activated New text messages eud-0840/2.1 — I7.7 — 10.
Security Security ■ Safety Information Failure to observe this information can be hazardous and infringe existing laws. Connections Always plug the phone cable connectors into the appropriate sockets. Do not modify the connections in any way. Mains connection Use the original power supply only. Connect the power supply only to power sources that conform to the indications on the device. Maintenance Make sure all installation and repair work is carried out by a specially qualified technician.
Security ■ User information Your terminal has been supplied with a Quick User’s Guide, safety information and, where applicable, with other terminal-specific information. You will find this and other documents for your device at http://www.aastra.com/docfinder. More information on your terminal can be found in the documentation or your dealer’s homepage. It is your responsibility to inform yourself about the scope of functions, operation and proper use of your equipment.
Security ■ System and software-related functions Some systems or system versions do not support all the features. The corresponding text sections are identified by a letter inside square brackets. The Chapter "System and Software-Related Functions", page 61 indicates which system versions support the relevant features. ■ Disclaimer This product was manufactured in accordance with ISO 9001 quality guidelines. This product and the user information belonging to it have been produced with the utmost care.
Contents ContentsInhalt Dialling and Phoning . . . . . . . . . . . . . . . . . . . . . . . . . . . . . . . . . . . . . . . . . . . . . . . . . . . . . . . . . . . . . . 9 Answering Calls . . . . . . . . . . . . . . . . . . . . . . . . . . . . . . . . . . . . . . . . . . . . . . . . . . . . . . . . . . . . . . . . . . . . . . . . . . . 10 Making calls. . . . . . . . . . . . . . . . . . . . . . . . . . . . . . . . . . . . . . . . . . . . . . . . . . . . . . . . . . . . . . . . . . . . . . . . . . . . . . .
Dialling and Phoning The following sections explain how to make phone calls simply and the functions your phone offers you whenever you receive a call. Answering Calls . . . . . . . . . . . . . . . . . . . . . . . . . . . . . . . . . . . . . . . . . . . . . . . . . . . . .10 eud-0840/2.1 — I7.7 — 10.2008 Making calls . . . . . . . . . . . . . . . . . . . . . . . . . . . . . . . . . . . . . . . . . . . . . . . . . . . . . . . . .
Dialling and Phoning Answering Calls This section explains the procedure for answering a call. ■ Answering a Call Your phone is ringing and the indicator LED is flashing. To answer the call, proceed as follows. Pick up the handset. Note: If the caller's phone number is received, it is shown on the display. If the phone number is stored in the private phone book or in the system, the display also shows the corresponding name. ■ Ending a Call You want to end the call.
Dialling and Phoning Making calls This section explains the different ways you can make a call with your phone. ■ Dialling with the Phone Number You want to call someone and key in that person's phone number. With call preparation you can enter a phone number without it being dialled automatically, so you have time to check the number and, if necessary, correct it. The number is not dialled until you go off-hook, for example by picking up the handset. Enter a phone number in call preparation.
Dialling and Phoning ■ Using Your Phone in Open Listening Mode You want other people in the room to be able to listen in to the call. The open listening function lets you activate the loudspeaker in addition to the handset. During a call: Press the Loudspeaker key. ➯ Open listening is now activated, is displayed. Note: You can continue with the call as usual using the handset. Deactivating open listening: Press the Loudspeaker key a second time. ➯ Open listening is now deactivated.
Using the Display and Operating Elements The following sections explain how to operate your phone quickly and simply. Display . . . . . . . . . . . . . . . . . . . . . . . . . . . . . . . . . . . . . . . . . . . . . . . . . . . . . . . . . . . . . .14 Keys . . . . . . . . . . . . . . . . . . . . . . . . . . . . . . . . . . . . . . . . . . . . . . . . . . . . . . . . . . . . . . . . .15 Input . . . . . . . . . . . . . . . . . . . . . . . . . . . . . . . . . . . . . . . . . . . . . . . . . . . . . . . . . .
Using the Display and Operating Elements Display ■ Display symbols and display text New events such as a call in your absence, a new message or activated functions (e.g. Forwarding) are signalled on the display in the idle state by a symbol or a display text. You can then use the relevant Foxkey to call up the information. You have access to the menu or the Foxkey functions available in each case. To see the rest of the text: Press the horizontal navigation key.
Using the Display and Operating Elements Keys ■ Pressing a Key A key may have various functions depending on the situation and the operating mode. The function activated depends on the number of times the key is pressed or whether it is pressed quickly or held down for a moment. Here are some examples: Press the Foxkey. Keep the Foxkey held down for a moment (about 2 seconds). <2x short> Press the key twice in quick succession.
Using the Display and Operating Elements Input ■ Enters digits The digit keys are used to enter the digits 0 to 9. ■ Enter the letters You can also use the digit keys to enter letters and special characters. A number of letters and special characters are assigned to each key. To enter letters using the digit keys, you need to be in text mode. The text mode is activated automatically if the phone is expecting a text input. You can switch back and forth between number mode and letter mode during your input.
Using the Display and Operating Elements ■ Switching between Upper and Lower Case You want to switch between upper and lower case while making an input in text mode. Upper-case input is automatically activated when the first letter is entered. The text mode then automatically switches to lower-case input. You can use the Foxkey to switch manually between upper-case and lower-case input. a>A Switching between upper case and lower case in text mode: Press Foxmenu > Fox key a>A and A>a respectively.
Using the Display and Operating Elements Menu-Guided Navigation ■ Accessing the menu The phone is in standby mode: Press the Foxmenu. ➯ The menu is displayed. Menu Press the Menu Foxkey. ➯ The first menu entry is displayed. Use the vertical navigation key to scroll through the menu entries. Select Press the Select Foxkey. ➯ Accessing the displayed menu. ■ Navigating with the navigation key You can retrieve a particular menu entry even more simply and efficiently using the navigation key.
Using the Display and Operating Elements ■ Other navigation possibilities Scrolling back through the menu: Press the correction key. ■ Resetting activated features You can deactivate again all the activated functions (e.g. Forwarding, Barring). Menu Press Foxmenu, then the Foxkey. Activated features Reset/Delete Scroll to Activated features and press the Select Foxkey. ➯ All the activated functions are now displayed. Reset or Delete the function in question. ➯ The function is now deactivated.
Supplementary features The following sections explain the supplementary features provided by your phone for more efficient use. Making and answering calls . . . . . . . . . . . . . . . . . . . . . . . . . . . . . . . . . . . . . . . . . 21 Using functions while in a call . . . . . . . . . . . . . . . . . . . . . . . . . . . . . . . . . . . . . . . 29 Organising absences from the desk . . . . . . . . . . . . . . . . . . . . . . . . . . . . . . . . . . 32 Functions for special situations . . . . . . . . . .
Making and answering calls This section explains some convenient features provided by your phone for making a call. ■ Dialling by Name - Quickdial You want to make a call by entering a name. Requirement: The name and the corresponding call number are stored in one of the system’s phone book or in an external phone directory connected to the system. With Quickdial you only need to press the digit keys for each letter once, even though each key is assigned several letters.
Supplementary features Press the phone book key. Search entry Scroll to Search entry and press the Select Foxkey. If required, enter the first few letters of the name you are looking for (first name and surname separated by a space) until the user or a list is displayed. Notes: • Text mode is activated automatically. • Use the #key to enter spaces. Scroll through the list until the user you want is displayed. Select the phone number you want. Pick up the handset. ➯ The phone number displayed is dialled.
Supplementary features ■ Dialling from the Call List of Unanswered Calls You want to call someone who has previously tried to reach you. Your phone automatically stores the phone number of this user in a calllist and the display reads Missed calls. You can now call the person back using this call list. The call list of unanswered calls contains a maximum of 4 entries. Show Calling a user back: Press Foxmenu > Foxkey Show. ➯ The display shows a list of the last unanswered calls.
Supplementary features ■ Dialling with Redial You want to call a person you have already called. In the last-number redial list your phone automatically stores the phone numbers of the persons you have already called, complete with their names, where available. You can now call the person in question using this last-number redial list. The last-number redial list has a maximum of 4 entries. Press the Redial key. ➯ Redial list is displayed.
Supplementary features ■ Requesting a Callback You want to talk to a certain person. The person is busy or does not answer. You can make callback requests to both internal and external users. Not all providers support this function. If the called party is busy, you can activate an automatic callback. In this case, your phone will start ringing as soon as the party you are trying to reach goes on-hook. When you pick up the handset, the person you want to call is dialled directly.
Supplementary features ■ Call Waiting on an internal user You want to talk to an internal user. However, the person is busy. As a result of your call waiting, the person hears a call waiting tone and your phone number or name appears on his display. The person can either answer or reject your call. Requirement: It is essential that the internal user has not barred the Call waiting function on his phone (for configuration see the Chapter "Do not disturb/Call waiting/Intrusion/Announcement/Forward", page 53).
Supplementary features Reject End call Rejecting the call: Press Foxmenu > Foxkey Reject or End key. ➯ You remain connected with your first call partner. Depending on the system configuration the call-waiting party hears the busy tone- or he is forwarded to a preconfigured destination. Ending a current call: Press Foxmenu > Foxkey End call. ➯ 1. The first call is terminated. You are now connected with the party who initiated the call waiting.
Supplementary features ■ Receiving an Announcement After an attention tone you will be addressed via your loudspeaker. You can listen to the announcement or stop it. To continue the announcement as a phone call: Pick up the handset. ➯ You are now connected to the person who initiated the announcement. Note: If the announcement was started to a group, all the other recipients of the announcement are excluded. To stop the announcement: Press the End key.
Supplementary features Using functions while in a call This section explains the different options provided by your phone while you are in a call. ■ Enquiry Call During a Call You want to call someone else briefly without losing your current call partner. Then you want to resume your conversation with your original call partner. With the Enquiry call function you can call someone else in the middle of a call and put your original call partner on hold.
Supplementary features ■ Making a Conference Call You are in a call and have a call party on hold at the same time. You want to include the party on hold in the conversation and hold a conference call. With the conference function you can include a call party on hold in the current conversation. From the conference call you can initiate an enquiry call to someone else. You can broker between the parties of the conference and the enquiry call party.
Supplementary features Connecting without notification: Wait for the first ringing tone, then hang up. ➯ The other party is then called directly by your first call partner. Note: Recall: If the other party does not answer, the call comes back to your phone. ■ Parking a Call Partner You want to put your call partner on hold without using a phone channel as a result. You can park your call partner locally.
Supplementary features Organising absences from the desk This section explains the different options provided by your phone when you want to leave your desk. Note: A forwarding applies to all connected terminals . ■ Organising absences using the Absence Key You want to leave your desk and set up your phone for your absence. Your phone has an Absence key. It is factory set as a call forwarding unconditional key. By simply pressing the Absence key you can activate a call forwarding unconditional.
Supplementary features ■ Forwarding Calls (Call forwarding) You want to leave your desk. Calls for you are to be forwarded to a different destination (e.g. phone, Voice Mail, pager). With Call Forwarding you can forward incoming calls directly to a different destination. Menu Press Foxmenu > Foxkey Menu. Forwarding Scroll to Forwarding and press the Select Foxkey. Call Forwarding Scroll to Call Forwarding and confirm Ok with the Foxkey. User Scroll to User and confirm Ok with the Foxkey.
Supplementary features ■ Forwarding a Call on No Reply (CFNR) You want calls that you receive on your phone to be forwarded to another destination. Both your own phone and the other destination will then start ringing. The system configuration determines whether or not there is a ringing delay at the other destination. Whoever goes off-hook first, answers the call. Depending on the system configuration, Call Forwarding on No Reply can also be activated when your phone is busy.
Supplementary features Call Forwarding Scroll to Call Forwarding and confirm Ok with the Foxkey. Voice Mail Scroll to Voice Mail and confirm Ok with the Foxkey. ➯ Forwarding is activated. Notes: • You can specify whether your Voice Mail should answer directly (Call Forwarding) or with a delay (Call Forwarding on No Reply), or only if you are already on the phone (Call Forwarding Busy). • You can deactivate forwarding using Menu > Activated features > Deactivate Foxkey.
Supplementary features ■ Locking Your Phone You need to leave your desk and want to ensure that no-one can alter your phone's settings, look at your private data, or make outside calls from your phone. You can lock your phone with a PIN consisting of two to ten digits. You can modify this via menu (see chapter "Changing the PIN", page 51) or with */# procedure *47 (see "User’s Guide */# Procedures"). Menu Press Foxmenu > Foxkey Menu. Settings Scroll to Settings and press the Select Foxkey.
Supplementary features ■ Unlocking Your Phone You want to unlock your phone. You can use the PIN to unlock your phone. If you have forgotten your PIN, your system administrator can reset it to the factory setting. Menu Press Foxmenu > Foxkey Menu. Activated features Scroll to Activated features and press the Select Foxkey. Select the barring you want and press Foxmenu >Foxkey Deactivate. ➯ You are prompted to enter your PIN. Enter the PIN and confirm with the Ok Foxkey.
Supplementary features Functions for special situations This section explains the different options provided by your phone to deal with special situations. ■ Deflect a call during the ringing phase You do not want to answer a call yourself but deflect it to another user. With the function Deflect you can deflect calls to an internal or external user or to the Voice Mail during the ringing phase. Your phone is ringing and the indicator LED is flashing. To deflect the call, proceed as follows.
Supplementary features Menu Press Foxmenu > Foxkey Menu. Text message Scroll to Text message and press the Select Foxkey. New Scroll to New and press Select Foxkey. Select one of the text messages stored in the system and press Select Foxkey. Adapt or expand the text and press the Send Foxkey. Select the destination and press the Select Foxkey. For user and group: Enter the call number and press the Send Foxkey. ➯ The message is sent.
Supplementary features ■ Picking Up a Call You hear a phone ringing in your vicinity and want to pick up the call. With the Pick up function you can pick up the call from the other phone on your own phone. Menu Press Foxmenu >Foxkey Menu. Call features Scroll to Call features and press the Select Foxkey. Pick up Scroll to Pick up and confirm Ok with the Foxkey. User Scroll to User and confirm Ok with the Foxkey.
Supplementary features ■ Making a call on a third-party phone You want to make a call on a third-party phone using your personal settings, for example on a colleague’s phone or in a meeting room. You can activate a third-party phone to make an internal or external call using your personal settings, even if the phone is locked for external calls. You can activate the phone for a business or private call.
Supplementary features ■ Paging an Internal User You are unable to reach an internal user and thus want to page them. If the system is equipped with a paging system (PS), the person can be paged. The paged person can answer from any phone. Menu Press Foxmenu > Foxkey Menu. Call features Scroll to Call features and press the Select Foxkey. Page Scroll to Page and confirm Ok with the Foxkey. Enter the phone number f the person to be paged and confirm with the Ok Foxkey.
Supplementary features ■ Answering a General Bell Via the general bell, you hear either your personal ringing pattern or the general ringing signal. Calls with the general bell as the destination can be signalled visually or acoustically via an external piece of supplementary equipment. The call can be answered on any terminal. Ask your system administrator whether a general bell is set up. You can answer from any internal phone. Menu Press Foxmenu > Foxkey Menu.
Supplementary features ■ Suppressing your call number from your called party's terminal display You do not want your call number to appear on the terminal display of a called party in the public network. You have two possibilities: • If you never want the phone number to be displayed, set CLIR permanently. • To suppress your call number display for certain calls only, select the function CLIR per call before dialling your party's call number.
Supplementary features ■ Personal call routing You wan to specify which of your terminals shall ring when you receive a call. If your system administrator has set up a phone number with several terminals for you as well as the 5 call routings, you can specify which of your terminals shall signal a call by using the personal call routing. Your system administrator can set up up to 5 call routings. You can only answer a call on terminals where the call is signalled.
Supplementary features Setting functions by remote control This section explains how you can alter your phone’s settings even if you are not directly at your phone. You are not at your desk and want to set various functions on your phone from a different phone. You can activate/deactivate many of your phone's functions by remote control from a different phone. The remote control is initiated using a special */# procedure. You can then enter the function commands and */# procedures.
Personalizing Your Phone These sections explain how to adapt the phone’s basic settings to suit your personal requirements. Display . . . . . . . . . . . . . . . . . . . . . . . . . . . . . . . . . . . . . . . . . . . . . . . . . . . . . . . . . . . . . 48 Setting the Ringing Properties (Audio) . . . . . . . . . . . . . . . . . . . . . . . . . . . . . . . 48 General settings . . . . . . . . . . . . . . . . . . . . . . . . . . . . . . . . . . . . . . . . . . . . . . . . . . . . 50 Protection . . . . . . . .
Personalizing Your Phone Display This section explains how to set display properties. ■ Setting the display You may find the display is too bright or too dark. You can adjust the display contrast. Menu Press Foxmenu, then Foxkey Menu. Settings Scroll to Settings and press the Select Foxkey. Display Scroll to Display and press the Select Foxkey. Display contrast Scroll to Display contrast and press the Modify Foxkey. Select the required setting and confirm with the Ok Foxkey.
Personalizing Your Phone ■ Setting the Volume during a Call You want to adjust the volume while in a call. This automatically adjusts the volume of the handset and loudspeaker. The new volume will remain stored even after the call is ended. Quieter: Press the –-key. Louder: Press the +-key. ■ Setting the Ringing Properties You want to change the way in which your phone rings. You can set the ringing volume, the ringing melody and the speed.
Personalizing Your Phone General settings This section explains other settings you can make on your phone. ■ Selecting the language The display text is not in the language you want. You can select a different language. The menu item under which you select your language is marked by an "*" in front of the word for "language" in the language of your choice, e.g. "*Language" for English. Menu Press Foxmenu, then Foxkey Menu. <*Language> Scroll to *Language and press the Modify Foxkey.
Personalizing Your Phone ■ Changing the PIN You want to change the PIN used to lock/unlock your phone (see Chapter "Locking Your Phone", page 36 and "Unlocking Your Phone", page 37). The factory setting is digit combination "0000"; you can select any 2 to 10-digit combination for your new PIN. If you have forgotten your PIN, your system administrator can reset it to the factory setting. Note: Your PIN applies to all your terminals . Menu Press Foxmenu, then Foxkey Menu.
Personalizing Your Phone ■ Identifying the communication system This terminal can be connected to different Aastra communication systems. You can verify to which system your terminal is connected to. Menu Press Foxmenu, then Foxkey Menu. Settings Scroll to Settings and press the Select Foxkey. General Scroll to General and press the Select Foxkey. Own ID Scroll to Own ID and press the Select Foxkey. ➯ Name, call number and communication system are displayed.
Personalizing Your Phone Protection This section explains how you can protect yourself against certain types of call. ■ Do not disturb/Call waiting/Intrusion/Announcement/Forward You want to protect yourself against certain types of calls. You can set your phone so that these functions are not permitted on it. Ask your system administrator whether these functions are enabled on the system. Menu Press Foxmenu, then Foxkey Menu. Settings Scroll to Settings and press the Select Foxkey.
Personalizing Your Phone Phone Book Management This section explains how to create a new entry in the phone book and how to edit or delete an entry. ■ Creating a New Phone Book Entry You want to store your own phone numbers. You can store your own phone numbers in the private phone book. Press the phone book key. Private contacts Scroll to Private contacts and press the Select Foxkey. New Press Foxmenu > Foxkey New. Enter the user’s name and confirm with the Ok Foxkey.
Personalizing Your Phone Configuring Voice Mail This section explains how to set your Voice Mail. ■ Personal greeting You have the possibility of recording up to three different greetings. If no personal greeting is activated or if none is available, the global greeting is activated automatically, provided it has been recorded. Contact your system administrator for more information. Menu Press Foxmenu, then Foxkey Menu. Voice Mail Scroll to Voice Mail and press the Select Foxkey.
Personalizing Your Phone Configuring Keys This section explains how to assign phone numbers and functions to a Foxkey or configurable key. ■ Available keys You can assign phone numbers or functions to one of the 10 configurable keys. These are accessible at all times. You can assign each key with a specific type so you can trigger a particular action by simply pressing that key.
Personalizing Your Phone ■ Store a function under a key– function key You want to retrieve a frequently used function - for example "call forwarding on no reply" using a single keystroke rather than having to enter it by hand. Usually the function is assigned so that you: • activate the function with the first keystroke, • and deactivate the command again with a second keystroke. To store a function under a configurable key: Function key Press the key and hold it down for a moment.
Personalizing Your Phone Formulating Functions This section explains how to activate an individual function, for example call forwarding unconditional, with the aid of function commands and how to assign it to a key. ■ Function Commands You can use function commands to define a function to suit your personal requirements. A function can consist of one or more function commands, function codes, and the phone number.
Further information The following sections contain more useful information about your phone. Troubleshooting . . . . . . . . . . . . . . . . . . . . . . . . . . . . . . . . . . . . . . . . . . . . . . . . . . . . .60 Declaration Open Source Software (Aastra 5360ip). . . . . . . . . . . . . . . . . . .61 eud-0840/2.1 — I7.7 — 10.2008 System and Software-Related Functions . . . . . . . . . . . . . . . . . . . . . . . . . . . . .
Further information Troubleshooting This section contains a few tips on how to operate your phone if you encounter any problems. ■ Malfunctions Your call partner cannot hear you or you cannot hear your call partner Make sure the handset cord is correctly plugged into both the handset and the phone (see chapter "Installation and First-Time Operation", page 62).
Further information Declaration Open Source Software (Aastra 5360ip). ■ About Open Source Software This product contains Open Source Software from third-party suppliers subject to the GNU licence provisions GPL (GNU General Public License) and LGPL (GNU Library/Lesser General Public License). The licence texts for the GPL and LGPL and for the source code of the software sections listed below are available at http://www.aastra.com/docfinder ("Public GNU source" document type).
Installation and First-Time Operation These sections explain the setup options available with your phone. Equipment provided. . . . . . . . . . . . . . . . . . . . . . . . . . . . . . . . . . . . . . . . . . . . . . . . . 63 Options . . . . . . . . . . . . . . . . . . . . . . . . . . . . . . . . . . . . . . . . . . . . . . . . . . . . . . . . . . . . . 63 Setting up and mounting the phone . . . . . . . . . . . . . . . . . . . . . . . . . . . . . . . . . 64 Connecting Aastra 5360 . . . . . . . . . . . . . .
Installation and First-Time Operation Equipment provided Telephone and handset Handset connection cable Stand rest; can also be used as a mounting frame for wall mounting Quick User's Guide and safety information Telephone connection cable Aastra 5360 Options eud-0840/2.1 — I7.7 — 10.2008 Plug-in power adapter (if the power supply is not supplied via the LAN, only Aastra 5360ip).
Installation and First-Time Operation Setting up and mounting the phone With the aid of the supplied stand rest you can set up the phone as a desktop phone or mount it to the wall. ■ Setting the phone up as a desktop phone You can set up the phone either at a 40° or a 25° angle. To do so, insert the stand rest in different positions into the back of the phone until it snaps into place. • Insert the stand rest as indicated on the installation diagram until it snaps into place.
Installation and First-Time Operation ■ Wall mounting You can also mount the phone on the wall. To do so, screw the stand rest onto the wall as a bracket and hook the phone onto the stand rest. Note: As there is only a limited amount of space between the sockets on the back of the phone and the wall on which it is mounted, you need to use a ribbon cable with a short connector for the cord. Ask your dealer for a list of suppliers for a suitable ribbon cable (only Aastra 5360ip).
Installation and First-Time Operation ■ Dismantling Desktop phone: • Disconnect the phone cord and remove. • Carefully pull the stand rest away in the opposite direction. Wall set: • Carefully slide the phone upwards out of the stand rest. • Disconnect the phone cord and remove. Connecting Aastra 5360 ■ Connections Telephone connection Connecting the handset ■ Connecting your phone to the system • Plug the connector on the phone cord on the underside of the phone into the socket with the phone symbol.
Installation and First-Time Operation Connecting Aastra 5360ip ■ Connections Connecting to the IP network Connecting the handset Connecting the power supply Note: Your system administration will take care of the IP addressing and the commissioning of the phone. The IP addresses and other information about your phone is available in the setting mode. ■ Connecting your phone to the LAN This phone communicates via the same connection as your PC (IP network / LAN).
Installation and First-Time Operation ■ Connecting your PC to the LAN If required, you can connect your PC or another LAN device to the phone, for example a printer. • Connecting the LAN cord (not included in the scope of delivery) to the PC’s network socket. • Plug the connector at the loose end on the underside of the phone into the PC socket. • Desktop installation only: To relieve the strain on the cable feed the cable through one of the cable guides on the stand rest.
Index IndexIndex %, *,+... */# Procedures . . . . . . . . . . . . . . . . . . . . . . . . . . . . . . . . 58 A Absence key . . . . . . . . . . . . . . . . . . . . . . . . . . . . . . . 3, 32 Accessing the menu . . . . . . . . . . . . . . . . . . . . . . . . . . . 18 Activate / deactivate DTMF mode . . . . . . . . . . . . . . 40 Activating/Deactivating a Discreet Ring . . . . . . . . 43 Ambient conditions . . . . . . . . . . . . . . . . . . . . . . . . . . . . 5 Announcement . . . . . . . . . . . . . . . .
Index Key block . . . . . . . . . . . . . . . . . . . . . . . . . . . . . . . . . . . . . . .2 L Labels . . . . . . . . . . . . . . . . . . . . . . . . . . . . . . . . . . . . . . . . . .3 LED . . . . . . . . . . . . . . . . . . . . . . . . . . . . . . . . . . . . . . . .2, 19 Local IP settings . . . . . . . . . . . . . . . . . . . . . . . . . . . . . . 52 Lock . . . . . . . . . . . . . . . . . . . . . . . . . . . . . . . . . . . . . . . . . . 36 Logging the IP phone . . . . . . . . . . . . . . . . . . . .
Declaration of Conformity Aastra Technologies Limited hereby declares that the equipment Ascotel® und Ascotel® IntelliGate® and the accessories there to comply with the basic requirements and other relevant stipulations of Directive 1999/5/EC. You will find the complete text of the declaration of conformity and other documents for this device and the telecommunications systems Ascotel® and Ascotel® IntelliGate® under: Ascotel® and IntelliGate® are registered trademarks of Aastra.