P0749459 02 E UG 8314 Page -1 Thursday, March 30, 2000 10:16 AM 8314 Installation and User Guide
P0749459 02 E UG 8314 Page 0 Thursday, March 30, 2000 10:16 AM
P0749459 02 E UG 8314 Page 1 Thursday, March 30, 2000 10:16 AM Table of Contents Key Descriptions 2 Basic Installation Connecting the handset cord Connecting the line cord Connecting an optional fax peripheral Connecting the power adaptor Checking your telephone Desk Mounting 4 4 4 5 5 6 6 Basic Features Making a call Answering a call Putting a call on hold Privacy/Extension in Use Making a handsfree call Putting a call on mute Using the Redial List 7 7 7 7 7 8 8 8 Telephone Setup Changing the displa
P0749459 02 E UG 8314 Page 2 Thursday, March 30, 2000 10:16 AM Key Descriptions Moveable display Light Left/right arrows Sliding panel Down/up arrows Number card and lens Contrast Directory Sav e Hold Rls Link Redial Dial Handsfree Mute Handset Volume bar Dial pad Set Options 8 memory keys ∆ Cycles through eight settings to adjust the display contrast. ¢ Lets you store and access up to 50 numbers and names. ß Stores numbers and names in the Directory and in memory keys.
P0749459 02 E UG 8314 Page 3 Thursday, March 30, 2000 10:16 AM ‘ Adds a space when entering names in the Directory or in memory keys. Lets you view status messages on the display. † The unlabeled Set Options key is hidden under the sliding panel. This key gives you access to five options that customize the basic setup of your telephone. Options Page 1. Change display language 9 2. Set the date and time 9 3. Select the ring tone 10 4. Add a timer key 18 5.
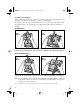
P0749459 02 E UG 8314 Page 4 Thursday, March 30, 2000 10:16 AM Basic Installation This section contains the information you need to install your 8314 telephone. Connecting the handset cord Attach the handset cord . Attach one end of the handset cord to the handset and the other end to the handset jack. Connecting the line cord 1 Attach the line cord in jack number 1, as shown by 1 . Attach one end of the line cord to jack number 1 and the other end of the line cord to the wall jack.
P0749459 02 E UG 8314 Page 5 Thursday, March 30, 2000 10:16 AM Connecting an optional fax peripheral 2 For your fax machine, answering machine or modem; attach the line cord in jack number 2 as shown by 2 . Attach one end of the line cord to jack number 2 and the other end of the line cord to the peripheral. Connecting the power adaptor ! Attach the power adaptor cord ! Attach the power adaptor to the base of the telephone, where the warning symbol is marked.
P0749459 02 E UG 8314 Page 6 Thursday, March 30, 2000 10:16 AM Checking your telephone When you first plug in your 8314, you may see a message asking you to make a language selection. Follow the directions on the display to select one of the languages. Your telephone also runs a test to ensure that the line cord is connected properly. If the test fails, the display prompts you to check the line cord. Make sure that all connections are fastened securely.
P0749459 02 E UG 8314 Page 7 Thursday, March 30, 2000 10:16 AM Basic Features Making a call With the 8314 you can make a regular call or predial a telephone number. Predialing allows you to check the number before it is dialed out. Follow the procedures below to make a regular or predialed call. To make a regular call: To make a predialed call: 1. Lift the handset. 1. Enter the number using the dial pad. 2. Enter the number using the dial pad. 2. Lift the handset or press ∂.
P0749459 02 E UG 8314 Page 8 Thursday, March 30, 2000 10:16 AM Making a handsfree call You can dial without using the handset or you can make a regular call and then talk without using the handset. To dial without picking up the handset: To switch to a handsfree call: 1. Press ©. 1. Lift the handset. 2. Enter the number using the dial pad. 2. Enter the number using the dial pad. 3. When the call is over, press ® 3. 4. When the call is answered, press ©. Hang up the handset.
P0749459 02 E UG 8314 Page 9 Thursday, March 30, 2000 10:16 AM Telephone Setup Place your 8314 on a table or hang it on a wall. Then adjust the display. Move the sliding panel over to the right to reveal the Set Options key. Changing the display language For changing business requirements, you may wish to change the language of your display messages. To change the display language: 1. Press the Set Options key. 2. Press – once or ⁄ to go directly to the item. 3. Press ⁄ to select the language.
P0749459 02 E UG 8314 Page 10 Thursday, March 30, 2000 10:16 AM Turning the ringer ON and OFF To turn the ringer ON: To turn the ringer OFF: 1. Press the right side of √. 1. Press the left side of √. 2. Press the right side of √. Continue pressing the right hand side until you reach the desired ring volume. 2. Press the left side of √. Continue pressing the left hand side until the ringer is off. 3. Press ß. 3. Press ß. Ringer is OFF appears on the display.
P0749459 02 E UG 8314 Page 11 Thursday, March 30, 2000 10:16 AM Directory The 8314 keeps the numbers and names of your business associates, clients, contacts, or friends at your fingertips. The 8314 lets you store up to 50 entries in alphabetical order so that you can dial numbers directly from the Directory. The Directory orders the names by the first character. If you want your Directory sorted by the last name, enter the last name first.
P0749459 02 E UG 8314 Page 12 Thursday, March 30, 2000 10:16 AM Entering Names To program a name, find the dial pad key that has the first character of the name. Keep watching the display as you press the key until that character appears on the display. Press a different dial pad key for the next character. If the next character is on the same key, press ‘ to move to the next space. To switch between upper and lower case letters, press ˙.
P0749459 02 E UG 8314 Page 13 Thursday, March 30, 2000 10:16 AM Editing in the Directory To edit a number and/or name in the Directory: 1. Press ¢. 2. Press ª to find the item you want to edit. 3. To begin editing, press “. 4. If you do not want to change the number, go to step 5. To backspace and erase digits, press “. To add digits, use the dial pad. 5. Press ß. 6. If you do not want to change the name, go to step 7. To change or add to the name, use “ and the dial pad.
P0749459 02 E UG 8314 Page 14 Thursday, March 30, 2000 10:16 AM Memory keys Saving numbers and names in memory keys You can save the numbers and names of your customers, business associates, or anyone you call frequently in 8314’s eight memory keys. You can store more numbers and names in the Directory. See the Directory section for more information. To save a number and name: 1. Press ß. 2. Press the memory key where you want to save the number. 3. Enter the number using the dial pad.
P0749459 02 E UG 8314 Page 15 Thursday, March 30, 2000 10:16 AM Labeling the memory keys After programming the memory keys, label them with the supplied blank labels and key caps.† Making calls from memory keys To call from a memory key: To predial from a memory key: 1. Lift the handset or press ©. 1. 2. Press the memory key with the number you want to dial out. 2. Press the memory key with the number you want to dial out. Lift the handset or press either ∂ or ©.
P0749459 02 E UG 8314 Page 16 Thursday, March 30, 2000 10:16 AM Deleting memory keys To delete a memory key: 1. To see its contents, press the memory key. 2. To erase, press £ twice. Note: The Live dial pad option must be turned OFF to edit memory keys. Saving features in memory keys For easy access, you can save the feature codes of telephone company services in your memory keys. This works well with network features such as Call Forwarding, Call Screen, and Call Return.
P0749459 02 E UG 8314 Page 17 Thursday, March 30, 2000 10:16 AM Saving a feature and light in memory keys You can make the set indicator light come ON when you turn a feature ON and go OFF when you turn that same feature OFF. You can only do this with one feature. This works well with any service that has separate ON and OFF codes such as Call Forwarding. For example, you may want the light to remind you that you have turned Call Forwarding ON.
P0749459 02 E UG 8314 Page 18 Thursday, March 30, 2000 10:16 AM Advanced Features Adding a timer key You can program any of the memory keys to be a timer key. To add a timer key: 1. Press the Set Options key. 2. Press – four times, or press › to go directly to the item. 3. Press › to add a Timer key. 4. Press a memory key. 5. Press ß. 6. Label the timer key. (See the diagram on page 15.) Using the Call Timer You can program a memory key to time the length of a call.
P0749459 02 E UG 8314 Page 19 Thursday, March 30, 2000 10:16 AM Selecting the dial pad mode When you select the dial pad mode, you are turning the Live dial pad option on or off. With Live dial pad ON, the telephone automatically dials out and turns on handsfree as soon as you press a dial pad key or a memory key. When Live dial pad is OFF, the telephone is in regular or predial mode.
P0749459 02 E UG 8314 Page 20 Thursday, March 30, 2000 10:16 AM Learning about the lights The set indicator light also alerts you when another extension is on the line, the telephone rings, or a feature is ON. There are also indicator lights beside the line keys and © to show you the status of the lines and of handsfree and mute. Set indicator light messages Feature Light Call is on hold Indicator light flashes quickly. Extension in use Indicator light is ON. Feature ON Indicator light is ON.
P0749459 02 E UG 8314 Page 21 Thursday, March 30, 2000 10:16 AM General display messages Message What it means Check line cord If there is no dial tone, make sure the line cord and handset cord are attached securely. Directory empty Use SAVE to add The Directory remains empty until you add numbers and names to it. Directory full No changes made The Directory has a 50 entry limit. If you want to add an item, delete an item you no longer use.
P0749459 02 E UG 8314 Page 22 Thursday, March 30, 2000 10:16 AM Helpful Hints The display is in the alternate language. You can change to the other language by pressing the Set Options key and then ⁄ twice. The cursor doesn’t move when saving in the Directory. The number or name is too long. Numbers can be no longer than 24 digits and names can be no longer than 16 characters. You cannot save a Directory number into a memory key. You cannot save Directory items into memory keys.
P0749459 02 E UG 8314 Page 23 Thursday, March 30, 2000 10:16 AM Index C Calls 7 holding 7 making 7 muting 8 redial list 8 I Installation 4 connecting cords 4 connecting fax peripheral 5 desk mounting 6 wall mounting 6 D Date and time 9 setting 9 Desk mounting 6 Dial pad mode 19 selecting 19 Directory 11 deleting items 13 editing 13 entering names 12 finding items 12 leaving 12 making a call 12 saving numbers and names 11 Display language 9 changing 9 Display messages 21 general 21 L Language see Display
P0749459 02 E UG 8314 Page 24 Thursday, March 30, 2000 10:16 AM T Timer key 18 adding 18 deleting 18 using 18 Troubleshooting see Helpful Hints 22 V Volume 10 receiver 10 ringer 10 speaker 10 turning the ringer off 10 turning the ringer on 10 W Wall mounting 6 24
P0749459 02 E UG 8314 Page 25 Thursday, March 30, 2000 10:16 AM
P0749459 02 E UG 8314 Page 26 Thursday, March 30, 2000 10:16 AM General inquiries If you have read the guide and you still have questions, call 1-800-574-1611 in Canada and the USA. In other areas, contact your telephone company. P0749459 Issue 02 CC1932 Rev 01 © Aastra Telecom Inc.