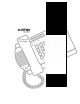
PowerTouch 350 User Guide • • • • • • • • • • • • • • • • • • • • • • • • • • • • • • • • • • • • • • • •
Contents Introduction..............................................................1 Unpacking the phone.........................................................3 Description...............................................................4 Installation................................................................6 Installing on a desk............................................................6 Installing on a wall ............................................................9 Checking your telephone......
Advanced features..................................................25 Predialing a number.........................................................25 Redialing a number..........................................................25 Dialing without the handset.............................................25 Dialing with a Live dial pad ............................................26 Timing a call....................................................................26 Using Flash......................................
Introduction Don’t stop what you’re doing to talk If you need both hands to do something, use the handsfree key. Then just talk normally on the speakerphone while you go on with your task. Your telephone has gone modular! Now you can change features simply by removing one module and sliding in another. Let the display be your guide Follow the display on the module for instructions to use features and handle calls. Your telephone has an 8-line display, with enlarged numbers.
Don’t worry if your line’s tied up* †† Your telephone display lets you know who that second caller is while you’re on the phone. Recognize a private number* You know your caller has a private number before you even answer because your telephone has a special ring for private callers. The display also shows you that the number is private. Identify callers by preferred name* The phone company knows her as Mrs. Smith, but you call her “Mom”.
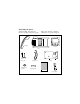
Unpacking the phone After unpacking, keep the boxes. Check to see that you have these parts: If any part is missing, contact the outlet where you got the telephone.
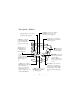
Description - Base Handsfree/Mute activates the speaker and microphone so you can listen and talk without lifting the handset (page 25). ˙ puts the call on hold (page 12). Light shows when you have calls or messages (page 30). ≈ allows you to connect to network features, such as call waiting (page 26). © always ends an active call (page 12). ¶ lets you adjust the receiver, speaker, and ringer volume (page 13, 29, and 31). ¥ lets you access eight options to customize your telephone (page 14).
Description - Module £ shows you the Services list, where you can access your subscribed services (page 27). ç lets you access a list of people who called (page 16). Display gives you instructions and information about calls and features (page 29). Softkeys let you activate the commands that they point to on the display (page 14, 16, 20, 25, 27). ∆ lets you store and access up to 50 numbers and names (page 20). Contrast gives you eight settings to adjust the display.
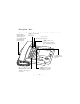
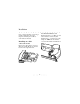
Installation 2. Connect the handset cord Turn the telephone over. Plug one end of the handset cord into the jack marked with on the bottom of the telephone. Then, route the handset cord down through the channel below. Note: Before inserting or removing a module, unplug all cords to the telephone. The telephone will not work without a module. Installing on a desk 1. Insert the module Remove the clip from the connector. Slide the module all the way into the base from the right-hand side.
3. Lower the stand into the slots Hold the stand so that the square opening is on the lower right. Note: To remove the stand: Reverse the process in steps 3 and 4. With one hand holding the phone and the other hand holding the stand, pull them apart, increasing pressure steadily until the stand pops off. 5. Connect the line cord Plug one end of the long (6 ft) line cord into the jack next to the handset jack on the bottom of the telephone, marked with 1 . 6.
8. Route the cords Route the line cords and power adaptor cord through the channels in the stand. 11. Insert the number card Write your telephone number on the card and place it into the slot on the telephone. Bend the clear plastic lens into the slot, over the number card. Note: Keep the plastic lens away from small children. 12. Insert the language plate Snap the plate over the keys above the dial pad. 9. Plug in the cords Plug the power adaptor into a wall outlet.
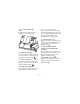
Installing on the wall 2. Connect the handset cord Turn the telephone over. Plug one end of the handset cord into the jack marked with on the bottom of the telephone. Then, route the handset cord down through the channel below. 1. Insert the module Remove the clip from the connector. Slide the module all the way into the base from the right-hand side. 3. Connect the line cord Plug one end of the short (8 in.) line cord into the jack next to the handset jack on the bottom of the telephone, marked with 1 .
4. Connect the fax machine, modem or answering machine (optional) Plug one end of the second line cord (not supplied) into the jack above the handset jack on the bottom of the telephone, marked with 2 . 5. Attach the power adaptor Plug the power adaptor into the power jack on the bottom of the telephone, marked with . 6. Plug in the cords Plug the power adaptor into a wall outlet. 7.
Checking your telephone 9. Insert the number card Write your telephone number on the card and place it into the slot on the telephone. Bend the clear plastic lens into the slot, over the number card. Whenever the telephone has been without power for a long period of time, the display asks you to select a language when power returns. Follow the directions on the display to select one of the languages. If you’ve missed the prompt for language, don’t worry. See page 14 for another way to change the language.
Basic features Making a basic call To place a call on hold 1. Make or answer a call. For other ways of handling calls (including predialing), see page 25. 2. Press ˙. To dial a number 3. Hang up the handset. 1. Lift the handset. 4. Lift the handset of this phone or an extension phone to retrieve the call. Note: If a call is held for more than 15 minutes, it is automatically reconnected. If the handset is off the telephone, the caller can hear you again.
Making volume adjustments Adjusting the speaker volume When you are on Handsfree, press the left or right side of ¶ to turn the speaker volume up or down. If you hold either end of the key down, you can scroll through all the volume settings. The speaker volume setting stays at the new level between calls. Adjusting the ringer volume Without lifting the handset, press the left side of ¶ until Ringer is OFF appears on the display.
Personalizing your phone 1. Display language Change to the other language (Spanish or English). 2. Time and date Enter the time and date. The setting is updated with each incoming call. 3. Ring tone Choose one of three ring tones. 4. Call timer Turn the timer on or off. When on, it times each call automatically (if a service is not active). 5. Dial pad mode Turn Live dial pad on or off. When on, the telephone automatically dials out any number you press on the dial pad.
Locking the Directory 7. Area code Enter up to three area codes so that calls can be dialed from the Callers List without the area code. 8. Callers List mode Select the type of calls to be logged in the Callers List. Choose between no calls, all calls, or unanswered calls. Once you've accumulated a lot of items in the Directory, you can lock it so that items won’t be accidently erased. Note: You cannot change or add items in a locked Directory. To lock the Directory Display icons 1. Press ¥.
Callers List Your telephone logs up to 25 incoming calls which are stored in the Callers List. Note: The Callers List remains empty until you receive calls AND until you subscribe to calling line identification service from your local telephone company. To view the Callers List 1. Press ç to see the Callers List heading. The Callers List tells you who called while you were out or unavailable, and lets you dial the callers back from the list.
Dialing from the Callers List Changing a number in the Callers List before dialing If you call a number from the Callers List and you don't get connected, you may have to edit the number (for example, the number may be long distance and you may have to add "1"). If you frequently have to delete an area code to dial a number, enter the area code in the Options list. Press ¥, , and follow the instructions on the display. After you do this, that area code will appear in brackets, but won’t be dialed out.
5. If no name is displayed, you are prompted to enter one. If you don’t want to save a name, go to step 6. To enter a name, use the dial pad. (The letters are on the keys. For special characters, see the chart on page 21.) Caution: Callers List does not save changes. If you plan to call the number again, copy it to the Directory before dialing it (see the next procedure). 5. Press the DIAL softkey or the Handsfree key, or lift the handset to make the call. 6. Press the SAVE softkey.
Icons in the Callers List You are in the Callers List. You answered the call when it came in. You did not answer the call when it came in. You were on another call when this call came in. √ You have returned the call from the Callers List. The area code has been stripped off. 4x The party called four times.
Directory If the number includes external access codes or personal identification numbers, enter a pause between the two numbers. Press the Pause softkey for a pause. (The Pause softkey appears after you’ve entered the first digit of the number.) If ≈ is required for a custom calling feature, press ≈ at the appropriate place in the number. You can press these keys without activating these functions on the telephone.
Press the NextSpace softkey or “ to move to the next letter or add a space. To copy from the display 1. When a number is on the display, press §. If a name was on the display, skip steps 2 and 3. For example, to enter Ruth: press , “, ¡ ¡ , “, ¡ , “, 2. If no name is displayed, you are prompted to enter one. If you don’t want to save a name, go to step 3. To enter a name, use the dial pad. (The letters are on the keys. For special characters, see the chart on this page.
4. If no name is displayed, you are prompted to enter one. If you don’t want to save a name, go to step 5. To enter a name, use the dial pad. (The letters are on the keys. For special characters, see the chart on page 21.) 5. Press the SAVE softkey. Finding items in the Directory • Press the Change softkey to edit a listing (the number, the name, or both). • If the display shows … after the number, it means the number is longer than the display.
4. Press © or hang up to end the call. 6. If you don’t want to change the name, go to step 7. To change the name, press the BackSpace softkey or ‘ to erase letters. Use the dial pad and the NextSpace softkey or “ to add letters. (The letters are on the keys. For special characters, see the chart on page 21.) Press the ChangeCase softkey to switch between upper and lower case. Note: When you finish the call, you are no longer in the Directory. Deleting Directory items To delete individual items 1.
To delete all items 1. Press ∆. 2. Press the DeleteList softkey. 3. Press the Delete softkey to confirm the action. 4. Press ∆, the Quit softkey, or © to get out of the Directory. Note: © also hangs up if you’re on a call. Display icons You are in the Directory. You pressed ≈ or ≈ has been programmed into a number. You pressed the Pause softkey or a pause (which can be up to 3 seconds) has been programmed into a number.
Advanced features If you dial any numbers after the call connects, those numbers won’t appear on the display. Predialing a number Predial lets you view the number first, before you dial it. It helps prevent dialing errors. Predial does not work when the Live dial pad option is on (see page 14). 1. Press †. To predial a number 2. Press ’ or ” to find the number. To delete a redial number 3. Press the Delete softkey twice. 1. Enter the number using the dial pad.
Timing a call 3. If you want to talk to someone else in the room without the caller hearing you, press the Handsfree key again. The Handsfree light flashes. You can still listen to the caller. You can turn the call timer on, if you want to automatically time the length of your calls, or you can turn it off. Press ¥, , and follow the instructions on the display. The timer begins counting when you answer, or 5 seconds after you dial. The timer does not run when a service is active.
Services The large display on your telephone offers you the advantages of fullscreen services, much like an automatic banking machine. You can subscribe to enhanced telephone company features and services such as home banking, catalog shopping, movie libraries, and restaurant guides. You can also subscribe to telephone network services such as network voice mail. Activating a service The Services list shows you the services that you subscribe to.
Deleting a service Display icons You may be able to delete a service when you no longer use it or when you want to replace it. You are in the Services list. “‘ Press “ or ‘ for more information. To delete a service 1. Press £. Service information is being downloaded to your telephone. 2. Press ’ and ” to move the cursor to the service you want. 3. Press the Delete softkey. 4. If you change your mind, press the Restore softkey. 5. Press the Quit softkey or © to leave the list.
Prompts and indicators In English Español Display prompts Your telephone display gives you instructions and information. If you want to know what to do about a particular display prompt, look it up here. The prompts are listed in alphabetical order. The telephone now has power. Press a softkey to change the language for the display. Message Waiting Check for new messages at your Voice Mail center. Press “ to see other display prompts. For other helpful hints, see page 31.
Unknown name or Unknown number Telephone light Feature Light The telephone company is unable to provide the name or number of the caller. Call is on hold Light flashes. Display shows Call is on hold. XX New callers XX new calls have been added to the Callers List since you last checked it. Press ç to access the list. Extension is in use Light is on. Display shows Extension in use. Message is Light flashes. waiting Display shows Indicators Message Waiting.
Helpful hints The telephone wobbles. Make sure the cords are routed properly through the stand, as indicated in the Installation section. Check that the stand has been properly snapped in. The display works but you can't hear a dial tone. Make sure the line cord is connected in the appropriate jack. If the problem persists, have your wall jack checked: the wiring may need to be repaired. The cursor doesn't move when you're adding to the Directory. The name or number may be too long.
The display is blank. Your telephone provides basic telephone service during a power failure. You can use the dial pad and receive calls, but the other keys and the display do not work until power returns. The time and date are wrong. If the power has been out, the next incoming call will reset the time and date. (You must subscribe to calling line identification service.) To manually reset the time and date, press , and follow the ¥, instructions on the display. The ringer sounds different.
Warranty and repairs General inquiries When you ship your telephone to a Aastra Telecom Service Center, you are responsible for shipping charges. If you’ve read the guide and you have questions, call 1-800-574-1611 in the USA and in Canada. Cleaning the display Regulatory information Use only a soft cloth soaked in isopropyl alcohol to clean the display. The Load Number (LN) for your telephone is 8. The Ringer Equivalence number (REN) is 0.7B.
Index Viewing items 16 Calls on hold 12 Changing a Callers item 17 a Directory item 22 Chart for special characters 21 Check phone cord 29 Cleaning the display 33 Contrast key 5 Copy key 5 Cords, routing 8 Customer service 33 Alternate language 14 Answering a call 12 Answering machine, connecting 7, 9 Area code 15 Arrow keys 5 Backspace key 5 Call is on hold 30 Call timer 14, 26 Callers key 5 Callers List 16–19 Answer mode 15 Changing an item 17 Copying to the Directory 18 Deleting items 18 Dialing a numbe
Desk mounting 6 Dial again See Redial Dialing a number 12 Problems 31 Directory 20–24 Adding items 20 Changing items 22 Copying from Redial 21 Deleting items 23, 24 Dialing a number 23 Finding items 22 Locking and unlocking 15 Problems 31 Directory full 29 Directory is empty 29 Directory key 5 Display 5 Cleaning 33 Enlarged numbers 1 Icons 15, 19, 24, 25, 28 Language 14 Problems 31 Prompts list 29 Display keys See Softkeys Display services 27 Down-arrow key 5 Enlarged numbers 1 Erasing items Callers List 1
Handset, connecting 8, 10 Handset cord, connecting 6, 9 Handsfree calls 25, 26 Handsfree light 30 Handsfree/Mute key 4 Helpful hints 31–32 Hold key 4 Overlay 8, 11 Holding a call 12 Line cord, connecting 7, 9 List of parts 3 Live dial pad 14, 26 Load number 33 Locking the Directory 15 Message Waiting 14, 29, 30 Microphone muted 30 Modem, connecting 7, 9 Module, installing 6, 9 Mounting the phone on a desk 6 on a wall 9 Mute key See Handsfree key Icons 15, 19, 24, 25, 28 In English 29 Inquiries 33 Installa
Options 14 Area code 15 Call timer 14 Callers List mode 15 Dial pad mode 14 Display language 14 Message Waiting prompt 14 Ring tone 14 Time and date 14 Options key 4 Overlay 8, 11 Problems 31–32 Callers List 31 Dialing 31 Directory 31 Display 31 Display language 31 Redial list 32 Ring tone 32 Time and date 32 Voice mail security 32 Volume 31 Prompts 29, 30 Parts list 3 Password, voice mail 32 Pause, in a Directory number 20 Plugging in the cords 8, 10 Power adaptor, connecting 7, 10 Predialing 25 Print ke
Right-arrow key 5 Ring tone 14 Problems 32 Ringer Equivalence number 33 Ringer is OFF 29 Ringer volume 13 Subscribed services 2, 26, 27 Symbols See Display icons Symbols See Icons Telephone Description 4, 5 Lights 4, 30 Unpacking 3 Time and date 14 Problems 32 Timing calls 26 Troubleshooting 31–32 Security Directory items 15 Voice mail 32 Service centers 33 Services 27 Deleting 28 Selecting 27 Services key 5 Softkeys 5, 32 Speaker volume 13 Problems 31 Special characters 21 Stand Connecting 7 Removing 7 R
Voice mail password 32 Volume Problems 31 Receiver 13 Ringer 13 Speaker 13 Volume key 4 Wall mounting 9 Warning, cleaning the display 33 39