800-336-4864 www.tele-movers.
THREE–LINE TELEPHONE User Guide Venture Multiline Communications WITH ANSWERING
P0814619 01 E UG.VTAD Page 1 Wednesday, April 15, 1998 4:30 PM phone/system with a built-in Telephone Answering Device (TAD). The Venture is a fully customizable phone, providing you with big features for the small business or home. Your Venture’s “system” intelligence is built right into the phone. Therefore, no costly or complicated central control is required. And, the Venture TAD easily connects to your home or office’s existing telephone lines.
Introduction P0814619 01 E UG.VTAD Page 2 Wednesday, April 15, 1998 4:30 PM • When you use your Venture TAD within a linked system, you can: - call or page between other phones in your system - transfer calls between other phones in your system - share messages between phones in your system using common lines - share a Public Directory between phones in your system - generate a list of the names and IDs for phones in your system - monitor the line/phone status for phones in your system.
P0814619 01 E UG.
Introduction P0814619 01 E UG.VTAD Page 4 Wednesday, April 15, 1998 4:30 PM Venture’s Answering Device and List Keys ¥ — displays the list of 42 options to customize your Venture set (page 25, page 49) D — enters the list of Public and Private Directory names and numbers.
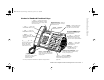
P0814619 01 E UG.VTAD Page 5 Wednesday, April 15, 1998 4:30 PM When you unpack your new Venture TAD phone, ensure that you have all of the parts shown below as well as a User Guide and the Quick Start Card.
Getting started P0814619 01 E UG.
P0814619 01 E UG.
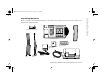
Getting started P0814619 01 E UG.VTAD Page 8 Wednesday, April 15, 1998 4:30 PM Installing the phone ❶ Disconnect all equipment, such as other phones, faxes, or modems from the lines you will be using for your Venture system. You can reconnect this equipment later, after the Venture system has been installed and checked. ❷ Review the following configuration drawings to determine which set up is best suited to your individual requirements. ❸ Install and check one Venture phone at a time.
P0814619 01 E UG.VTAD Page 9 Wednesday, April 15, 1998 4:30 PM Getting started One or more lines, one phone jack 1. Plug one end of a grey 6-wire cord into the phone jack; the other end into port 1 of the CAM. line 1, line 2 & line 3 Optional for fax or modem CAM 1 2. Plug one end of a black 8-wire cord into the phone port of the CAM, run the cord through the stand and plug the other end into the CAM port on the back of phone. 1 5 2 3. Connect the handset cord to the end of the handset.
Getting started P0814619 01 E UG.VTAD Page 10 Wednesday, April 15, 1998 4:30 PM Two lines, two phone jacks 1. Plug one end of a grey 6-wire cord to the line 1 phone jack; the other end to port 1 on the CAM. 6. Plug the power adapter cord into the power adapter port on the top of the CAM and the power adapter into an electrical outlet. line 2 line 1 1 2. CAM Plug one end of another grey 6-wire cord to the line 2 phone jack and plug the other end to port 2 on the CAM. 2 3. 4. 5.
P0814619 01 E UG.VTAD Page 11 Wednesday, April 15, 1998 4:30 PM 1 2. 5. Connect the handset cord to the handset. Connect the other end to the 6. back of the base . Route the handset cord through the bottom right channel on the back of the base. 7. Plug the power adapter cord into the power adapter port on the top of the CAM and the power adapter into an electrical outlet. Connect one end of another grey 6-wire cord to the line 2 phone jack and plug the other end to port 2 on the CAM.
Getting started P0814619 01 E UG.VTAD Page 12 Wednesday, April 15, 1998 4:30 PM ☞ For additional configurations see pages 71 through 73. Attaching the stand With the line cord routed through the hole on the stand: 1. Align the tabs on the edge of the stand with the holes on the back of the phone. ☞ You can adjust the phone to sit at a higher or lower angle by choosing between the two sets of holes on the phone. 3. Push the stand against the phone until the tabs click into the locking holes. 1.
P0814619 01 E UG.VTAD Page 13 Wednesday, April 15, 1998 4:30 PM Plug the other end of the black short 8-wire cord into the CAM port on the back of your phone. 11. Align the slots on the back of the phone with the studs on the wallmount plate. 2. The display now shows: Enter phone ID (01 - 99) 12. Slide the phone down until it locks into place. 3. Enter a number between 01 and 99 for the phone ID—a different two digit number for each Venture set in your system.
Getting started P0814619 01 E UG.VTAD Page 14 Wednesday, April 15, 1998 4:30 PM 4. Press s. Your display shows Enter a name for this phone. Use the dial pad to enter a name. See “Entering numbers, letters and symbols” on page 16. ☞ A name can have up to 16 characters including spaces. 5. Press s once you have entered a name. 6. Fill out the paper handset label. 7. Insert the handset label on the front of the phone and attach the plastic handset lens. 8.
P0814619 01 E UG.VTAD Page 15 Wednesday, April 15, 1998 4:30 PM Single phone check To check the installation of a single Venture TAD, simply press each line key. You should hear a dial tone and each line’s indicator should light. System check Once each Venture set is installed, you need to ensure that your system is communicating. To do so, you must verify that line 1 is common to each Venture set in your system. To verify, first lift the handset and press the line 1 key on ONE set.
Getting started P0814619 01 E UG.VTAD Page 16 Wednesday, April 15, 1998 4:30 PM Entering numbers, letters and symbols Each dial pad key has a variety of symbols, as well as the labelled number and letters, programmed into it. When you are prompted to enter a name, simply press the appropriate dial pad key until the number, letter or symbol you wish to enter is displayed. If you go past the number, letter or symbol you wish to enter, continue to press the key; it circles back through the list.
P0814619 01 E UG.VTAD Page 17 Wednesday, April 15, 1998 4:30 PM make and receive calls using several different methods. You can also transfer calls, reserve lines and use features while making calls. Making calls By setting various options you can customize your Venture TAD to your individual needs. You can decide if you want to set your Venture to predial (the number you enter is not dialed out until you pickup the handset, press a line key or press Handsfree/Mute).
Making & receiving calls Other ways to make a call Any number stored in a Venture list or to a memory key can also be used to make calls. See “To make a call or activate a feature in a list” beginning on page 54. Incoming call icons If you subscribe to Caller ID you will see the following icons.
P0814619 01 E UG.VTAD Page 19 Wednesday, April 15, 1998 4:30 PM Answering Call Waiting calls When you subscribe to Call Waiting, you can answer a second incoming call on a line that is already in use. If you subscribe to Caller ID on Call Waiting, you can not only answer the second call but also know who is calling before you answer. When a second call comes in, you will hear the unique Call Waiting tone — press f to interrupt your call.
Making & receiving calls P0814619 01 E UG.VTAD Page 20 Wednesday, April 15, 1998 4:30 PM Adjusting the ringer volume When the phone is idle or ringing, you can adjust the volume of the ringer. You need to adjust the volume for each of the three telephone lines. 1. Press ¶. The display shows: Ringer volume Select line key 2. Press a line key. 3. Press the right side of the volume bar to increase volume OR press the left side of the volume bar to reduce volume. 4. Press s. 5. Repeat for each line.
P0814619 01 E UG.VTAD Page 21 Wednesday, April 15, 1998 4:30 PM To transfer a call 1. When you have answered a call that you want to transfer, press ⁄. The display shows Transfer to? ’. 2. Press ’ until the display shows the phone to which you want to transfer the call OR if you have programmed a memory key for the phone that you want to transfer the call to, press the memory key. 3. Press — (Play) or ⁄.
Making & receiving calls P0814619 01 E UG.VTAD Page 22 Wednesday, April 15, 1998 4:30 PM To consult privately during a conference call 1. Press the line key for the person with whom you want to speak privately. The other line is automatically placed on hold. 2. To reestablish the conference call, press ø. ☞ If you make a conference call using the telephone service 3 Way Calling, you must use f to connect each participant to the call. 3. Speak into the handset or handsfree microphone. 4.
P0814619 01 E UG.VTAD Page 23 Wednesday, April 15, 1998 4:30 PM The Room monitor feature is used to remotely listen to sounds in a room, such as an unattended lobby or a baby’s room. The Room monitor feature only works between two phones at a time. When functioning, each phone’s display shows the message: Room monitor ON. If you receive a call when Room monitor is active, you must press the flashing line key to answer the call and press “ to view the incoming callers information.
Making & receiving calls 3. Press the Room monitor memory key, you programmed previously, in the room which you wish to listen from. The light next to your Handsfree key flashes and your display shows: Room monitor ON. Using a headset To end Room monitoring 1. When the display shows: Room monitor ON You can connect a headset and amplifier for your Venture phone. This enables you to make and answer calls without using the handset.
P0814619 01 E UG.VTAD Page 25 Wednesday, April 15, 1998 4:30 PM As you begin using your phone you may decide to change the way your phone operates. You can do this by customizing any of the 42 available options to suit your individual needs. To set an option 1. Press ¥. 2. Press ’ or ” repeatedly until your display shows the option you want to set OR use the dial pad to enter the two digit option number to go directly to it in the list (e.g. 06 for Call timer). 3.
Programming P0814619 01 E UG.VTAD Page 26 Wednesday, April 15, 1998 4:30 PM Options chart Number and Option Settings (*=default) Option function 03 Hndfree ansr ON * Allows you to answer a page automatically, without lifting the handset or pressing the Handsfree/Mute key. You will hear a page tone every 15 seconds. OFF Allows you to answer the page by lifting the handset or by pressing the Handsfree/Mute key or I/C key. You will not hear a page tone.
P0814619 01 E UG.VTAD Page 27 Wednesday, April 15, 1998 4:30 PM Number and Option Settings (*=default) Option function When you secure a number, passwords such as PINs and access codes are replaced with asterisks (*) so the password will not be visible on your display. You can secure up to five 12-digit numbers. 09 Secure number For example, your bank PIN is 3333 and your bank phone number is 555-4444. When 555-4444 is made a secure number and you dial this number, the display shows 555-4444.
Programming P0814619 01 E UG.VTAD Page 28 Wednesday, April 15, 1998 4:30 PM Options chart Number and Option Settings (*=default) Option function 13 Live dialpad ON Numbers entered using the dial pad are automatically dialed out on the defined Prime line. If no Prime line is set in option 11, you are prompted to press a line key. OFF* Numbers entered using the dial pad are displayed before dialing. You must manually select a line to make the call.
P0814619 01 E UG.VTAD Page 29 Wednesday, April 15, 1998 4:30 PM Number and Option Settings (*=default) Option function 18 Restrictions Blocks specific numbers or numbers beginning with certain digits (such as longdistance calls starting with 0 or 1) from being dialed from your phone. You can restrict up to five 12-digit numbers. 19 Overrides Allows numbers that have been restricted (Option 18) to be dialed from your phone.
Programming P0814619 01 E UG.VTAD Page 30 Wednesday, April 15, 1998 4:30 PM Options chart Number and Option Settings (*=default) Option function 25 Directory Enables you to erase all items in either the Public Directory or one of the three Private Directories. This can be done even when Option 22, Lock lists is on. 26 Reset options Resets all the options on your phone to the default factory settings. 27 Time/Date Enables you to manually set the time and date.
P0814619 01 E UG.VTAD Page 31 Wednesday, April 15, 1998 4:30 PM Number and Option Settings (*=default) Option function 32 Auto attend ON Creates an auto-attendant service (see “Setting up Auto Attendant” on page 40). OFF* Allows normal Answering Device functionality. ON Sends incoming calls, with blocked names and/or numbers, directly to the Private mailbox after the first ring.
Programming P0814619 01 E UG.VTAD Page 32 Wednesday, April 15, 1998 4:30 PM Options chart Number and Option Settings (*=default) Option function 37 No. of rings 4 rings* Sets the number of times your phone rings before the telephone answering device answers a call. (1 - 9 rings) 38 RemoteNotify 39 Remote password ON When a message is received, your phone calls you (at the number you specify in Option 40) to indicate you have new messages.
P0814619 01 E UG.VTAD Page 33 Wednesday, April 15, 1998 4:30 PM with Answering Device (TAD) answers calls that you are unable or choose not to answer. The versatility of the built-in answering machine allows you to customize your Venture and makes retrieving and sorting messages easy. ☞ The total recording time is approximately 60 minutes. Answering Device Basics You hear... messages - recorded by an incoming caller when you do not answer their call.
Using the answering device P0814619 01 E UG.VTAD Page 34 Wednesday, April 15, 1998 4:30 PM ☞ Mailboxes are not password protected. Messages are accessible to all Venture system users. ☞ Your Venture TAD can record a message for 2 lines at once. If a third call is received, it will go unanswered.
P0814619 01 E UG.VTAD Page 35 Wednesday, April 15, 1998 4:30 PM To set the number of rings You can set your Venture TAD to answer after a predefined number of rings. 1. Press ¥. 2. Press 37 to go to No. of rings. 3. Press *. 4. Enter the number of rings you wish. You must enter at least 2 and not more then 9 rings. 5. Press ß. ☞ Also see “37 No. of rings” on page 32. ☞ The Answering device is set to On (default). To turn off the answering device, see “31 Answr machne” on page 30.
Using the answering device P0814619 01 E UG.VTAD Page 36 Wednesday, April 15, 1998 4:30 PM 5. Press œ. The display shows: Recording... Use SAVE to end 6. Press s when you have finished recording your greeting. ☞ To review your greeting press — (Play). ☞ Modify a General greeting by repeating the steps above (record a new greeting over the old). Changing a mailbox name Mailbox names can be up to 10 characters long including spaces. 1. Press ¤. The display shows: Greetings list Use ” , ’ to view 2.
P0814619 01 E UG.VTAD Page 37 Wednesday, April 15, 1998 4:30 PM Lift the handset. The display shows: Press RECORD to begin 3. Press — (Play). The display shows: *=Greeting #=Mailbox tag 6. Press œ. The display shows: Recording... Use SAVE to end 4. Press *. Your display shows: Playing greeting or press #. The display shows: Playing Mbox tag 7. Record your message. 8. Press ß.
Using the answering device P0814619 01 E UG.VTAD Page 38 Wednesday, April 15, 1998 4:30 PM Deleting or changing a mailbox greeting or tag 1. Press ¤. The display shows: Greetings list Use ”, ’ to view 2. Press ’ until the display shows the mailbox you want. 3. Press ¡. The display shows the name of the mailbox and ’=Next *=Change. 4. Press ’ until the display shows Mailbox Greeting or Mailbox tag. 5. Press * to change and record a new greeting or tag OR press d twice. 6.
P0814619 01 E UG.VTAD Page 39 Wednesday, April 15, 1998 4:30 PM 8. 9. Lift the handset. The display shows: Press RECORD to begin Press œ. The display shows: Recording... Use SAVE to end Record your greeting or voice tag. 10. Press ß. The display shows: Saved: greeting or Saved: tag Time left xx:xx To listen to a personalized greeting or voice tag 1. Press D. 2. Press ‘ or “ until the display shows the sub-directory you want. 3. Press ’ until the display shows the Directory name or number you want.
Using the answering device P0814619 01 E UG.VTAD Page 40 Wednesday, April 15, 1998 4:30 PM Setting up Auto Attendant When Option 32, Auto Attend is set to On, your Venture TAD answers incoming calls and directs them to any mailboxes you specify.
P0814619 01 E UG.VTAD Page 41 Wednesday, April 15, 1998 4:30 PM ☞ 4. Record a greeting. See“Recording a General greeting” on page 35. 5. Set the mailbox type to Announce only, Normal or Ring through, depending on how you want the mailbox to work. See “Selecting a mailbox type” on page 37. When Auto Attendant is active, personalized greetings can no longer be heard. To set up Auto Attendant Refer to your list of mailbox numbers and subjects, as recorded for the General/Auto Attendant greeting. 1.
Using the answering device P0814619 01 E UG.VTAD Page 42 Wednesday, April 15, 1998 4:30 PM Knowing when you have a message After the TAD has answered a call, the telephone indicator light will flash slowly and x New messages appears on the screen. Message Alert You can program your phone to alert you audibly when there is a message or a memo. A reminder tone sounds every 20 seconds. The default setting for the message alert is off. 1. Press ¥. 2. Using the dial pad enter 35. The display shows: Mess.
P0814619 01 E UG.VTAD Page 43 Wednesday, April 15, 1998 4:30 PM 2. Press “ until the display shows the line or mailbox you want. To make a message new Once you have listened to a message, you can make it appear “new” again by reactivating any message alerts, such as tones and lights. 1. Press ç. 2. Press “ until the display shows the line or mailbox you want. 3. Press — (Play). 4. All of the new messages in the line or mailbox are played. 3. Press ’ until the message you want to make new appears.
Using the answering device P0814619 01 E UG.VTAD Page 44 Wednesday, April 15, 1998 4:30 PM To delete all messages When you delete the Callers list, you not only delete all of your voice messages but all entries in the Callers list as well. 1. Press ç. 2. Press d when the display shows: Callers List=x 5. 6. Recording a memo Recording a memo allows you to leave a message for someone on your phone. To Record a memo 1. Press œ. 2. Lift the handset. The display shows: Press RECORD to begin 3. Press œ.
P0814619 01 E UG.VTAD Page 45 Wednesday, April 15, 1998 4:30 PM You can program your Venture phone to call you at a different telephone number when a new message is recorded. If the Remote notification call is not answered, the phone attempts to call you once more (3 1/2 minutes later). Options 38 and 40 must be set (see “38 RemoteNotify” on page 32, and “40 Remote phone#” on page 32). You can also turn Remote notification on for individual mailboxes.
Using the answering device P0814619 01 E UG.VTAD Page 46 Wednesday, April 15, 1998 4:30 PM Remote access You can access your Callers list, Directory, Greetings list, Options list and record memos remotely. Once you’ve called your Venture set, audible prompts guide you through the various functions. If you have changed the name of a mailbox and recorded a new mailbox tag, you will hear the new mailbox tag.
P0814619 01 E UG.
Using the memory keys P0814619 01 E UG.VTAD Page 48 Wednesday, April 15, 1998 4:30 PM Your Venture phone has eight memory keys which you can customize for easy dialing or option activation. ❶ Store any telephone number you wish, whether it’s already stored elsewhere in your Venture set or not. ❷ Store the name and Phone ID of the other Venture sets in your system (one ID for each key). ❸ Program a telephone company service, such as Repeat Dial, Call Forward, or Call Trace.
P0814619 01 E UG.VTAD Page 49 Wednesday, April 15, 1998 4:30 PM Saving a Phone ID to a memory key Press ’ to locate the list of phone IDs. When you save all the Phone IDs in your system to the memory keys, you will not only be able to quickly dial others in your system, but also display the status of each—a solid light beside a memory key indicates that the phone is in use. Saving an option to a memory key You can save the Don’t disturb, Page, Room monitor or Call timer options to a memory key.
Using the memory keys P0814619 01 E UG.VTAD Page 50 Wednesday, April 15, 1998 4:30 PM To Save an option to a memory key 1. Press ¥. To change a memory key 1. Press the memory key. 2. Press ¡. 2. Enter 08 using the dial pad. The display shows: Memory keys prog ☞ 3. Press * to enter the selection list. 3. 4. Press ’ to move through the list: Don’t disturb; Room monitor; Page; and Timer. 5. Press * to save one of the four options when it appears on your display.
P0814619 01 E UG.VTAD Page 51 Wednesday, April 15, 1998 4:30 PM ☞ You must program a separate on and a separate off memory key. To save an on and an off reminder light to a memory key 1. Press ß. 2. Press 1 to a turn the light on. The display shows: Save feature ON to? OR press 0 to turn the light off. The display shows: Save feature OFF to? 3. Press a memory key. 4. 5. 6. Use the dial pad to enter the telephone company service code to turn the feature on or off.* Press ß.
Using the list keys P0814619 01 E UG.VTAD Page 52 Wednesday, April 15, 1998 4:30 PM Your Venture has a variety of lists. Lists such as Callers and Redial log and track incoming and outgoing calls. Lists such as the Phone list and Directory allow you to add frequently called telephone numbers or customize your Venture. You can use the information stored in these lists to place calls and activate features. List descriptions The Phone list...
P0814619 01 E UG.VTAD Page 53 Wednesday, April 15, 1998 4:30 PM You can save information directly to any of your Directories and view information in either one of your Directories or the main list. Entries saved to each Directory that include only a phone number are listed first in the Directory and are sorted by the first digit. For example, 555-4111 appears before 555-8989. Entries that include a name and a number are listed after the numeric listings and are sorted by name alphabetically.
Using the list keys P0814619 01 E UG.VTAD Page 54 Wednesday, April 15, 1998 4:30 PM Using the lists To view a list item 1. Press D, †, ç, £ or ¤ to access the list. If the number is in the Phone list, press ” or ’ to view. ☞ If you receive an incoming call while you are in any list, you will be bumped out of the list. 2. To go to a Directory or Callers sublist, press “ to locate the sublist that you want. ☞ 3.
P0814619 01 E UG.VTAD Page 55 Wednesday, April 15, 1998 4:30 PM 2. 3. Press ¡. The display shows: ]=Next *=Change Press * to make a change to the number and press s OR press ’ to move to the name and then press *. 4. Press s to confirm your changes. ☞ If Lock lists is turned on, your display will show List is locked No changes made . To turn Lock lists off, see Option “22 Lock lists” beginning on page 29. ☞ You can press ™ at any time to exit a list without ending a call.
Using the list keys P0814619 01 E UG.VTAD Page 56 Wednesday, April 15, 1998 4:30 PM ☞ 4. 5. 6. 7. 8. 9. To insert a two-second pause in the dialing sequence, press ˙. Press ß. The display shows: Press 1st letter to enter name Press ß. If you are saving to the Services list, you are finished. If you are saving to the Directory, the display shows: Save to? Use “ to choose Use “ to select a Directory and press s. Select a mailbox and press s. Record a greeting and press s. Record a voice tag and press s.
P0814619 01 E UG.VTAD Page 57 Wednesday, April 15, 1998 4:30 PM 7. 8. 9. Press ß. The display shows: Press number to Choose mailbox If you do not want to assign calls from this number to a mailbox, press s again. Using the dial pad, enter one of the following to select a mailbox: - 1 through 9 for numbered mailboxes -line keys 1, 2 or 3 for line mailboxes - 0 for the Private mailbox - # for the Special mailbox Press ß.
Using the list keys P0814619 01 E UG.VTAD Page 58 Wednesday, April 15, 1998 4:30 PM To name a Private Directory The default names for Venture’s directories are Public, A, B and C. You may change A, B and C as you wish. 1. Press D. 4. Press ‘ or “ to locate the Private Directory (Directory A, B, or C). 5. Press * to change the item. 6. Press ß to confirm your change. 2. 3. Press ¡. 4. Enter the name (see “Entering numbers, letters and symbols” beginning on page 16). 5. 3.
P0814619 01 E UG.VTAD Page 59 Wednesday, April 15, 1998 4:30 PM If your display shows List is locked , see option “22 Lock lists” beginning on page 29. 5. Press £ or D. If you are saving to the Directory, the display shows Save to? Use “ to choose. 6. If you are saving to the Services list, you are finished. Otherwise press “ to locate the Directory to which you want to save the information.
Using the list keys P0814619 01 E UG.VTAD Page 60 Wednesday, April 15, 1998 4:30 PM To save a code and a light setting 1. Press ß. 2. Press 1 to a turn the light on. The display shows: Save feature ON to? OR Press 0 to turn the light off.
P0814619 01 E UG.VTAD Page 61 Wednesday, April 15, 1998 4:30 PM A new voice message To delete a single Callers list entry 1. Press ç. 2. Press ” or ’ to move to the Callers list entry you wish to delete. 3. Press d twice. To delete entire Callers list All voice messages stored in the Callers list are deleted. A new message—viewed but not played 1. Press ç. 2. Press d twice.
Status messages P0814619 01 E UG.VTAD Page 62 Wednesday, April 15, 1998 4:30 PM The following status messages may be displayed when your Venture set is idle. If you have more than one status message, you can view additional messages using “. When you clear one status message from the display, the next one appears. Status messages Check line cord A line cord may be damaged, not plugged in, or otherwise disabled. Copying...
P0814619 01 E UG.VTAD Page 63 Wednesday, April 15, 1998 4:30 PM help you overcome difficulties that may occur when installing and using a new Venture with TAD. Blank display Your display is blank and the lights on your phone are not working. 1. Check that the power adapter is plugged into a working power outlet and that proper connections have been made to the CAM. 2. Be certain that you have an 8wire cord connected from the CAM to your Venture phone. Display language error 1. Press ¥. 2. Press 28. 3.
Troubleshooting P0814619 01 E UG.VTAD Page 64 Wednesday, April 15, 1998 4:30 PM In order to communicate, all Venture phones must share line 1. 1. To ensure that the same telephone line is connected to line 1 on all Venture phones you can: • Press „. • If you do not hear dial tone, see “No dial tone” on page 63. • If you hear dial tone, leave the handset off hook and check every Venture phone. The „ indicator light should be lit.
P0814619 01 E UG.VTAD Page 65 Wednesday, April 15, 1998 4:30 PM 3. Press *. You forgot your password You can’t enter the Options list because you have forgotten the password. 1. Press ¥. The display reads: Please enter Password “. 4. Enter your two-digit ID. 2. 5. Press *. 6. If the display shows: Invalid phone ID Please try again Repeat steps 1 to 5 using a different number. 2. Enter 23.
Troubleshooting P0814619 01 E UG.VTAD Page 66 Wednesday, April 15, 1998 4:30 PM You can’t turn off the message waiting light Your message waiting light cannot be turned off using Option, “10 Clear Msg. Wtg.” on page 27. The problem is related to the type of message waiting signalling provided by your telephone company, and not with your Venture phone. • Report the problem to your telephone company. A caller hears, “We are unable to take your call. Please call back later.
Warranty and repair The Venture phone is fully supported by Aastra. Warranty and repairs If you have a problem with your phone, return it to where it was purchased. Cleaning the display Use only a soft cloth soaked in isopropyl alcohol to clean the display. Warning: Do not use a dry cloth— it might scratch the surface. Do not use ketone, acetone, toluene or xylene. They may damage the coating.
Glossary P0814619 01 E UG.VTAD Page 68 Wednesday, April 15, 1998 4:30 PM Play/Action key This key (—) is located in the center of the arrow keys on the right side of your Venture phone. It is used to dial anything on your display, play messages or to change options. Call log This is another name for the Callers list. Call Waiting This is a telephone company service to which you can subscribe. The phone beeps, letting you know that a call is waiting.
Navigational keys The four arrow keys that surround the action key (—): ”, ’, “ and ‘. With these keys you can move up, down, and sideways through the Callers list, Directory, Phone list, Redial list and Services list. Non-square In the Venture system, a system configuration in which the first line must be the same on all the phones, but the other lines can be arranged in any order. Phone list The name and identification number of all phones in a Venture system are automatically stored in this list.
Appendix P0814619 01 E UG.VTAD Page 70 Wednesday, April 15, 1998 4:30 PM This appendix is intended for use by installers or individuals with system wiring experience. It provides in-depth information required to complete the wiring of a Venture system, from the connecting blocks through the jacks and the Venture cord adapter module (CAM) to a Venture phone. It also provides information relevant to new installations and previously wired facilities.
P0814619 01 E UG.VTAD Page 71 Wednesday, April 15, 1998 4:30 PM 2. 3. connecting block line 1 line 2 Connect one end of a 6-wire cord to the first teledapt jack and the other end to port 1 on the CAM. Connect line 2 to the red and green pins of the second teledapt jack. 4. Connect line 3 to the black and yellow pins of the second teledapt jack. 5. Connect one end of the 6-wire cord to the second teledapt jack and the other end to port 2 on the CAM.
Appendix P0814619 01 E UG.VTAD Page 72 Wednesday, April 15, 1998 4:30 PM Lines 1 and 2 on one jack and line 3 on a separate jack 1. Connect phone line 1 to the red and green pins of the first teledapt jack 2. 3. connecting block line 1 line 2 Connect phone line 2 to the black and yellow pins of the first teledapt jack. Connect one end of the 6-wire cord to the first teledapt jack and the other end to port 1 on the CAM. 4. Connect line 3 to the red and green pins of the second teledapt jack. 5.
P0814619 01 E UG.VTAD Page 73 Wednesday, April 15, 1998 4:30 PM 2. From the phone box, connect your lines to the ISDN Adapter. 3. Run a line jack to either Port 2 or Port 3 on the CAM. 4. Connect the ISDN Adapter to your computer. to your computer ISDN Analog Adapter From the telephone company ISDN Line Line 1 Venture 3-Line Telephone with Answering Device User Guide 73 Appendix Connecting an ISDN line to a single Venture set 1. Connect your line to your phone box.
Regulatory P0814619 01 E UG.VTAD Page 74 Wednesday, April 15, 1998 4:30 PM Canadian regulatory information Industry Canada Notice The Industry Canada label identifies certified equipment. This certification means that the equipment meets certain telecommunications network protective, operational and safety requirements. The Department does not guarantee the equipment will operate to the user’s satisfaction.
Such misuse can result in unsafe sound levels The exclamation point within an equilateral triangle is intended to alert the user to the presence of important operating and maintenance (serving) instruction in the literature accompanying the product.
Regulatory P0814619 01 E UG.VTAD Page 76 Wednesday, April 15, 1998 4:30 PM U.S. regulatory information Radio/TV interference Terminals equipped with electronic push-key dials generate and use radio frequency energy, and if not installed and used properly and in strict accordance with the manufacturer’s instructions, may cause interference to radio and television reception.
P0814619 01 E UG.VTAD Page 77 Wednesday, April 15, 1998 4:30 PM If this terminal equipment causes harm to the telephone network, the telephone company will notify you in advance that temporary discontinuance of service may be required. If advance notice isn’t practical, the telephone company will notify the customer as soon as possible. Also, you will be advised of your right to file a complaint with the FCC if you believe it necessary.
Regulatory P0814619 01 E UG.VTAD Page 78 Wednesday, April 15, 1998 4:30 PM 1. Check with local authorities before making any test calls to emergency numbers. 2. Remain on the line and briefly explain to the dispatcher the reason for calling before hanging up. 3. Perform such activities in the offpeak hours, such as early mornings or late evenings.
P0814619 01 E UG.VTAD Page 79 Wednesday, April 15, 1998 4:30 PM Never spill liquid of any kind on the product. 10. To reduce the risk of electric shock do not disassemble this product, but have it sent to a qualified service person when some service or repair work is required. 11. Unplug this product from the wall outlet and refer servicing to qualified service personnel under the following conditions: (A) When the power supply cord or plug is damaged or frayed.
Regulator y For North American Markets mains nominal AC voltage 110-117V: For Venture- Input: 117/120VAC, 50/60Hz, 12W and Output: 16VAC 500 mA. For International Markets mains nominal AC voltage 220-240V: For Venture- Input: 220/240VAC, 50/60Hz, 12W and Output: 16VAC 500 mA. Substitution of non approved equipment will void the Aastra warranty.
P0814619 01 E UG.VTAD Page 81 Wednesday, April 15, 1998 4:30 PM indirectly arising from the customer’s use or inability to use this product, either separately or in combination with other equipment. This paragraph, however, shall not apply to consequential damages for injury to the person in the case of telephones used or bought for use primarily for personal, family, or household purposes. The warranty sets forth the entire liability and obligations of Northern Telecom Inc.