
Replacement Part List


For snow or drifts of a great depth, slow your pace to allow the discharged chute to dispose of
the snow as rapidly as the auger receives the snow.
2. Plan to have the snow discharged in the direction the wind is blowing.
Wet Packed Snow
Move slowly into wet, packed snow. If the wet, packed snow causes the auger to slow down or the
discharge chute begins to clog, back off and begin a series of short back and forth jabs into the
snow. These short back and forth jabs, four to six inches, will “ belch ”the snow from the chute.
Snow Banks And Drifts
In snow of greater depth than the unit, use the same “jabbing” technique described above. Turn the
discharge chute away from the snow bank. More time will be required to remove snow of this type
than level snow.
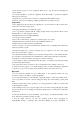
6/MAINTENANCE CHART
CUSTOMER RESPONSIBILITIES
SERVICE
RECORDS
Fill in dates as you
Complete regular
service
Before
Each
Use
First
2
Hours
Every
5
Hours
Every
10
Hours
Every
25
Hours
Each
Season
Before
Storage
SERVICE
DATE
Check and tighten
all screws and nuts
√
√
Check spark plug
√
Check drive belt
√
√
Check fuel
√
Drain fuel
√
Lubricate chute
control flange
√
7/MAINTENANCE
NOTE: Illustrations begin on page 3.
Use the following maintenance section to keep your unit in good operating condition. All the
maintenance information for the engine is in the engine manufacturer’s instructions. Before you
start the engine, read this book.
WARNING: Before you make an inspection, adjustment (except carburetor ), or repair,
disconnect the wire from the spark plug.
General Recommendations
The warranty on this snow thrower does not cover items that have been subjected to operator
abuse or negligence. To receive full value from the warranty, the operator must maintain the snow
thrower as instructed in this manual. Some adjustments must be made periodically to properly