20" REEL MOWER AGT9320 Owner’s Manual TOLL-FREE HELPLINE: 1-866-591-8921 Read all safety rules and instructions carefully before operating this tool.
SAFETY INFORMATION IMPORTANT SAFETY INSTRUCTIONS I M P O R TA N T READ AND UNDERSTAND ALL INSTRUCTIONS. Failure to follow all instructions listed below may result in electric shock, fire, and/or serious personal injury. • Do not operate power tools in explosive atmospheres, such as in the presence of flammable liquids, gases, or dust. Power tools create sparks which may ignite the dust or fumes. • Avoid body contact with grounded surfaces such as pipes, radiators, ranges, and refrigerators.
SAFETY INFORMATION SPECIFIC SAFETY RULES FOR REEL MOWER WA R N I N G This symbol points out important safety instructions, which if not followed, could endanger the personal safety and/or property of yourself and others. Read and follow all instructions in this manual before attempting to operate this machine. Failure to comply with these instructions may result in personal injury. D A N G E R This machine was built to be operated according to the rules for safe operation in this manual.
SAFETY INFORMATION • Avoid dangerous environments. Do not operate the mower in the rain or in wet or damp grass. • • Stop machine if anyone enters the area. • Do not pull machine backward unless absolutely necessary. Always look down and behind before and while moving backward. • Never leave a running machine unattended.
KNOW YOUR REEL MOWER Read this operator's manual and safety rules before operating your reel mower. Compare the illustration in Figure 1 to your reel mower in order to familiarize yourself with the location of various controls and adjustments. Save this manual for future reference. Upper handle Middle handle Bag Lower handle Adjustment lever Rear wheel Front wheel Housing Fig.
ASSEMBLY INSTRUCTIONS UNPACKING Before attempting to assemble, empty carton and compare parts with parts list below. • Carefully remove the product and any accessories from the box. • Inspect the parts to make sure no breakage or damage occurred during shipping. • Do not discard the packing material until all parts are examined. • If any parts are damaged or missing, please call 1-866-591-8921 for assistance. • Be sure to tighten the lock nuts when assembled to prevent the handle from rocking.
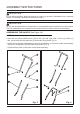
ASSEMBLY INSTRUCTIONS WA R N I N G Do not allow familiarity with this product to make you careless. Remember that a careless fraction of a second is sufficient to inflict serious injury. WA R N I N G Do not use any attachments or accessories not recommended by the manufacturer of this product. The use of attachments or accessories not recommended can result in serious personal injury. ASSEMBLING THE HANDLE (See Figure 3-4) NOTE: Do not completely tighten bolts until assembly is complete.
ASSEMBLY INSTRUCTIONS ATTACHING THE HANDLE TO THE MOWER BASE (See Figure 5) Align holes (1) at the lower end of each handle arm with posts (2) extending from the mower base side plates. Slide lower ends of handle arms onto posts. Fig.
ASSEMBLY INSTRUCTIONS ATTACH THE REAR BAG (See Figure 6-8) • Take out all components in the packing (Fig. 6). • Place the hooks on the rear bag onto the roller shaft. Secured the bag to the lower handle using the belt supplied. (Fig. 7). • Adjust strap for proper height so the bag does not rub the ground while mowing or transporting. (Fig. 8). Fig. 6 Fig. 7 Fig.
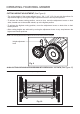
OPERATING YOUR REEL MOWER CUTTING HEIGHT ADJUSTMENT (See Figure 9) • The cutting height of the mower adjusts from 1 3/8 - 2 1/2” (3.5-6.4 cm) with 9 positions for adjustment height by moving the height adjustment levers to the required position. • To achieve the lowest cutting position, one at a time, move the adjustment levers on both sides, located next to the smaller wheels, up to the highest position.
OPERATING YOUR REEL MOWER MOWER BLADE ADJUSTMENT (See Figure 11) WA R N I N G BLADES ARE EXTREMELY SHARP. TO AVOID INJURY, DO NOT TOUCH BLADES WHEN MAKING ADJUSTMENTS. NOTE: Blades are factory adjusted. • Misalignment can occur, often caused by blades being too loose or too tight. This can cause an uneven cut or difficulty pushing the mower. • Each end of the cutting bar is adjusted separately. To move the cutting bar closer to the blades turn the adjustment screw clockwise.
CARE AND MAINTENANCE • Minimum care is required to ensure smooth operation of your mower. • To avoid damage to mower or cutting blades, keep area to be mowed free from debris. • For best results, regularly apply lubricant to mower’s cutting surfaces, cutting reel axle shaft and wheels. WA R N I N G Clean any grinding compound or debris from the cutter bar blade, reel blade, pinions and pawls. SHARPENING THE CUTTING BLADES: • Spread a thin layer of lapping compound on the front edge of the reel blades.