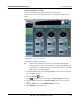
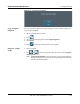
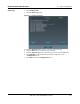
WHITESTAR SIGNATURE PRO System 5 • Program Settings Occlusion Mode Power Settings You can set different power levels when the phaco tip occludes. When you are in Occlusion mode phaco, there is an additional control panel for power. Figure 5.18 – Phaco Surgical Screen with Occlusion Mode Power Settings 1. WHITESTAR Technology with Pulse Shaping with ELLIPS FX Technology 2.
WHITESTAR SIGNATURE PRO System 5 • Program Settings Venting an Occlusion When there is a blockage or an occlusion to the aspiration port by some tissue or other material, the vacuum pressure builds up. The aspiration flow system vents to the bottle when you release the foot pedal. Another choice is that you can release the foot pedal to position 1 and that causes the aspiration system fluid to vent using pump rotation. This is used with the OPO70 FUSION Pack.
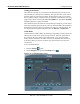
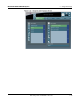
WHITESTAR SIGNATURE PRO System 5 • Program Settings 3. On the FUSION screen, press the On button to turn CASE mode on. Note: If the Venturi pump option is on, you cannot access the FUSION Fluidics screen. There is no Occlusion mode phaco or CASE mode with Venturi. 4. The FUSION screen shows the CASE settings as a graph. Use the up and down arrows at the bottom of the screen to adjust the: • Upper Threshold (Up) – This is the maximum threshold vacuum setting.
WHITESTAR SIGNATURE PRO System 5 • Program Settings Table 5.
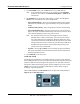
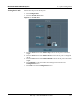
WHITESTAR SIGNATURE PRO System 5 • Program Settings Figure 5.21 – Program Lock Button Copy a Surgeon Program You can copy the settings of one surgeon program for use by another surgeon. To copy a surgeon program: 1. Select a program name on the list. 2. Press . 3. Select a surgeon and program from the Copy Program list. 4. Press Enter. 5. Press Program – Assign Order if you need to edit the name of the program. 1. Select a program. 2.
WHITESTAR SIGNATURE PRO System 5 • Program Settings RX Only- NGP Z370500 Rev.
6 SYSTEM CONFIGURATION Setting the Maximum IV Pole Height Testing the IV Pole Event Log Wireless Setup - Foot Pedal and Remote Control Wireless Remote Test Touch Screen Calibration View Software Versions System Self Test Language Selection Surgical Media Center (SMC) (Optional) Set the System Date and Time Set Units of Measure for Vacuum Service Interval Import/Export Database Backup All Restore Database Restore All RX Only – NGP Z370500 Rev.
WHITESTAR SIGNATURE PRO System Setting the Maximum IV Pole Height 6 • System Configuration Follow these steps to set the maximum IV pole height. Note: The Configuration screen is only available when you are not in a case. If you need to access the Configuration screens you must select End Case, select Next Case, then press the Configuration button. 1. Press Configuration. 2. Press the Max IV Pole Height button. Figure 6.1 – Max IV Pole Height Dialog Box 3.
WHITESTAR SIGNATURE PRO System Testing the IV Pole 6 • System Configuration Follow these steps to test the IV pole. 1. Press Configuration. 2. Press the IV Pole Test button. Figure 6.2 – IV Pole Test 3. Press the Start button under Send to Top to move the IV pole to maximum height. 4. Press the Start button under Send to 30 cm to move the IV pole to a height of 30 cm. 5. Press the Start button under Send to Bottom to move the IV pole to minimum height. 6.
WHITESTAR SIGNATURE PRO System Event Log 6 • System Configuration 1. Press Configuration. 2. Press the Event Log button. Figure 6.3 – Event Log Screen 3. 4. 5. 6. Press the Previous button to move to the prior page of the log. Press the Next to move to the next page of the log. Press the Export Log button to save the log file to an external USB device. Press Finished to close the Event Log dialog box and return to the Configuration screen. 7. Press Exit to close the Configuration screen.
WHITESTAR SIGNATURE PRO System Wireless Setup Foot Pedal and Remote Control 6 • System Configuration Pairing Foot Pedal - Advanced Control Pedal Follow these steps to pair the Advanced Control Pedal to the system with a wireless BLUETOOTH connection. Wireless Pairing 1. On the main screen, press Configuration. 2. Press Wireless Setup. Figure 6.4 – Wireless Setup Screen 3. On the Wireless Setup dialog box, press the Advanced Control Pedal button. RX Only – NGP Z370500 Rev.
WHITESTAR SIGNATURE PRO System 6 • System Configuration Figure 6.5 – Advanced Control Pedal Pairing Screen 4. On the Foot Pedal Pairing screen, press the Wireless Pairing button. 5. Remove the cable from the foot pedal and select OK. 6. Follow the instructions on the screen. Figure 6.6 – Wireless Pairing Instructions 7. The system communicates the appropriate data to the foot pedal. The system shows a progress screen during the pairing process. RX Only – NGP Z370500 Rev.
WHITESTAR SIGNATURE PRO System 6 • System Configuration 8. When pairing completes, the progress screen closes and the system displays the message The foot pedal is now paired with the system. • If the blue light is on, the wireless foot pedal is paired. • If the blue light is blinking the wireless foot pedal is not paired. • If the green light is on, the batteries in the foot pedal are charged. • If the green light is blinking, the batteries in the wireless foot pedal need to be charged.
WHITESTAR SIGNATURE PRO System 6 • System Configuration 7. When pairing completes, the progress screen closes and the system displays the message The foot pedal is now paired with the system. 8. Test the foot pedal or press Finished to close the test screen. 9. Press Exit to close the Configuration screen. Foot Pedal - Advanced Linear Pedal Figure 6.8 – Advanced Linear Pedal Pairing Screen 1. 2. 3. 4. 5. On the main screen, press Configuration. Press Wireless Setup.
WHITESTAR SIGNATURE PRO System 6 • System Configuration 6. When pairing completes, the progress screen closes and the system displays the message The foot pedal is now paired with the system. 7. Test the foot pedal or press Finished to close the test screen. 8. Press Exit to close the Configuration screen. RX Only – NGP Z370500 Rev.
WHITESTAR SIGNATURE PRO System 6 • System Configuration Remote Control Pairing Note: Make sure that the back light feature for the wireless remote control is off before you start the wireless setup process. 1. On the main screen, press Configuration. 2. On the Wireless Setup dialog box, press Remote Control. 3. Press Remote Pair. Figure 6.9 – Wireless Remote Pair Screen 4. Follow the instructions shown on the screen. 5. Press the corresponding buttons on the wireless remote control as prompted. 6.
WHITESTAR SIGNATURE PRO System Touch Screen Calibration 6 • System Configuration You must calibrate the system touch screen as part of the system setup. Follow these steps to calibrate the touch screen. 1. On the main screen, press Configuration. 2. Press Touch Screen Calibration. Figure 6.10 – Touch Screen Target Circle 3. Press the arrow on the screen. When released, the arrow moves to the next calibration point. 4. Repeat for all the calibration points. 5.
WHITESTAR SIGNATURE PRO System View Software Versions 6 • System Configuration 1. On the main screen, press Configuration. 2. Press View Software Versions. Figure 6.11 – View Software Versions Screen 3. Press Finished to close the View Software Versions dialog box. 4. Press Exit to close the Configuration screen. RX Only – NGP Z370500 Rev.
WHITESTAR SIGNATURE PRO System System Self Test 6 • System Configuration 1. On the main screen, press Configuration. 2. Press Self Test. Figure 6.12 – Self Test Screen 3. The Self Test closes automatically. 4. Press Exit to close the Configuration screen. RX Only – NGP Z370500 Rev.
WHITESTAR SIGNATURE PRO System Language Selection 6 • System Configuration The system features a 31-language user interface. Before you proceed, select one of the languages for your display screen. (English is the default language). 1. On the main screen, press Configuration. 2. Press Language. Figure 6.13 – Language Screen 3. Select the desired language from the listing (for additional languages, press the Next List button). 4. Press Yes at the confirmation pop-up.
WHITESTAR SIGNATURE PRO System Surgical Media Center (SMC) (Optional) 6 • System Configuration The Surgical Media Center (SMC) is used to integrate and record the video image from the surgical microscope and the surgical operating data to be viewed at a later date and time. The surgery displays on a separate monitor with the instrument settings. The SMC hardware is attached to the communications port on the rear panel. (Figure 4.6 – Rear Panel Connections.
WHITESTAR SIGNATURE PRO System Set the System Date and Time 6 • System Configuration Follow these steps to set the system date and time. 1. Press Configuration. 2. Press the Set Date/Time button. Figure 6.15 – Set Date/Time Dialog Box 3. On the Set Date/Time screen, press the up and down arrows to set the day, month, year, hour, and minute. 4. You can change the way the date is displayed.
WHITESTAR SIGNATURE PRO System Set Units of Measure for Vacuum 6 • System Configuration Follow these steps to set the units of measure for vacuum. 1. Press Configuration. 2. Press the Set Vacuum Units button. Figure 6.16 – Set Vacuum Units Dialog Box 3. On the Set Vacuum Units dialog box, the current selection is highlighted in green. Press the button for the units of measure you want to use for the display of vacuum settings. 4. Press Finished to return to the Configuration screen 5.
WHITESTAR SIGNATURE PRO System Service Interval 6 • System Configuration 1. On the main screen, press Configuration. 2. Press Service Interval. Figure 6.17 – Service Interval Screen 3. Press Finished to close the dialog box. 4. Press Exit to close the Configuration screen. RX Only – NGP Z370500 Rev.
WHITESTAR SIGNATURE PRO System Import/Export Database 6 • System Configuration Export 1. From Configuration, press Import/Export Database. Note: Make sure that you place the USB device into the USB port on the back of the system. Figure 6.18 – Export Database Screen 2. Press the Export button. 3. Select a file to export from the list or use the Select All to export all of the files listed. 4. Press the Copy Programs button. 5. Press OK to close the screen. 6.
WHITESTAR SIGNATURE PRO System 6 • System Configuration Figure 6.19 – Copy Successful Dialog Box Import 1. From Configuration, press Import/Export Database. Note: Make sure that you place the USB device into the USB port on the back of the system. Figure 6.20 – Import Database Screen 2. Press the Import button. 3. Select a file to import from the list or use the Select All to import all of the files listed. 4. Press the Copy Programs button. 5. Press OK to close the screen. RX Only – NGP Z370500 Rev.
WHITESTAR SIGNATURE PRO System 6 • System Configuration Figure 6.21 – Copy Successful Dialog Box 6. Press Exit to close the Configuration screen. Backup All 1. From Configuration, press Backup All. Note: Make sure that you place the USB device into the USB port on the back of the system. Figure 6.22 – Backup All Event Logs 2. Enter a name for the file. 3. Press Enter. 4. Press OK to complete the backup. RX Only – NGP Z370500 Rev.
WHITESTAR SIGNATURE PRO System 6 • System Configuration Figure 6.23 – Backup Successful Dialog Box 5. Press Exit to close the Configuration screen. Print to File 1. From Configuration, press Print to File. 2. Press OK to close the confirmation dialog box. Figure 6.24 – Print to File Dialog Box RX Only – NGP Z370500 Rev.
WHITESTAR SIGNATURE PRO System Restore Database Note: 6 • System Configuration When you save a new surgeon or save changes to an existing program the system updates this list. The database names are a date and time stamp. 1. From Configuration, press Restore Database. 2. Select a database from the list. Figure 6.25 – Database Restore Screen 3. Press Restore Selection. Figure 6.26 – Restore Selection Dialog Box 4. Press Yes at the confirmation. 5. Press OK or wait for the dialog box to close.
WHITESTAR SIGNATURE PRO System 6 • System Configuration Figure 6.27 – Database Restored Confirmation Dialog Box 6. Press Finished to close the screen. 7. Press Exit to close the Configuration screen. Restore All 1. From Configuration, press Restore All. Note: Make sure that you place the USB device into the USB port on the back of the system. Figure 6.28 – Database Restore Screen 2. Select the database to restore from the list. 3. Press Restore Selection. 4. Press OK at the confirmation screen.
WHITESTAR SIGNATURE PRO System 6 • System Configuration Figure 6.29 – Database Restore Confirmation Dialog Box 5. Press Finished to close the screen. 6. Press Exit to close the Configuration screen. Delete a Backup Database You can delete a database from your portable USB device. Contact your AMO service representative to delete the database from your system's hard drive. 1. 2. 3. 4. 5. Insert the USB device into the port on the back of the system. From Configuration, press Restore All.
7 CARE AND CLEANING Cleaning and Sterilization Procedures Phaco Handpiece Irrigation/Aspiration Handpiece Diathermy Handpiece Vitrectomy Cutter Touch Screen Cleaning RX Only – NGP Z370500 Rev.
WHITESTAR SIGNATURE PRO System Cleaning and Sterilization Procedures 7 • Care and Cleaning Handle all previously used reusable items according to the Directions for Use for the particular product.
8 ERROR MESSAGES TROUBLESHOOTING AND DIAGNOSTICS Most Common User-Correctable Problems Fuse Replacement Procedure Advanced Linear Pedal Battery Replacement Charging Options for Wireless Devices Troubleshooting Status, Warning and Error Messages Error Messages RX Only –NGP Z370500 Rev.
WHITESTAR SIGNATURE PRO System Most Common User-Correctable Problems 8 • Error Messages Troubleshooting and Diagnostics Use the information in this section if you are not successful with the system check-out. Consult this section to resolve the problem before you call AMO for technical service: • Make sure that you plugged the system in to a power receptacle. • Make sure that there is electrical power to the receptacle.
WHITESTAR SIGNATURE PRO System 8 • Error Messages Troubleshooting and Diagnostics To replace the console fuses: 1. Unplug the system electrical power. 2. Unplug the power cord from the back panel. 3. Locate the fuse holder on the back panel of the system. Figure 8.1 – Rear Panel Connections 1. USB port 5. Potential equalizer 2. Communication port 6. Power switch 3. Foot pedal connector 7, Fuse holder 4. Compressed air 8. Power cord connector 4.
WHITESTAR SIGNATURE PRO System Advanced Linear Pedal Battery Replacement 8 • Error Messages Troubleshooting and Diagnostics To replace the battery in the Advanced Linear Pedal: Note: Remove the battery when shipping or transporting the foot pedal. Figure 8.2 – Bottom View Advanced Linear Pedal 1. Battery Cover 1. Use a flat-head screwdriver to remove the battery cover. Note: The screws cannot be separated from the cover. 2. Remove the battery. Note: Dispose of the used battery in the proper manner.
WHITESTAR SIGNATURE PRO System Charging Options for Wireless Devices 8 • Error Messages Troubleshooting and Diagnostics Figure 8.3 – AC Charger for the Foot Pedal 1. AC Charger 3. Foot Pedal 2. Foot Pedal Cable 1. Disconnect the foot pedal cable from the console. 2. Attach the AC charger cable to the foot pedal cable. 3. Plug the AC charger into a power receptacle. Note: When the green light is no longer blinking, the foot pedal batteries are charged. Figure 8.
WHITESTAR SIGNATURE PRO System 8 • Error Messages Troubleshooting and Diagnostics Table 8.
WHITESTAR SIGNATURE PRO System 8 • Error Messages Troubleshooting and Diagnostics Troubleshooting General The system does not come on when you turn the power switch to on 1. Turn the power switch off. 2. Confirm that you attached the power cord to the console back panel. 3. Confirm that you plugged the power cord into the electrical receptacle or another power source. 4. Confirm that there is electrical power to the wall receptacle or to the power source. 5. Turn the system on. 6.
WHITESTAR SIGNATURE PRO System 8 • Error Messages Troubleshooting and Diagnostics • Move the first remote out of range from the console. • Wait for the first remote to go into “sleep” mode. • Pair the new remote. 6. Make sure that you fully charge the batteries before you pair the remote with the console. Low batteries can cause pairing failures. 7. Charge the batteries if pairing has failed after several attempts. 8. When the batteries are charging: • The BLUETOOTH is off. • You cannot use the remote.
WHITESTAR SIGNATURE PRO System Irrigation 8 • Error Messages Troubleshooting and Diagnostics No Irrigation Flow 1. Make sure you selected the appropriate mode on the screen. 2. Check for kinks in the irrigation tubing. 3. Check the tubing connection to the handpiece. 4. Tap the drip chamber to make sure the valve operates properly. 5. Check the bottle height. 6. Press the foot pedal to position 1 and check for flow. 7.
WHITESTAR SIGNATURE PRO System 8 • Error Messages Troubleshooting and Diagnostics Using large amounts of fluid 1. Check the incision size. 2. Check the bottle height. 3. Check the flow rate (pump speed too high). 4. Check that no fluid enters the collection bag when you do not use irrigation. 5. Reseat or replace the tubing. Aspiration No aspiration 1. Make sure you have the appropriate mode selected on the screen. 2. Check for kinks or clogs in the tubing. 3.
WHITESTAR SIGNATURE PRO System 8 • Error Messages Troubleshooting and Diagnostics Not building vacuum or pump does not turn 1. Check the programming. If the surgeon is in “linear vacuum” as opposed to “linear aspiration”, you must press the foot pedal through position 2 for the vacuum to reach the preset maximum. 2. Make sure you are pressing the foot pedal. 3. Check the tubing connection to the handpiece. 4. Check for air in the irrigation and aspiration tubing. 5. Check the system vacuum settings. 6.
WHITESTAR SIGNATURE PRO System Phacoemulsification 8 • Error Messages Troubleshooting and Diagnostics No phacoemulsification 1. Make sure that you selected the phaco mode on the touch screen. 2. Make sure that the system is primed and tuned. 3. Check the foot pedal operation. 4. Make sure that you properly connected the phaco handpiece cord to the phaco receptacle on the front of the system. 5. Check the phaco power setting. 6. Make sure that the phaco tip is tight on the handpiece. 7.
WHITESTAR SIGNATURE PRO System Diathermy 8 • Error Messages Troubleshooting and Diagnostics No diathermy or poor diathermy 1. Make sure that you selected the diathermy mode on the touch screen. 2. Check the foot pedal operation. 3. Check the diathermy power setting. 4. Check the diathermy cord for a secure connection to the forceps and to the diathermy receptacles on the system. 5. Make sure that the diathermy cord connections are dry. 6.
WHITESTAR SIGNATURE PRO System Status, Warning and Error Messages 8 • Error Messages Troubleshooting and Diagnostics The system shows status, warning, and error messages on the monitor. Alerts (Gray) show at the top of the screen. You do not need to clear an alert as with an error message. An alert, for example, can be: Not Primed/Not Tuned. Error messages show at the top of the screen. Press button to open the corrective action for that error.
WHITESTAR SIGNATURE PRO System 8 • Error Messages Troubleshooting and Diagnostics 103 Fluidics read error. Probable cause: The Microcontroller, SPI, SPI Bus, EEPROM, or ADC is bad. Corrective action: 1. Select End Case. 2. Select Shutdown. 3. Select Yes and wait for the system to power off. 4. Start up the system. 5. If the error does not clear or if the error continues to occur, document the error message and contact AMO for technical service. 110 Fluidics RAM error. Probable cause: Bad Microcontroller.
WHITESTAR SIGNATURE PRO System 8 • Error Messages Troubleshooting and Diagnostics 112 Fluidics Master communication error Probable cause: There is no communication between the Fluidics Controller and the Instrument Host. Corrective action: 1. Select End Case. 2. Select Shutdown. 3. Select Yes and wait for the system to power off. 4. Start up the system. 5. If the error does not clear or if the error continues to occur, document the error message and contact AMO for technical service.
WHITESTAR SIGNATURE PRO System 8 • Error Messages Troubleshooting and Diagnostics 119 Fluidics pinch valve error. Probable cause: Valve or drive circuit failure. Corrective action: 1. Select End Case. 2. Select Shutdown. 3. Select Yes and wait for the system to power off. 4. Start up the system. 5. If the error does not clear or if the error continues to occur, document the error message and contact AMO for technical service. 123 Fluidics Venturi valve fault.
WHITESTAR SIGNATURE PRO System 8 • Error Messages Troubleshooting and Diagnostics 125 Fluidics pack valve error. Probable cause: Valve or drive circuit failure. Corrective action: 1. Select End Case. 2. Select Shutdown. 3. Select Yes and wait for the system to power off. 4. Start up the system. 5. Eject the FUSION Fluidics pack. 6. Insert the FUSION Fluidics pack. 7. Insert a new FUSION Fluidics pack. 8.
WHITESTAR SIGNATURE PRO System 8 • Error Messages Troubleshooting and Diagnostics 130 Fluidics encoder error. Probable cause: • There is a tubing pack loading problem. • Encoder, decoder or stepper driver circuit failed. Corrective action: 1. Select End Case. 2. Select New Case. 3. If the error does not clear select End Case. 4. Select Shutdown. 5. Select Yes and wait for the system to power off. 6. Start up the system. 7. Remove the tubing pack. 8. Reinstall the tubing pack. 9. Install a new tubing pack.
WHITESTAR SIGNATURE PRO System 8 • Error Messages Troubleshooting and Diagnostics 134 Fluidics drain pump rotational error. Probable cause: • There is a pack loading problem. • There is an encoder, decoder circuit, or stepper driver circuit failure. Corrective action: 1. Insert a new Dual Pump FUSION Fluidics pack. 2. Select Next Case and prime the system. 3. Replace the Dual Pump FUSION Fluidics pack with a FUSION pack. 4. Select Next Case and prime the system. 5.
WHITESTAR SIGNATURE PRO System 8 • Error Messages Troubleshooting and Diagnostics 137 Foot pedal error. Probable cause: • The foot pedal has failed. • The user pressed the foot pedal. Corrective action: 1. Select End Case. 2. Select Shutdown. 3. Select Yes and wait for the system to power off. 4. Start up the system. 5. Disconnect the foot pedal from the system. 6. Connect the foot pedal to the system. 7. Press and release the foot pedal at least three times. 8. Run the Self Test. 9.
WHITESTAR SIGNATURE PRO System 8 • Error Messages Troubleshooting and Diagnostics 151 Peristaltic pump stall. Probable Cause: Encoder, Decoder, or Stepper driver is faulty. Corrective Action: 1. Reinsert the pack. 2. Prime the system. 3. If the error does not clear or if the error continues to occur, document the error message and contact AMO for technical service. 201 Phaco communication error. Probable cause: Bad data sent from the host or communication error. Corrective action: 1.
WHITESTAR SIGNATURE PRO System 8 • Error Messages Troubleshooting and Diagnostics 202 Phaco power error. Probable cause: Hardware failure. Corrective action: 1. Check the handpiece connections. 2. Retune the handpiece. 3. If the error does not clear, select End Case. 4. Select Shutdown. 5. Select Yes and wait for the system to power off. 6. Start up the system. 7. Retune the handpiece. 8. If the error still does not clear, replace the handpiece with a new handpiece and tune the handpiece. 9.
WHITESTAR SIGNATURE PRO System 8 • Error Messages Troubleshooting and Diagnostics 204 Phaco handpiece error. Probable cause: A wire in the handpiece is broken. Corrective action: 1. Check the handpiece connections. 2. Retune the handpiece. 3. If the error does not clear, select End Case. 4. Select Shutdown. 5. Select Yes and wait for the system to power off. 6. Start up the system. 7. Retune the handpiece. 8.
WHITESTAR SIGNATURE PRO System 8 • Error Messages Troubleshooting and Diagnostics 208 Handpiece error. Probable cause: • Hardware failure. • The handpiece is shorting out. Corrective action: 1. Check the handpiece connections 2. Retune the handpiece. 3. If the error does not clear, select End Case. 4. Select Shutdown. 5. Select Yes and wait for the system to power off. 6. Start up the system. 7. Retune the handpiece. 8.
WHITESTAR SIGNATURE PRO System 8 • Error Messages Troubleshooting and Diagnostics 211 Phaco ROM error. Probable cause: Bad Microcontroller. Corrective action: 1. Select End Case. 2. Select Shutdown. 3. Select Yes and wait for the system to power off. 4. Start up the system. 5. If the error does not clear or if the error continues to occur, document the error message and contact AMO for technical service. 212 Phaco controller timeout. Probable cause: Instrument Host failure or bad Microcontroller.
WHITESTAR SIGNATURE PRO System 8 • Error Messages Troubleshooting and Diagnostics 214 SPI error. Probable cause: SPI Microcontroller failure. Corrective action: 1. Select End Case. 2. Select Shutdown. 3. Select Yes and wait for the system to power off. 4. Start up the system. 5. If the error does not clear or if the error continues to occur, document the error message and contact AMO for technical service. 281 Phaco communication error. Probable cause: Software or hardware failure. Corrective action: 1.
WHITESTAR SIGNATURE PRO System 8 • Error Messages Troubleshooting and Diagnostics 284 Phaco power supply error. Probable cause: The power supply is bad. Corrective action: 1. Select End Case. 2. Select Shutdown. 3. Select Yes and wait for the system to power off. 4. Start up the system. 5. If the error does not clear or if the error continues to occur, document the error message and contact AMO for technical service. 285 Loose tip error. Probable cause: The tip is loose on the handpiece.
WHITESTAR SIGNATURE PRO System 8 • Error Messages Troubleshooting and Diagnostics 287 Diathermy error. Probable cause: Diathermy Driver failure. Corrective action: 1. Check the diathermy cord connections. 2. Select End Case. 3. Select Shutdown. 4. Select Yes and wait for the system to power off. 5. Start up the system. 6. If the error still does not clear or if the error continues to occur, document the error message and contact AMO for technical service. 290 Foot pedal error.
WHITESTAR SIGNATURE PRO System 8 • Error Messages Troubleshooting and Diagnostics 308 External air pressure high/low. Probable Cause: There is a valve or drive circuit failure. Corrective action: 1. Check air hose connections. 2. Select End Case. 3. Select Next Case. 4. If the error does not clear or if the error continues to occur, document the error message and contact AMO for technical service. 309 Piston pump pressure high/low. Probable cause: The pump or the drive circuit failed.
WHITESTAR SIGNATURE PRO System 8 • Error Messages Troubleshooting and Diagnostics 322 Pneumatics system pressure too low. Probable cause: • • • • • The system pressure is too low. The external air valve does not work. The piston pump does not work. There is a system air leak. The vitrectomy cut valve is on. Corrective action: 1. Select End Case. 2. Select Next Case. 3. If the error does not clear or if the error continues to occur, document the error message and contact AMO for technical service.
WHITESTAR SIGNATURE PRO System 8 • Error Messages Troubleshooting and Diagnostics 328 Pneumatics system pressure too high. Probable cause: • • • • The system pressure is too high. The external air valve does not work. The piston pump does not work. The selector valve does not work. Corrective action: 1. Select End Case. 2. Select Next Case. 3. If the error does not clear or if the error continues to occur, document the error message and contact AMO for technical service. 352 IH Failure.
WHITESTAR SIGNATURE PRO System 8 • Error Messages Troubleshooting and Diagnostics 360 IH Fluidics - read error. Probable cause: Communication error. Corrective action: 1. Select End Case. 2. Select Shutdown. 3. Select Yes and wait for the system to power off. 4. Start up the system. 5. If the error does not clear or if the error continues to occur, document the error message and contact AMO for technical service. 361 IH Fluidics - write error. Probable cause: Communication error. Corrective action: 1.
WHITESTAR SIGNATURE PRO System 8 • Error Messages Troubleshooting and Diagnostics 370 IH Phaco read error. Probable cause: Communication error. Corrective action: 1. Select End Case. 2. Select Shutdown. 3. Select Yes and wait for the system to power off. 4. Start up the system. 5. If the error does not clear or if the error continues to occur, document the error message and contact AMO for technical service. 371 IH Phaco write error. Probable cause: Communication error. Corrective action: 1.
WHITESTAR SIGNATURE PRO System 8 • Error Messages Troubleshooting and Diagnostics 416 Foot pedal error. Probable cause: • Foot pedal communication error. • Could not open port. • Too many wireless devices. • Foot pedal battery too low. Corrective action: 1. Check the wired or wireless connection to the system. 2. Wired Connection. • Disconnect and reconnect the foot pedal cable. 3. Wireless Connection • Wake up the foot pedal and allow the wireless to connect to the system.
WHITESTAR SIGNATURE PRO System 8 • Error Messages Troubleshooting and Diagnostics 420 Foot pedal battery too low. Probable cause: Foot pedal battery to low to operate wireless. Corrective action: 1. Connect the foot pedal to the system with the foot pedal cable to clear the error. 2. Continue with the current case once the error is cleared. 501 Prime excessive vacuum error. Probable cause: • The system does not prime. • There is too much vacuum. Corrective action: 1. Prime the system. 2.
WHITESTAR SIGNATURE PRO System 8 • Error Messages Troubleshooting and Diagnostics 503 Prime low vacuum error. Probable cause: Hardware failure. Corrective action: 1. Remove the tubing pack. 2. Reinstall the tubing pack and reprime. 3. If the error does not clear, replace the tubing pack with a new tubing pack and prime the system. 4. If the error does not clear or if the error continues to occur, document the error message and contact AMO for technical service. 506 Pack detect failure.