
Specifications


ABBRA INSTALLATION GUIDE Version.04 4/12/17 23
NEXT
NEXT
READY 00:00
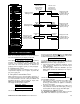
USER SETTINGS
NORMAL MODE
NEXT
ENTER CODE
1. NEW INSTL CODE
NEXT
2. ENROLLING
NEXT
3. DEFINE ZONES
NEXT
NEXT
5. DEFINE COMM
NEXT
[installer code]
OK
INSTALLER MODE
4. DEFINE PANEL
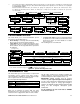
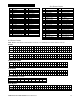
COMMUNICATING TEL # NOT DEFINED
DOWNLOADING DIAL ATTEMPT FAIL
DOWNLOAD OK DOWNLOAD FAILED
Displayed during
dialing process
Displayed for half
a minute approx.
accompanied by sad
(failure) melody
If UL/DL server
tel. # was not
defined before
(see par. 4.5.34)
If UL/DL server
tel. # is already
defined (see
par. 4.5.34)
Dialing
OK
Dialing
failed
Download
OK
Download
failed
Displayed during
download process
Displayed for half
a minute approx.
accompanied by sad
(failure) melody
Displayed for half
a minute approx.
accompanied by sad
(failure) melody
Displayed for half
a minute approx.
accompanied by happy
(success) melody
OK
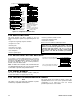
7. DEFINE OUTPUTS
NEXT
8. RECORD SPEECH
NEXT
9. DIAGNOSTICS
NEXT
10. USER SETTINGS
NEXT
11. FACTORY DEFLT
NEXT
12. SERIAL NUMBER
<OK> TO EXIT
NEXT
13. START UL/DL
NEXT
NEXT
6. DEFINE GSM
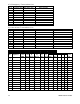
Figure 4.13 – Start UL/DL
5. TESTING PROCEDURES
5.1 Preparations
Make sure all windows and doors are closed. If all zones
are secured (undisturbed), the display should read:
READY HH:MM
If the display is “NOT READY”, query the control panel by
pressing the <<View/Select> button repeatedly. The
source(s) of the problem(s) will be displayed and read
aloud. Take the necessary measures to eliminate the
problem(s) before testing the system (see next paragraph).
5.2 Diagnostic Test
To verify proper function of all detectors in the system, a
comprehensive diagnostic test is required. To perform this
test, refer to figure 4.9.
5.3 Keyfob Transmitter Test
Initiate transmission from each transmitter enrolled as a
keyfob unit (according to the list in Table A2, Appendix A).
Use each transmitter to arm the control panel AWAY and
immediately disarm it. Upon pressing the keyfob unit’s
AWAY key, the ARM indicator should light.
The display should respond as follows:
ARMING AWAY
ê
PLEASE EXIT NOW
The exit delay beeps will begin.
Press the keyfob unit’s DISARM ( ) key. The ARM indicator
should extinguish, the announcement “Disarm, ready to arm"
should be heard and the display should revert to:
READY HH:MM
Test the AUX button in each keyfob in accordance with the
information noted in Table A.2, Appendix A. Verify that the
AUX button performs its duty as programmed.
n If the AUX (]) button is defined as “STATUS”, system
status should be displayed and announced upon
pressing the button.
n If the AUX (]) button is defined as “INSTANT”, press the
AWAY button and then the AUX button. The response
should be:
ARMING INSTANT
(alternating)
PLEASE EXIT NOW
and the exit delay beeps will start. Press the DISARM ( )
key immediately to disarm.
n If the AUX (]) button is programmed as “PGM / X-10”
and permitted to activate one or several X-10 units,
pressing (]) should activate the appliance controlled by
the chosen X-10 unit(s).
n If the AUX (]) button is programmed as “PGM / X-10”
and permitted to activate the PGM output, pressing (])
should activate the device wired to the PGM output.
5.4 Appliance ON/OFF Test
The “X-10 unit assignment” information that you noted in
Appendix B of this manual is very useful for this test.