Abee C3/C3G GPS Speed Cam Alert Full HD Car Camcorder User Manual
Content About FCC Statement CE and RoHS Statement 1 Product 1.1 Features 1.2 Design and Accessories 1.3 Notes on Installation 1.4 Caution 2 Start 2.1 Installation 2.1.1 Insert Micro SD Card 2.1.2 Install and Adjust Device Position 2.1.3 Connect to Power 2.2 Device ON/OFF 2.3 Initial Setup 2.3.1 Language 2.3.2 Automatic Recording 2.3.3 Time Date Info 3 Operate 3.1 Record 3.1.1 Auto/Manual Recording and Snapshots 3.1.2 Emergency Recording 3.1.3 Recording Screenshot 3.2 Browse Files 3.2.1 Playback 3.2.
About The content of this manual is for reference only. The producer retains the rights to adjustment without prior notice. We keep working on the accuracy and completeness of our manual. Feel free to contact us if you find anything lacking. FCC Statement In accordance with Part 15 of the FCC Rules, our device has been tested and proven to comply with the limits for a Class B digital device. The limits are set to prevent against harmful interference in a residential installation.
1 Product Thank you for purchasing Abee C3/C3G car camcorder. Our company is dedicated to providing innovative, high quality electronics to our customers. This device functions as a video and audio recorder in the car and on condition that its built-in battery is fully charged, it also supports off-car usage. 1.
Extra features for C3G Built-in GPS 18mm*18mm module recording speed, time, direction and coordinates Built-in fixed point speed cam information with voice notification; data updates available online or add speed points manually Customized speed limit alert issues notification when speed limit exceeded Flexible self-set speed limit adapting to user habits Exclusive DVR player shows GPS tracking info, speed, direction, coordinates and G-Sensor curve 4 C3/C3G Full HD Car Camcorder User Manual –Engl
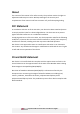
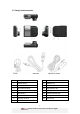
1.2 Design and Accessories No. Description No.
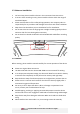
1.3 Notes on Installation 1. 2. 3. 4. 5. 6. For best view, please install the device in the area around rearview mirror. To ensure clear recording in rains, please install the device within the range of windshield wipers. Please avoid hindrance of the safety airbag operation. Our company takes no responsibility for any accidents and damages arisen from such false installation. Wipe clean the selected are prior to installation for firm installation.
adjusted. Please adjust time zone when necessary. Satellite signals cannot penetrate solid objects such as buildings, tunnels, high way. Signals might be affected by woods and weather as well. GPS fixed point speed cam alert function is not radar detection. It is recommended to follow the traffic rules and drive carefully. The built-in lithium-polymer battery requires that the device be recycled or properly disposed. Please follow your local traffic rules and consider your driving safety.
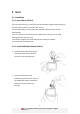
2 Start 2.1 Installation 2.1.1 Insert Micro SD Card The LCD screen facing up, insert the micro SD card with its gold contacts facing up into the memory card slot until you hear a click. For discharge of the memory card, push card and it will eject from the slot automatically. *Do not remove or insert the memory card when the device is on to avoid damaging of your memory card. *The device supports micro SD card Class 6 or above up to 32GB. *Please format card before use. 2.1.
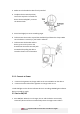
3. Make sure the bracket has been firmly installed. 4. To adjust device vertical position, loosen the top knob. To swivel the device horizontally(360°), unscrew the bottom knob. 5. Screw back tightly to secure recording angle. 6. To disconnect the suction cup and the windshield, pull down the clamp. Make sure the device is securely in your hand in advance. 7.
Automatic Record function is on, the device will begin to record after started(2.3.2 Automatic Recording). When the engine is off, the device will save the files automatically and shuts down completely. 2. Manual ON/OFF: Press on Power button to switch on; press Power button for 2 seconds to switch off. 2.3 Initial Setup 2.3.1 Language If it shows a foreign language when switched on, please follow the steps below to select the language you prefer first for easy operation later. 1.
3 Operate 3.1 Record 3.1.1 Auto/Manual Recording and Snapshots 1. Automatic Recording: when this mode is on, the device records according to engine status. 2. Manual Recording: Press button to start recording and press button to stop. 3. Press button to take photos. *The cigarette lighter in certain type of cars keeps supplying power when the engine is off. In order to prevent draining of car battery, please remove the car charger or disconnect the device when leaving the car. 3.1.
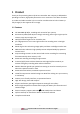
3.1.3 Recording Screenshot No. Item.
3. Choose from Video, Emergency, Picture for the type of files you want 4. Press to enter the type of files 5. Use / button to select between files and click on to play 3.2.2 Delete Follow the steps below to delete files: 1. Press button to enter Menu 2. Go to File Management and select File Deleting 3. Choose from Video, Emergency, Picture for the type of files you want and click on to enter 4. Use / button to select between files and click on to delete 5.
Video Setting Resolution Choose recording in 1080P or 720P Record Interval 2/3/5-min interval at choice for circular recording purpose Voice Record Sound recording ON/OFF Time Stamp Time Stamp in files ON/OFF Speed Mark Speed Mark in files ON/OFF Function Setting Automatic Record Switch ON/OFF recording according to engine status when on Collision Detection Adjust G-Sensor sensitivity Motion Detection Starts recording from 5 seconds prior when lens detects a motion Delay Shutdown Delay shut
3.5 GPS and Fixed Point Speed Cam (available for C3G) 3.5.1 GPS Positioning If GPS Positioning is successful, an icon will be shown on the upper right corner of the screen and current speed will be shown next to it . The numbers of signal bars indicates the strength of the signals. As per how to adjust GPS setting, please refer to 3.3 Adjust Settings via M(Menu) button. *Global Positioning System (GPS) is built by the Ministry of National Defense of the United States of America.
3.6 DVR Player (available for C3G) For installation of the DVR Player, please see below. 1. Operating System requirement: CPU: Intel Core 2 Duo E6600 or AMD Phenom X3 8850 or above RAM: 1G or above Operating System: Windows XP or above 2. Execute “Setup.exe” from enclosed CD for installing Abee DVR Player. 3.
4 Specification DSP Advanced WDR and noise reduction chip Image Sensor High light sensitivity, low light CMOS View Angle 148° wide angle Aperture F/1.9 Built-in GPS module、18mm*18mm ceramic antenna (available on GPS C3G) Display 2.4“ TFT LCD Video Resolution Full HD 1920*1080P @ 30fps HD 1280*720P @ 30fps or 60fps Video Format .MOV Video Compression H.