Home Surveillance System Digital Wireless Camera & Receiver Users Manual Model: A + alarm
INDEX PACKAGE CONTENTS ........................................ 01 FUNCTION INTRODUCE ...................................... 02 Wireless Camera ............................................... 02 Receiver ............................................................ 03 Menu ................................................................ 06 SYSTEM INSTALLATION ..................................... Camera Install .................................................. 07 Receiver Install ...............
PACKAGE PACKAGE CONTENTS CONTENTS Check all of the components shown as below are included in box before using. 1. Wireless Camera ........................................................ 2. Receiver ............................................................................. 3. 9V Power Adaptor (for Camera) ...................... 4. 5V Power Adaptor (for Receiver) .................. 5. RCA/ Scart Cable ........................................................ 6. AV Cable ...................................
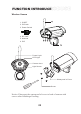
FUNCTION FUNCTION INTRODUCE INTRODUCE Wireless Camera 5 1. ID SET 2. PIR Jack 3. Power Switch 4. DC Jack 5. Antenna 1 2 6. PIR 3 4 6 Power Light LED Light Camera Lens Light Sensor Waterproof of Cover Screw Notice: Please put the waterproof of cover to back of camera with screws after finishing all setting.
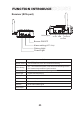
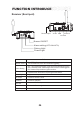
FUNCTION FUNCTION INTRODUCE INTRODUCE Receiver (RCA port) RCA output Antenna AV out USB DC Jack Buzzer ON/OFF Alarm setting (OFF / ON) Pairing Light Power Light Define Item Buzzer ON/OFF Turn OFF the Buzzer, and it won’t sound after detonating Turn ON the Buzzer, and it will sound after detonating Alarm Setting OFF: Turn off the alarm system, it will haven’t the detonating function. ON: Camera always send the signal to receiver.
FUNCTION FUNCTION INTRODUCE INTRODUCE Receiver (Scart port) Scart output Antenna AV out USB DC Jack Buzzer ON/OFF Alarm setting (OFF/ON/AUTO) Pairing Light Power Light Define Item Buzzer ON/OFF Alarm Setting Turn OFF the Buzzer, and it won’t sound after triggering Turn ON the Buzzer, and it will sound after triggering OFF: Turn off the alarm system, it will haven’t the detonating function. AUTO: Stand by mode. Camera signal was off unless it was triggered.
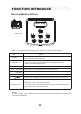
FUNCTION FUNCTION INTRODUCE INTRODUCE Receiver(Button Define) Hot Key 1 Zoom In/Out 4 Menu/Next 3 2 Quad View/Pair Notice: The Button don’t work(except “Hot Key”) when connecting PC Item Define Hot Key Menu/Next Up (Camera 1) Cut the buzzer immediately. when the Receiver alarm, press it and sound stopped Press “Menu” to enter the setting system, and select function you want to set; press again the system will enter the next page, press twice and then leave the setting system.
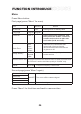
FUNCTION FUNCTION INTRODUCE INTRODUCE Menu Press Menu button: First page (press “Menu” for once) Item Define Default NTSC/PAL Setting NTSC or PAL by hand PAL Language English Cam Pair 1234 Select one of four channels, and then press the “ID SET” button of camera and receiver to pair with each other(in 60 seconds). OFF 5sec 10sec 15sec Glance every camera that has paired with receiver already. And it can select the time interval of glance or off.
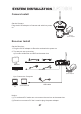
SYSTEM SYATEM INSTALLATION INSTALLATION Camera Install Set the Camera: Plug the 9V DC adaptor to Camera and switch to power on. DC 9V power adaptor Receiver Install Set the Receiver: 1. Plug the 5V DC adaptor to Receiver and switch to power on. 2.
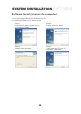
SYSTEM SYATEM INSTALLATION INSTALLATION Software Install (connect to computer) 1. Put the compact disk to CD-ROM drive of PC 2.
SYSTEM SYATEM INSTALLATION INSTALLATION Software Function Item File Define Move the camera video file or photos to another path(09-1) Close the software Start to preview Stop previewing Select one of four channel, then press ID SET on camera in 60 seconds, the screen will show the camera video if the pairing is successful.
SYSTEM SYATEM INSTALLATION INSTALLATION Software Function A B C D E F G J I H K 10-1 (A) Move the camera video file or photos to another path (B) Press it and Auto Record the camera video for 17~19 seconds each file after triggering. (Avi format) (The video signal will be saved to C:/ video, unless you change the storage path. ) (C) Take the picture (Jpg format) (The photo will be saved to C:/ video, unless you change the storage path ) (D) Record the camera video.
OPERATION OPERATION Work with TV Step 1: Power on the receiver and camera Step 2: Complete the pairing Step 3: Receiver connects to TV by RCA or Scart cable (P7) Step 4: Press the TV/AV button on controller of TV, then switch to camera channel. You can select any setting on receiver when the TV monitor is switched to camera. Step 5: Press the hot key on receiver to stop the buzzer after detonating. (The buzzer function will start to work again after 2 minutes.
TROUBLE TROUBLE SHOOTING SHOOTING Buzzer alarm doesn’t work? 1. Make sure the receiver and camera are power on. 2. Make sure the PIR cable is plugged into PIR port 3. Check the alarm setting of receiver is in “STB” or “ON”. 4. Check the receiver is paired with camera already. 5. Check the receiver is switched to Buzzer on. Buzzer alarm can’t turn it off ? 1. Buzzer keep alarming If the camera is still triggering. Receiver Doesn’t work with computer? 1. Make sure the receiver and camera are power on. 2.
TROUBLE TROUBLE SHOOTING SHOOTING The software shows “can not connect to device”? 1. Make sure the receiver are power on. 2. Make sure the USB cable is plugged. 3. Check the alarm setting of receiver is in “STB” or “ON”. 4. Check the power light is opened. Why do the PIR triggered without triggering at times? The PIR is a kind of sensor, so it is very easy triggered by irresistible factors. ex:wind、humidity、rainy day.
Home Surveillance System Digital Wireless Camera & Receiver
Federal Communication Commission Interference Statement This equipment has been tested and found to comply with the limits for a Class B digital device, pursuant to Part 15 of the FCC Rules. These limits are designed to provide reasonable protection against harmful interference in a residential installation. This equipment generates, uses and can radiate radio frequency energy and, if not installed and used in accordance with the instructions, may cause harmful interference to radio communications.