
User Guide


Quick Installation
A-5
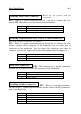
Mouse - Connect the six-threads PS/2 Mouse
cable that comes with the hardware to the connector on the mainboard. Install
the bracket located on the other end of the computer case. When you buy a
Mouse, it has to be a PS/2 Mouse for it to be connected to this port.
Attach the bracket of Parallel Port, Serial Port and PS2 Mouse on the
computer case.
FAN1 - There is a specific
orientation. Connect the three-threads CPU Fan power cable to the Fan
connector on the mainboard.
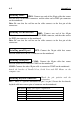
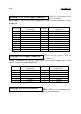
AX5/PX5 FAN1
Pin number Name of the signal or signification
1 Ground
2 +12V
3 Ground
TX5 FAN1/FAN2/FAN3
Pin number Name of the signal or signification
1 Sensor
2 +12V
3 Control on/off
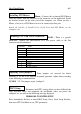
Some jumpers are reserved for future
functions or are not to be adjusted in normal operation. Adjust them according
to the following recommendations.
CCMOS ¡G Put jumper on pin 1 and pin 2.
Parameters and CPU settings After you have followed the
steps described above and completed the installation, when you power the
computer on, you will see the following message displayed:
PRESS DEL TO ENTER SETUP
Press immediately Del key to enter BIOS Setup. Select Load Setup Defaults,
than enter CPU Soft Menu to set CPU parameters.
Installing PS2 Mouse:
Installing CPU Fan Power connector:
Adjusting other jumpers:
BIOS Setup: