
User`s manual


Installing the Motherboard
User’s Manual
3-9
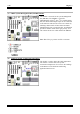
anything to the ATX2 connector). Remember you have to push the connector from the ATX power
supply firmly to the end with the ATX1 and ATX2 connectors, insuring that you have a good connection.
Note: Watch the pin position and the orientation.
Caution
If the power supply connectors are not properly attached to the ATX power supply, the power supply
or add-on cards may be damaged.
One end of AC power core connects to ATX power supply, and the other end (AC plug) will plug into
the wall outlet. Be aware that when facing the wall outlet, the round hole is in the middle. The right
side slot is called ground wire slot. It has a longer slot length than the left side slot. The left side slot is
called the live wire slot. You can use an electroscope to detect its polarity or you can use a voltage
meter to measure the voltage of both slot sides. If you insert an electroscope into the live wire slot, the
electroscope will light up. Using a voltage meter, you will find that the live wire slot will register a
higher voltage.
If you reverse the polarity of AC plug, it may affect the life of computer equipment, or cause an
electric shock when you touch the computer chassis. We suggest that you plug the computer AC plug
to a three-hole wall outlet for better safety and to avoid electric shock.
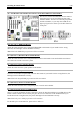
(2). FAN1, FAN2, FAN3, FAN4 and FAN5 Headers
Attach the connector from the processor fan to the
header named FAN1 or FAN2 and connector from
the front chassis fan to the header FAN3. Attach the
connector from the power fan or back chassis fan to
FAN4 header and attache the connector from
northbridge fan to the header named FAN5. You
must attach the processor fan to the processor, or
your processor will work abnormally or may be
damaged by overheating. To prevent the computer
chassis internal temperature from getting too high,
also connect the chassis fan.
Note: Watch the pin position and the orientation