802.
FCC Certifications This equipment has been tested and found to comply with the limits for a Class B digital device, pursuant to Part 15 of the FCC Rules. These limits are designed to provide reasonable protection against harmful interference in a residential installation. This equipment generates, uses and can radiate radio frequency energy and, if not installed and used in accordance with the instructions, may cause harmful interference to radio communications.
Table of Content Introduction ............................................................................................................................ 1 FEATURES ............................................................................................................................. 1 PARTS NAMES AND FUNCTIONS ............................................................................................ 2 Solid............................................................................................
I N T RODU CT I ON The Wireless 802.11b Access Point is an IEEE802.11b compliant access point, which provides a powerful high-speed wireless connection for compatible wireless-enabled devices into the network with the freedom to roam. This Access Point provides 64/128bit WEP encryption, WPA and IEEE802.1x which ensures a high level of security to protects users’ data and privacy. The MAC Address filter prevents the unauthorized MAC Addresses from accessing your Wireless LAN.
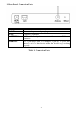
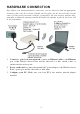
Parts Names and Functions 1. Front Panel: (LED Indicators) LED Indicator Status Solid Power WLAN LAN Dim/ Flashing Turns green when the device is turned Dim when no power is on. applied. Turns green when this device is Flashing when this device connected to a network equipment. The is sending/receiving data green light will vanish once a wireless LAN card is connected to the device. 10M:Turns yellow when the LAN port Flashing when this device is connected with 10M Ethernet cable.
2. Rear Panel: Connection Ports Port/button DC 5V LAN ANTENNA REBOOT Functions Connects the power adapter plug Connects to Ethernet 2.5dBi 1/4 λ dipole antenna with reverse SMA connector Use a pin-shape item, for example a pin tip, to press this button to re-boot this device when the device stop working properly.
Factory Default Settings Setting Device Name SSID Channel WEP IP Address Wireless Access Point Wireless AP Default value: 802.11bAP 11 Default value: Disabled 192.168.100.
H ARDWARE CON N ECT I ON Note: Before you starting hardware connection, you are advised to find an appropriate location to place the Access Point. Usually, the best place for the Access Point is at the center of your wireless network, with line of straight to all your wireless stations. Also, remember to adjust the antenna; usually the higher the antenna is placed, the better will be the performance. 1.
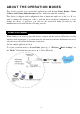
ABOU T T H E OPERAT I ON M ODES This device provides four operational applications with Access Point, Bridge, Client (Ad-hoc) and Client (Infrastructure) modes, which are mutually exclusive. This device is shipped with configuration that is functional right out of the box. If you want to change the settings in order to perform more advanced configuration or even change the mode of operation, you can use the web-based utility provided by the manufacturer as described in the following sections.
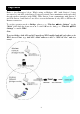
Bridge Mode Refer to the illustration below. While acting as Bridges, AP1 (with Station 1 being associated to) and AP2 (with Station 2 being associated) can communicate with each other through wireless interface (with WDS). Thus Station 1 can communicate with Station 2 and both Station 1 and Station 2 are able to access the Internet if only AP1 or AP2 has the Internet connection.
Client Mode (Infrastructure) If set to Client (Infrastructure) mode, this device can work like a wireless station when it’s connected to a computer so that the computer can send packets from wired end to wireless interface. Refer to the illustration below. This station (AP1 plus the connected computer 1) can associate to another Access Point (AP2), and then can have the Internet access if the other Access Point (AP2) has the Internet connection.
Client Mode (Ad-hoc) If set to the Client (Ad-hoc) mode, this device can work like a wireless station when it is connected to a computer so that the computer can send packets from wired end to wireless interface. You can share files and printers between wireless stations (PC and laptop with wireless network adapter installed). See the sample application below.
CON FI GU RAT I ON Login 1. 2. 3. Start your computer. Connect an Ethernet cable between your computer and the Wireless Access Point. Make sure your wired station is set to the same subnet as the Wireless Access Point, i.e. 192.168.100.12. Start your WEB browser. In the Address box, enter the following: HTTP: / / 192. 168. 100. 252 The configuration menu is divided into four categories: Status, Wireless, TCP/IP, and Other settings.
Status In this screen, you can see the current settings and status of this Access Point. You can change settings by selecting specific tab described in below. System System Alias Name Uptime Firmware Version Wireless Configuration Wireless Mode SSID You can assign a unique name to this Access Point. The alias name is especially important for identification when there are more than one Access Point is applied in a network. The time period since the device was up.
Channel Number: Encryption Associated Clients BSSID TCP/IP Configuration IP Protocol br0 IP Address br0 Subnet Mask br0 Default Gateway br0 MAC Address WLAN must use the same SSID. It is casesensitive and must not exceed 32 characters. A device will not be permitted to join the BSS unless it can provide the unique SSID. An SSID is also referred to as a network name because essentially it is a name that identifies a wireless network.
Statistics The Statistics table shows the packets sent/received over wireless and ethernet LAN respectively. Active Clients This page display wireless stations that are associated to this Access Point, with information of their MAC addresses, transmitted/received packets, transmitting rate, power saving mode, and expired time. Press Refresh to get the latest information.
14
Wireless Basic Settings This page includes all primary and major parameters. Any parameter change will cause the device to reboot for the new settings to take effect. Alias Name: Disable Wireless LAN Interface: Mode: Maximum 32 characters alpha-numeric You can assign a unique name to this Access Point. The alias name is especially useful for identification when there are more than one Access Point is applied in a network.
Network Type: SSID: Channel Number: From Channel: To Channel: Allowed Clients Apply Change Reset When in Client mode, you can select between Ad-Hoc and Infrastructure. The SSID differentiates one WLAN from another, therefore, all access points and all devices attempting to connect to a specific WLAN must use the same SSID. It is casesensitive and must not exceed 32 characters. A device will not be permitted to join the BSS unless it can provide the unique SSID.
Authentication Type To provide a certain level of security, the IEEE 802.11 standard has defined two types of authentication methods, Open System and Shared Key. With Open System authentication, a wireless PC can join any network and receive any messages that are not encrypted. With Shared Key authentication, only those PCs that possess the correct authentication key can join the network. By default, IEEE 802.11 wireless devices operate in an Open System network.
Fragment Threshold RTS Threshold Fragmentation mechanism is used for improving the efficiency when high traffic flows along in the wireless network. If your 802.11g Wireless LAN PC Card often transmit large files in wireless network, you can enter new Fragment Threshold value to split the packet. The value can be set from 256 to 2346. The default value is 2346. RTS Threshold is a mechanism implemented to prevent the “Hidden Node” problem.
Data Rate Preamble Type Broadcast SSID IAPP Apply Change Reset window for listening to broadcast and multicast messages. When the access point has buffered broadcast or multicast message for associated clients, it sends the next DTIM with a DTIM Period value. Access point clients hear and awaken to receive the broadcast and multicast messages. The default DTIM period is ‘3’. By default, the unit adaptively selects the highest possible rate for transmission.
Security Here you can configure the security of your wireless network. Selecting different method will enable you to have different level of security. Please note that by using any encryption, by which data packet is encrypted before transmission to prevent data packets from being eavesdropped by unrelated people, there may be a significant degradation of the data throughput on the wireless link. Encryption : None ( Encryption is set to None by default.
Set WEP key Use 802.1x Authentication Click the Set WEP Keys will prompt you a window to set 64bit or 128bit Encryption. Select HEX if you are using hexadecimal numbers (0-9, or A-F). Select ASCII if you are using ASCII characters (case-sensitive). Ten hexadecimal digits or five ASCII characters are needed if 64-bit WEP is used; 26 hexadecimal digits or 13 ASCII characters are needed if 128-bit WEP is used. If Use 802.1x is selected, then the Set WEP Key won’t be usable. If Use 802.
Group Time Key which the 802.1x Authentication will be activated. Make sure the same password is used on client's end. There are two formats for choice to set the Pre-shared key, i.e. Passphrase and Hex. If Hex is selected, users will have to enter a 64 characters string. For easier configuration, the Passphrase format is recommended. Refresh Enter the number of seconds that will elapse before the group key change automatically. The default is 300 seconds.
Enable Wireless Access Check the checkbox to enable this function. Control Enter the MAC Address of a station that is allowed to access MAC Address this Access Point. You may enter up to 20 characters as a remark to the Comment previous MAC Address. Press to save the new settings on the screen. Apply Change Press to discard the data you have entered since last time Reset you press Apply Change.
WDS Setting To enable WDS function will let this AP enter “Bridge Mode”. Two APs in bridge modes can communicate with each other through wireless interface. That is, two stations associated to different AP in bridge mode can communicate with each other. Enable WDS Add WDS AP MAC Address Apply Change Reset Current WDS AP List Delete Selected Check the checkbox to enable WDS. Enter the MAC Address for the new Access Point to participate the WDS with this Access Point.
Delete All Reset You can delete all of the WDS Access Points listed above. Press to discard the data you have entered since last time you press Apply Change.
TCP/IP Basic In this page, you can change the TCP/IP settings of this Access Point, select to enable/disable the DHCP Client, 802.1d Spanning Tree, and Clone MAC Address. IP Address Subnet Mask Default Gateway DHCP Client This field can be modified only when DHCP Client is disabled. If your system manager assigned you static IP settings, then you will have to enter the information provided. Enter the information provided by your system manager. Enter the information provided by your system manager.
802.1d Spanning Tree Clone MAC Address Web Server Port: Apply Change Reset To enable 802.1d Spanning Tree will prevent the network from infinite loops. Infinite loop will happen in the network when WDS is enabled and there are multiple active paths between stations. You can specify the MAC address of your Access Point to replace the factory setting. The web server provides the configuration service to manage this Access Point. Generally the web server port is set to 80. You can change it in this field.
If “Web Redirection” is enabled, unauthorized clients associating to this AP will be redirected to the specified “Redirection URL” when they are trying to access the Internet Web Redirection Redirection URL Open Address 1 Open Address 2 Open Address 3 Open Address 4 Apply Change Reset Click the “Enable/Disable” radio button to enable/disable the function of “Web Redirection”.
SNMP Setup Server Trust Host IP Trust Trap IP Agent Port Read Community Write/ReadCommunity Trap Port Trap Community Trap Version Click the radio button to enable/disable the SNMP server. You have to enable this function first to set the following settings. Enter the IP address of the NMS (Network Monitoring Stations). The NMS is the only host PC that is allowed to access this AP.
Trap Activity Send a trap to the Trap Receiver (already defined in the Trust Trap IP) when a station (wireless client) is redirected to the default web site. Sent on Auth Success Send a trap to the Trap Receiver (already defined in the Trust Trap IP) when a station (wireless client) gets (Authorization success) authorization from the 802.1x server (or RADIUS server).
Other Upgrade Firmware 1. 2. 3. Download the latest firmware from your distributor and save the file on the hard drive. Start the browser, open the configuration page, click on Other, and click Upgrade Firmware to enter the Upgrade Firmware window. Enter the new firmware’s path and file name (i.e. C:\FIRMWARE\firmware.bin). Or, click the Browse button, find and open the firmware file (the browser will display to correct file path). Click Reset to clear all the settings on this page.
Save/Reload Settings This function enables users to save the current configurations as a file (i.e. config.dat) To load configuration from a file, enter the file name or click Browse… to find the file from your computer. Save Settings to File: Click SAVE.. to save the current configuration to file. When prompted the upper left screen, select “Save this file to disk”, and the upper right screen will prompt you a dialog box to enter the file name and the file location.
Reset: Click to restore the default configuration.
Password For secure reason, it is recommended that you set the account to access the web server of this Access Point. Leaving the user name and password blank will disable the protection. The login screen prompts immediately once you finish setting the account and password. Remember your user name and password for you will be asked to enter them every time you access the web server of this Access Point.