USB Home PhoneLine 1Mbps Network Adapter User Manual Doc. No.
REGULATORY STATEMENTS Part15, Class B This device complies with Part 15 of FCC rules. Operation is subject to the following two conditions: 1. This device may not cause harmful interface, and 2. This device must accept any interface received, including interface that may cause undesired operation. This equipment has been tested and found to comply with the limits for a Class B digital device, pursuant to Part 15 of the FCC Rules.
FCC Part 68 Registration This device complies with FCC Part 68 rules, and the use of this device is subject to the following restrictions: The FCC has established rules which permit this device to be directly connected to the telephone network. Standardized jacks are used for these connections. This equipment should not be used on party lines or coin phones.
INTRODUCTIONS The USB Home PhoneLine 1Mbps Network Adapter brings the latest technology of instant connectivity to multiple PCs over a home's existing telephone line. You can network any notebook computer by connecting it to any standard phone line. No switches, hubs, or even any additional cables are needed - the network runs on standard home-grade telephone wires just like the ones you use everyday. This USB device is equipped with two standard RJ11 telephone ports.
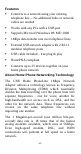
Features ! Connects to a network using your existing telephone line -- No additional hubs or network cables are needed ! Works with any PCs with a USB port ! Supports Microsoft Windows 98/ ME/ 2000 ! 1Mbps data transfer rate over telephone lines ! External USB network adapter with 2 RJ-11 modular telephone ports ! USB cable included – true plug & play ! HomePNA compliant ! Connects up to 25 devices together on your home phone network About Home Phone Networking Technology The USB Home PhoneL
Note: Because of the limitations of standard telephone cables, Home Phone Networking devices require that your cabling does not exceed a total length of 500 feet for your entire network. Specifications Network Standard ! HomePNA specification 1.
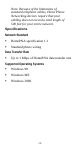
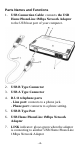
Parts Names and Functions 1. USB Connection Cable: connects the USB Home PhoneLine 1Mbps Network Adapter to the USB host port of your computer. 2. USB B Type Connector 3. USB A Type Connector 4. RJ-11 telephone ports - Line port: connects to a phone jack. - Phone port: connects to a phone setting. 5. USB B Type Port 6. USB Home PhoneLine 1Mbps Network Adapter 7.
. TX/RX indicator: blinks orange when the Network Adapter is transmitting/receiving data via Home Phoneline Networking -5-
HARDWARE INSTALLATION Precaution Before the installation, make sure the USB port exists in your computer and is enabled. To check this, go to My Computer$Control Panel$System. Open the Device Manager tab. If the Universal Serial Bus controller device is found, it means your USB port is installed and enabled. If not, it means no USB port is installed or the USB bios is not properly enabled. In this case, consult your computer dealer for USB support.
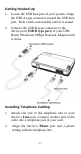
Getting Hooked Up 1. Locate the USB host port of your system. Align the USB A-type connector toward the USB host port. Push evenly and steadily until it is seated. 2. Connect the USB B-type connector to the device port (USB B type port) of your USB Home PhoneLine 1Mbps Network Adapter until it clicks. Installing Telephone Cabling 1. Attach one end of the telephone line to your device’s Line port. Connect another end of the cable into a telephone jack in your wall. 2.
The USB Home PhoneLine 1Mbps Network Adapter is now connected to your PC. Perform the following procedures for the software installation.
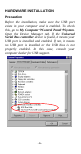
SOFTWARE INSTALLATION Installation for Windows 98 1. Once the USB Home PhoneLine 1Mbps Network Adapter is connected to your computer, Windows 98 will automatically detect the new device. Click Next. 2. Select Search for the best driver for your device. (Recommended) and click Next.
3. Insert the device driver disk into the floppy disk drive on your system. Select Floppy disk drives and click Next. Windows will search for the drivers for what the new device needs. 4. Click Next. Windows will copy all the necessary files to your system.
5. Click Finish installation. to complete 6. When asked if you want to restart your computer, click No to continue the Network configuration.
Installation for Windows ME 1. Once the USB Home PhoneLine 1Mbps Network Adapter is well connected to your computer, Windows ME will automatically detect the new device. Select Specify the Location of the driver (Advanced) and click Next. 2. Insert the device driver disk into the floppy disk drive on your system. Select Removable Media (Floppy, CD-ROM…) and click Next to continue.
3. Click Next. Windows will copy all the necessary files to your system. 4. Click Finish installation.
5. When asked if you want to restart your computer, click No to continue the Network configuration. Installation for Windows 2000 1. Once the USB Home PhoneLine 1Mbps Network Adapter is well connected to your computer, Windows 2000 will automatically detect the new device. Click Next.
2. Select Search for a suitable driver for my device (recommended) and click Next. 3. Insert the device driver disk into the floppy disk drive on your system. Select Floppy disk drives. Click Next. 4. Click Next. Windows will copy all the necessary files to your system.
5. Click Yes to continue. 6. Click Finish to complete the software installation.
7. When asked if you want to restart your computer, click No to continue the Network Configuration. Network Connection 1. To verify if the Network Adapter exists in your computer and is enabled, go to My Computer$Control Panel$System. Click the Device Manager tab. If the USB Home PhoneLine 1Mbps Network Adapter is found, it means your Network Adapter is well installed and enabled. If not, consult your computer dealer for technical support.
2. Once the driver has been installed, you must make some changes to your network settings. Click Start$Settings$Control Panel$ Network and make sure that you have all the following components installed.
3. If any components are missing, click the Add button to add them in. All the protocols and clients required and listed above are provided by Microsoft. After you click Add, highlight the component you need, click Add, highlight Microsoft, and then double click on the item you want to add. 4. If you are using the Windows NT, Windows for workgroups, Windows 98 or Windows ME network, enable the File and Printer Sharing to make your computer visible on the network.
5. Click the Identification tab. Type the name of your computer in the computer name box. Make up a name that is unique from the other computers' names on the network. 6. Type the name of your workgroup in the workgroup box. The name you type should be the same workgroup name used by all of the other PCs on the network. 7. Click the Access Control tab. Make sure that “Shared-level access control” is selected. If connecting to a Netware server, share level can be set to “User-level access control.
8. When finished, remove all disks from your computer and restart your computer to activate the new device. Once the computer has restarted and Windows has booted up, a Logon window will appear requiring you to enter a username and password. Make up a username and password, enter them, and click OK. Do not click the Cancel button, or you won’t be able to log onto the network. When you are at the Windows desktop, double-click the Network Neighborhood icon.
Connecting to a NetWare File Server 1. Click Start$Settings$Control Panel. Double-click Network. 2. Change the Network Logon to Client for NetWare Network. 3. Double-click the Client for NetWare networks. Put your server's name in the Preferred Server box. Click in the Enable Logon Script Processing box.
4. Click OK and restart your computer. Using File and Printer Sharing 1. Click Start$Settings$Control Panel. Double-click Network. 2. Click the Configuration tab, followed by the File and Printer Sharing button. The File and Printer Sharing window will appear.
3. ! If you'd like others to access the files on your computer’s hard drive, select I want to be able to give others access to my files. ! If you'd like to share your printer with other users on the network, select I want to be able to allow others to print to my printer. Click OK. File and Printer Sharing for Microsoft Networks should now appear on the list of installed components. Click OK. When asked to restart your computer, choose to do so. Enabling File Sharing 1. Double-click My Computer.
4. decide on the access type that you want to give other users. ! Read-Only access allows other users to view the files on your PC. ! Full access allows users to create, change, or delete files on your PC. ! Depends on Password access allows users have Read-Only and/or Full access, depending on the password that you decide to give them. Use your mouse to select the access type that you want other users to have. If you want to assign access password(s), type them into the Password box (es).
If you are sharing a cable modem or DSL broadband connection that you will be using to access the Internet, you should protect all of your shared drives and printers with private passwords. When finished, click Apply, followed by OK. Enabling Printers Sharing Click Start$Settings$ Printers. A window of available printers will appear. Right-click the printer that you want to share with other users. Click Sharing, followed by the Sharing tab. Click Share As.