802.11b Wireless PCI Card User Manual Doc. No.
REGULATORY STATEMENTS FCC Certification The United States Federal Communication Commission (FCC) and the Canadian Department of Communications have established certain rules governing the use of electronic equipment. Part15, Class B This model 802.11b Wireless PCI Card (WP2000) must be installed and used in strict accordance with the manufacturer’s instructions as described in the user documentation that comes with the product. This device complies with Part 15 of FCC rules.
Warring: Changes or modifications not expressly approved by party responsible for compliance could void the user the user authority to operate the equipment. CAUTION: 1)To comply with FCC RF exposure compliance requirements, a separation distance of at least 20cm must be maintained between the antenna of this device and all persons. 2)This transmitter must not be co-located or operating in conjunction with any other antenna or transmitter. Technical Support AboCom Systems, Inc. 300 1F, No.21, R&D Rd.
Table of Contents INTRODUCTION ......................................................................................1 FEATURES .................................................................................................1 WIRELESS NETWORK OPTIONS..................................................................2 The Peer-to-Peer Network ............................................................2 The Access Point Network ...........................................................3 LED INDICATORS .....
IN WINDOWS 2000/XP ............................................................................23 CONFIGURATION .................................................................................26 USE MANUFACTURER’S CONFIGURATION UTILITY .................................26 NETWORK STATUS ICON .........................................................................27 The Status Icon ...........................................................................27 Link Info........................................
Introduction A wireless LAN links network users to LAN services without the use of a cabled connection to attach them to the network infrastructure and gives mobile workers the freedom to stay connected to the network while roaming around a building or multiple buildings, maintaining access to the Internet, e-mail, networked applications, and print services. The 802.
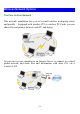
Wireless Network Options The Peer-to-Peer Network This network installation lets you set a small wireless workgroup easily and quickly. Equipped with wireless PCI or wireless PC Cards, you can share files and printers between each PC and laptop. Or you can use one computer as an Internet Server to connect to a wired global network and share files and information with other PCs via a wireless LAN.
The Access Point Network The network installation allows you to share files, printers, and Internet access much more conveniently. With wireless PCI Cards, you can connect wireless LAN to a wired global network via an Access Point. LED Indicators Link: Green (On/Off) Glow – linking to an Access Point or Peer-to-Peer mode. Act: Green (Blink) Blink – Transmitting/receiving wireless data.
Install the Utility Precaution: Installing the Adapter's utility before installing the device is highly recommended for saving your time. Precaution for Windows XP users: There are two options for you to choose: Follow below instructions to install the utility. Skip this section. Go to Installi the Device – Manually - In Windows XP section to install the device, and then you can use the built-in utility in Windows XP. 1. Insert the Setup Utility CD-ROM into the CD-ROM drive and double click on Setup.
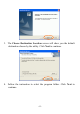
3. The Choose Destination Location screen will show you the default destination chosen by the utility. Click Next to continue. 4. Follow the instruction to select the program folder. Click Next to continue.
5. In Start Copying Files, click Next to continue. 6. In Setup Status, the InstallShield Wizard will begin copying the files.
7. Click Finish.
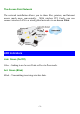
Install the Device Automatically Once the Application setup in Install the Utility section has been completed, follow below steps to install the device. 1. Before installing the device, make sure the computer is turned off. 2. Remove the expansion slot cover from the computer. 3. Carefully slide the wireless PCI card into an available PCI slot, push it evenly and firmly and ensure it is screwed securely in place using the mounting screw.
Manually If you want to install the device before installing the utility, please follow below sections. 1. Before installing the device, make sure the computer is turned off. 2. Remove the expansion slot cover from the computer. 3. Carefully slide the wireless PCI card into an available PCI slot, push it evenly and firmly and ensure it is screwed securely in place using the mounting screw. Once the device has been connected to your computer, Windows will detect the new hardware automatically.
3. Insert the device driver CD-ROM into the CD-ROM drive. Select CD-ROM and Specify a location: and click Browse to provide the appropriate path (e.g. D:\Win9xMe). Click Next. 4. Click Next, Windows will copy all the necessary files to your system. 5. Insert Windows 98 CD-ROM, and then click OK.
6. Click Finish to complete the installation. 7. When Windows prompts you to restart your computer, click Yes.
In Windows ME 1. Select Specify the location of the driver (Advanced), click Next. 2. Insert the device driver CD-ROM into the CD-ROM drive. Select Search for the best driver for your device (Recommended) and click Browse to provide the appropriate path (e.g. D:\Win9xMe). Click Next. 3. Click Next, Windows will copy all the necessary files to your system.
4. Click Finish to complete the installation. 5. When Windows prompts you to restart your computer, click Yes.
In Windows 2000 1. In Found New Hardware Wizard, click Next. 2. In Install Hardware Device Drivers, select Search for a suitable driver for my device (recommended), click Next. 3. Insert the device driver CD-ROM into the CD-ROM drive. Select CD-ROM drivers and Specify a location, click Next.
4. Click Browse to provide the appropriate path (e.g. D:\Win2kXP). Click OK. 5. Click Next, Windows will copy all the necessary files to your system.
6. In Digital Signature Not Found window, click Yes to continue. 7. Click Finish to complete the installation. 8. Restart your computer.
In Windows XP 1. Once the device is well connected to your computer, Windows XP will automatically detect the new device. Select Install from a list or specific location (Advanced) and click Next. 2. Insert the device driver CD-ROM into the CD-ROM drive. Select Include this location in the search: and click Browse to provide the appropriate path (e.g. D:\Win2kXP). Click Next.
3. Click Continue Anyway to proceed. Windows will copy all the necessary files to your system. 4. Click Finish to complete the installation.
Verify To verify if the device exists in your computer and is enabled, go to Start Device System ( Hardware) Control Panel Settings Manager. Expand the Network adapters category. If the 802.11b Wireless PCI Card is listed here, it means that your device is properly installed and enabled.
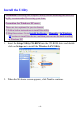
Network Connection Once the driver has been installed, you must make some changes to your network settings. In Windows 98/ME 1. 2. Go to Start Settings Control Panel Network. Make sure that you have all the following components installed. 802.
If any components are missing, click on the Add button to add them in. All the protocols and clients required and listed above are provided by Microsoft. 3. After clicking Add, highlight the component you need, click Add. 4. Highlight Microsoft, and then double click on the item you want to add. Click OK. 5. For making your computer visible on the network, enable the File and Print Sharing. 6. Click the Identification tab. Make up a name that is unique from the other computers' names on the network.
7. Click the Access Control tab. Make sure that “Share-level access control” is selected. If connecting to a Netware server, share level can be set to “User-level access control.” 8. When finished, restart your computer to activate the new device.
9. Once the computer has restarted and Windows has booted up, a Logon window will appear and require you to enter a username and password. Make up a username and password and click OK. Do not click the Cancel button, or you won’t be able to log onto the network. 10. Double-click the Network Neighborhood icon on the windows desktop, and you should see the names of the other PCs on the network. In Windows 2000/XP 1.
2. Make sure that you have all the following components installed. Client for Microsoft Networks NWLink NetBIOS NWLink IPX/SPX/NetBIOS Compatible Transport Protocol Internet Protocol (TCP/IP) 3. If any components are missing, click on the Install… button to select the Client/Service/Protocol required. After selecting the component you need, click Add… to add it in.
4. For making your computer visible on the network, make sure you have installed File and Printer Sharing for Microsoft Networks. 5. When finished, you must restart your computer to complete the installation.
Configuration Note: For Windows XP users, you have two options to configure the Wireless settings: 1) Use Manufacturer’s Configuration Utility Please go to Step 4 of Use Windows XP’s Wireless Configuration Utility section to disable the Windows XP's wireless configuration. 2) Use Windows XP's Wireless Configuration. Please go to Use Windows XP's Wireless Configuration Utility section to use the configuration.
Network Status Icon The Status Icon Icon Link Status Access Point mode. (Green) (Please refer to below table for the exact link quality) Peer-to-Peer mode. (White) No connection. (Red) Icon Signal Strength Excellent link quality. Good link quality. Fair link quality. Poor link quality.
Link Info The Link Info tab will display the current status of the Wireless Network Adapter. Item Description Status It displays the information about the status of the communication (the BSSID of the Access Point to which the card is associated). The SSID is the unique name shared among all points in your wireless network. The name must be identical for all devices and points attempting to connect to the same network. It shows the current SSID setting of the Wireless Network Adapter.
Configuration You can change advanced configuration settings, such as the SSID, Operation Mode, Tx Rate and Preamble Type. Item Description SSID SSID is the unique name shared among all points in your wireless network. It must be identical for all points in the network. It is case-sensitive and must not exceed 32 characters. Make sure that all points in the network are set the same. Operating Mode It displays the current operating mode. (Access Point or Peer-to -Peer).
Item Description Preamble A preamble is a signal used in wireless environment to synchronize the transmitting timing including Synchronization and Start frame delimiter. (Note: If you want to change the Preamble type into Long or Short, please check the setting of AP. Some Access Points do not support Auto Preamble.) Auto Select Auto for the Network adapter to select the Preamble type automatically depending on the Access Point Preamble type.
Item Description Data Encryption WEP is a data privacy mechanism based on a 64 Bit/128 Bit shared key algorithm. Check this box to enable WEP encryption. Auth. Mode The authentication mode defines configuration options for the sharing of wireless networks to verify identity and access privileges of roaming wireless network cards. You may choose between Open Authentication, Shared Authentication, and Auto.
Site Survey The Site Survey tab shows all the available Access Points and their features. Item Description SSID WEP It displays the current SSID setting of the Wireless Network Adapter. It displays the status of WEP Encryption. Channel It displays the selected channel that is currently used. Signal BSSID/IBSSID It displays the signal strength of the connection between the Wireless Network Adapter and the Access Point it connects.
About You can view basic information about the Utility like the Driver and Utility Version.
Use Windows XP’s Wireless Configuration Utility 1. Go to Start Control Panel Network Connections. 2. In Network Connections window, right-click the Wireless Network Connections icon, and select Properties. Note: Double-click the Wireless Network Connection icon and you can see the status of the Wireless PCI Card as described below. 3. In Wireless Network Connection Properties window, select the General tab. Click Configure to enable Windows configuration.
Property Description Antenna (Diversity, Antenna A or Antenna B): These settings determine which antenna will be used to transmit or receive. Channel Select the appropriate channel from the list provided to correspond with your network settings. All devices in the wireless LAN must be configured to share the same radio channel in order to work correctly. (There are 14 channels available, depends on the country.) Select (1, 2, 5.
Auto Long Preamble Select Auto for the Network adapter to select the Preamble type automatically depending on the Access Point Preamble type. If in a "noisy" network environment, the Preamble Type should be set to Long Preamble. Short Preamble The Short Preamble is intended for applications where minimum overhead and maximum performance is desired. If in a "noisy" network environment, the performance would be decreased. RTS Threshold This value should remain at its default setting of 2347.
Use Windows to configure… * Use Manufacturer’s Configuration Utility Note: If you want to use the manufacturer’s configuration utility to configure the wireless settings. Make sure the check box is NOT enabled (please refer to below figure), and then the Network Status icon will appear in the taskbar. You can open it by double-clicking the icon.
* Use Windows to configure Note: Right-click the Network Status icon in the taskbar, click Disable Utility. The Network Status icon in the taskbar will disappear, and then you can use Windows to configure the wireless settings. Available networks Displays all available networks. Configure Click the button to set up a new network or WEP configuration as illustrated as below. Refresh Click the button to refresh and search for all available networks.
Preferred networks From available network(s) listed above, you can select preferred one(s) in an order that you can arrange. The marked one is the currently used network. Move up Move the selected network forward one position. Move down Move the selected network back one position Add… Click the button and the Wireless Network Properties window will appear. In the Network name field, enter your desired network name listed in the above Available networks box, and click OK.
Uninstallation In case you need to uninstall the Utility or device, please refer to below sections. Uninstall the Manufacturer’s Configuration Utility 1. Go to Start Programs Wireless LAN Utility. Wireless LAN Utility Uninstall 2. Click OK to continue. 3. This step is only for Windows XP users: Make sure the Wireless LAN Utility is closed prior to clicking Yes.
(To close the Wireless LAN Utility: right-click the Network Status icon in the taskbar, and then click Exit.) 4. Select Yes, I want to restart my computer now, and then click Finish to complete the uninstalled procedure. Uninstall the device 1. 2. Right-click My Computer → Properties → Hardware → Device Manager. Right-click 802.11b Wireless PCI Card then click Uninstall (or Remove).
3. Click OK. 4. The system will prompt you to restart your computer. Click Yes.
Specifications Standard IEEE 802.11b, Wi-Fi compliant Host Interface PCI 2.2 Antenna Dipole Antenna LED Indicators Frequency Range Number of Selectable Channels LINK: Green (ON) ACT: Green (Blink) 2.412GHz-2.4835GHz USA, Canada: 11 channels Europe: 13 channels Japan: 14 channels Data rate 1/2/5.
Supported OS EMC Certification Windows 98 Windows ME Windows 2000 Windows XP FCC Part 15 in US EN300328 and EN300826 (EN301489-17) in Europe - 44 -