802.
REGULATORY STATEMENTS FCC Certification The United States Federal Communication Commission (FCC) and the Canadian Department of Communications have established certain rules governing the use of electronic equipment. Part15, Class B Warning: Changes or modifications to this unit not expressly approved by the party responsible for compliance could void the user authority to operate the equipment. This device complies with Part 15 of FCC rules.
Table of Contents INTRODUCTION ...................................................................................................1 WIRELESS NETWORK OPTIONS ...............................................................................1 The Peer-to-Peer Network .........................................................................1 The Access Point Network ........................................................................2 INSTALLATION ..............................................................
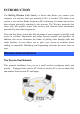
INTRODUCTION The 802.11g Wireless LAN Card is a device that allows you connect your computer to a wireless local area network (LAN). A wireless LAN allows your system to use wireless Radio Frequency (RF) technology to transmit and receive data without physically attaching to the network. The Wireless protocols that come with this product ensure data security and isolation from interference generated by other radio frequencies.
You can also use one computer as an Internet Server to connect to a wired global network and share files and information with other computers via a wireless LAN. The Access Point Network The network installation allows you to share files, printers, and Internet access much more conveniently. With Wireless LAN Cards, you can connect wireless LAN to a wired global network via an Access Point.
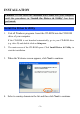
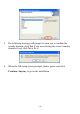
INSTALLATION Caution: Do not insert the Wireless LAN Card into your computer until the procedures in “Install the Driver & Utility” has been performed. Install the Driver & Utility 1. Exit all Windows programs. Insert the CD-ROM into the CD-ROM drive of your computer. If the CD-ROM is not launched automatically, go to your CD-ROM drive (e.g. drive D) and double-click on Setup.exe. 2. The main screen of the CD-ROM opens. Click Install Driver & Utility to start the installation. 3.
5. The following message will prompt to warn you to confirm the country domain, click Yes if you are selecting the correct country domain, if not, click No to fix it. 6. When the following screen prompts, please ignore and click Continue Anyway to go on the installation.
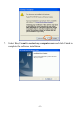
7. Select Yes, I want to restart my computer now and click Finish to complete the software installation.
Install the device Note: Make sure the procedures in “Install the Driver & Utility” has been performed. 1. Make sure the computer is turned off. Remove the expansion slot cover from the computer. 2. Carefully slide the Wireless PCI Card into the PCI slot. Push evenly and slowly and ensure it is properly seated, you may have to use the mounting screw to have the card screwed securely in place. 3. After the device has been connected to your computer, turn on your computer.
-7-
NETWORK CONNECTION Once the driver has been installed, you will need to make adjustments to your network settings. In Windows 98/ME 1. 2. Go to Start Settings Control Panel Network. Make sure that you have all the following components installed.
If any components are missing, click on the Add button to install them. All of the protocols and clients required (listed above) are provided by Microsoft. 3. Next, highlight the specific network component you need, click Add. 4. Highlight Microsoft, and then double click on the item you want to add. Click OK. After returning to the Network screen, you can make your computer is visible on the network by enabling the File and Print Sharing. 5. Click the Identification tab.
6. Click the Access Control tab. Make sure that “Share-level access control” is selected. If connecting to a Netware server, share level can be set to “User-level access control.
7. When finished, restart your computer to activate the new device. 8. Once the computer has been rebooted, a Logon window will appear and will require you to enter a username and password. Enter a username and password and click OK. Do not click the Cancel button, or you won’t be able to log onto the network. 9. Double-click the Network Neighborhood icon on the windows desktop, and you should see the names of the other PCs on the network. In Windows 2000/XP 1.
2. Make sure that you have all the following components installed. Client for Microsoft Networks NWLink NetBIOS NWLink IPX/SPX/NetBIOS Compatible Transport Protocol Internet Protocol (TCP/IP) If any components are missing, click on the Install… button to select the Client/Service/Protocol required. After selecting the component you need, click Add… to install.
Select the network protocol you wish to add and click OK. This will return you to the Local Area Connections Properties window. To allow your computer to be visible on the network, make sure you have checked off the File and Printer Sharing for Microsoft Networks. When finished, you must restart your computer to complete the installation.
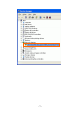
CONFIGURATION After successful installation of the Wireless LAN Card’s driver, the utility icon will display in the task bar. You will be able to access the Configuration Utility through the Network Status icon. If the icon doesn’t appear automatically, go to Start Programs 802.11g Wireless LAN Driver and Utility Wireless Network Configuration Utility, it will appear in the task bar.
Easy Config 1. In the Main tab, click Easy Config on the right down corner to start quick configuration. 2. Select the wireless connection type, either Infrastructure or Ad-Hoc. Click Next to continue.
3. Select a wireless station on the list, and click Next to configure its settings. The following screen will appear for you to configure, for detailed configuration, please refer to Profile Manager tab in the later selection.
4. Configure the network TCP/IP, you may select DHCP to obtain an IP address automatically or select Manual to set an IP address. Click Next to continue. 5. Select DNS Auto to obtain DNS automatically or select Manual to set the primary and secondary DNS. Click Finish to complete the Easy Config procedure.
Main Tab The main tab enables you to scan for available networks, select a network to which to connect, modify the settings for the current connection, or set up your station for Ad Hoc connection. Status Shows the current connection status. Speed Shows the connection speed. Type Shows the wireless connection type. Authentication Shows the authentication type. Encryption Shows the encryption type.
SSID The SSID is the unique name shared among all points in your wireless network. The name must be identical for all devices and points attempting to connect to the same network. Signal Strength The signal strength from the network Access Point or station. The strength is displayed in three formats: a signal quality level (one of five levels, from Bad to Best), a numerical value in dBm, and a signal quality bar graph with a scale of –82 to –10. Link Quality Shows the link quality percentage.
On Windows XP systems, the ZCU service is automatically stopped when the WLAN utility is installed. The ZCU is started when you check the Configure using Windows Zero Configuration checkbox. The checkbox is only displayed on Windows XP systems. Disable Adapter Place a check in the check box to disable this wireless adapter. OK Click OK to save your settings. Cancel Click Cancel to discard changes. Apply Click Apply to save any changes to profiles and connection settings.
Connect Select a wireless device that you want to connect with and click Connect to make a connection. The wireless device you have connected will be added into the Available Profile(s) field below. Rescan Click Rescan to refresh the wireless device list. Configure Click Configure to set up the detailed configuration. Add Click Add to add a wireless device into the Available Profile(s) field below.
The following configuration screen will appear if you just click Connect, Configure or Add buttons. Profile Name You may enter the preferred profile name in this column. Network Name (SSID) The SSID for the current profile. Ad Hoc Ad Hoc Place a check in the check box to enable the Ad Hoc function.
computers to communicate directly with each other. No access point is used. Note: Infrastructure: The infrastructure allows wireless and wired networks to communicate through an access point. Channel Select the channel (Channel 1-11) from the pull-down list. Wireless Network Security Network Authentication The authentication type defines configuration options for the sharing of wireless networks to verify identity and access privileges of roaming wireless network cards.
Passphrase of your wireless network. Key Length Select the key length from the pull-down menu, either 64Bit or 128 Bit. If you are using 64-bit WEP encryption, then the key must consist of exactly ten hexadecimal characters. If you are using 128-bit WEP encryption, then the key must consist of exactly 26 he xadecimal characters. Valid hexadecimal characters are “0” to “9” and “A” to “F”. Default Key Index Select the default key index from the pull-down menu.
Username Enter the username in this column. Identity Enter the identity in this column. Password Enter the password in this column. Certificate Place a check in the check box and then select the certificate from the pull-down menu. OK Click OK to save the configuration. Cancel Click Cancel to exit the configuration screen. Information Tab The Information tab displays information maintained by the driver, such as the number of packet errors and the total number of bytes received or transmitted.
About Tab Click on the About tab to view basic version information about the OS Version, Utility Version, Driver Version, Firmware Version and EEPROM Version.
UNINSTALLATION In case you need to uninstall the Utility and driver, please refer to below steps. (As you uninstall the utility, the driver will be uninstalled as well.) 1. Go to Start and Utility (All) Programs Uninstall. 802.11g Wireless LAN Driver 2. Click OK to continue. 3. Click Finish to complete the uninstalled procedure.