REGULATORY STATEMENTS FCC Certification The United States Federal Communication Commission (FCC) and the Canadian Department of Communications have established certain rules governing the use of electronic equipment. Part15, Class B Wireless USB Adapter User Manual This device complies with Part 15 of FCC rules.
CAUTION: 1) To comply with FCC RF exposurecompliance requirements, a separation distance of at least 20 cm must be maintained between the antenna of this device and all persons. 2) This Transmitter must not be co-located or operating in conjunction with any other antenna or transmitter Table of Contents INTRODUCTION ............................................. 1 FEATURES ........................................................ 2 LED INDICATORS.............................................
CLIENT SETUP FOR WINDOWS 2000 AND XP . 23 Connecting to a Windows NT Domain ........................................................... 23 Connecting to a NetWare File Server 24 Introduction A wireless LAN links network users to LAN services without the hassle of cabling or wiring, which significantly brings mobile workers the CONFIGURATION AND MONITOR freedom of staying connected to the network UTILITY FOR WINDOWS 98/ME/2000...... 26 while roaming around a building or multiple STATUS ................
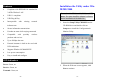
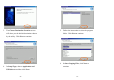
Features • Compliant with IEEE802.11b standard for 2.4GHz Wireless LAN • USB 1.1 compliant • USB Plug & Play • Interoperable Installation the Utility under Win 98/ME/2000 Precaution for Windows 98, 2000, and ME users: You must install the Adapter's software before installation of the hardware. with existing network 1. Insert the Setup Utility CD-ROM into the infrastructure CD-ROM drive and double click on • Secure information transmission Setup.
3. The Choose Destination Location screen 5. will show you the default destination chosen Follow the instruction to select the program folder. Click Next to continue. by the utility. Click Next to continue. 6. 4. In Setup Type, choose Application and In Start Copying Files, click Next to continue. USB drivers and then click Next.
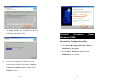
7. In Setup Status, the InstallShield Wizard will begin copying the files. Uninstall Procedure Windows 98/ME Under Uninstall the Configuration Utility 1. Go to Start → Settings → Control Panel → Add/Remove Program. 2. Select 802.11 Wireless LAN then click Add/Remove to continue. 8. After the Configuration Utility has been successfully installed, select Yes, I want to restart my computer now, and then click Finish to restart.
2. Select Wireless USB Adapter then click Remove. Click OK. Uninstall the Device 1. Go to Start → Settings → Control Panel → 3. Network. The system will prompt you to restart your computer. Click Yes.
Uninstall Procedure Under 3. Windows 2000 1. Go to Start In Choose a Hardware Task, select Uninstall/Unplug a device and click Next to → Control Panel continue. → Add/Remove Hardware. 4. 2. When the Welcome screen appears, click In Choose a Removal Task, select Uninstall a device and click Next. Next to continue.
5. Check the Show hidden devices check box and locate the device in the device list. Select 7. Click Finish to complete the uninstalled procedure. the device and click Next. 6. Select Yes, I want to uninstall this device and click Next.
Hardware Installation Precaution for Windows 98, 2000, and ME users: Please do NOT install the hardware until the Application setup in Installation the Installation of the USB Adapter for Win XP 1. Once the device is well connected to your computer, Windows XP will automatically Utility under Win98/ME/2000 has been completed. detect the new device. Click Install from a list… and click Next. 1. Plug the USB's square end (Type B) into the adapter's USB port. 2.
3. Click Continue Anyway to proceed. 4. Click Finish to complete the Utility installation.
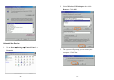
Network Connection Configuring the Network Protocols for Windows 98/ME 1. Once the driver has been installed, you must make some changes to your network settings. Click Start Settings Control Panel Network. Wireless USB Adapter NetBEUI TCP/IP 2. Make sure that you have all the following If any components are missing, click on the Add components installed. button to add them in. All the protocols and clients required and listed above are provided by Microsoft. 3.
4. Highlight Microsoft, and then double click on the item you want to add. 7. Click the Access Control tab. that 5. 6. “Shared-level access Make sure control” is For making your computer visible on the selected. network, enable the File and Printer share level can be set to “User-level access Sharing. control.” Click the Identification tab. If connecting to a Netware server, Make up a name that is unique from the other computers' names on the network.
10. Double-click the Network Neighbourhood icon on the windows desktop, and you should see the names of the other PCs on the network. Client Setup for Windows 2000 and XP If you are not using NT or Novell with Windows, skip the next two sections. Perform the following procedures to prepare your computer to be used with any file servers that may be on the network. 8. 9. When finished, reboot your computer to activate the new device.
2. Change the Network Logon to Client for NetWare Network. 3. Double-click the Client for Microsoft networks. 4. Select the Log on to Windows NT domain 3. box. Put your NT domain name in the 1. Client NetWare Logon Script Processing box. 4. Click OK and restart your computer. Click Start Settings Control Panel. Double-click Network. - 24 - for Preferred Server box. Click in the Enable Click OK and restart your computer. Connecting to a NetWare File Server the networks.
Configuration and Monitor Utility for Windows 98/ME/2000 After installing the device successfully, go to Start Programs Icon Status Mode Infrastructure mode 802.11 Wireless LAN Icon Link Status Red. The station is not associated to an Access Point. Blue. The associates itself Access Point. Configuration and Monitor Utility. Ad-Hoc mode station to an Red. The color is red only when the card is during resetting and initialization procedure. Blue.
All settings are categorized into 6 tabs: Status Item Description Statistics Operating Mode It displays the current operational mode. (Ad-Hoc or Infrastructure) Channel It shows the selected channel that is currently used. (from 1 ~ 11) SSID Version The SSID is the unique name shared among all points in your wireless network. The name must be identical for all devices and points attempting to connect to the same network. Status It shows the current SSID setting of the Wireless USB Adapter.
Item Description Change Change Click to change the configuration parameters such as Operating Mode, Channel, SSID and Tx Rate. (Refer to below page) Submit Click Submit to save the changes. Cancel Click Cancel to ignore the previous setting. - 30 - Statistics This option shows you to view the available statistic information (Data packets, Management Packets and Rejected packets). Press the Reset button to renew or update this list of statistics.
Item Site Survey The Site Survey tab shows all the available Access Points and their features. Item Description BSSID When one Access Point (AP) is connected to wired network and a set of wireless stations it is referred to as a Basic Service Set (BSS). Computers in a BSS must be configured with the same BSS ID. SSID The SSID is the unique name shared among all points in your wireless network.
Key1/Key2/ Encryption Key3/Key4 WEP (Wired Equivalent Privacy) encryption can be used to ensure the security of your wireless network. This setting is the configuration key used in accessing the wireless network via WEP encryption. To generate an encryption key: 1. Select 64 Bit or 128 Bit. 2. Click "Key1" or "Key2" or "Key3" or "key4" item, then fill in the appropriate value/phrase. Default Key You can specify up to 4 different keys to decrypt wireless data.
authentication, then the wireless adapter will need to be set to the same authentication type. Shared Key: Shared Key is when both the sender and the recipient share a secret key. Advanced You can change advanced configuration settings, such as the Preamble Type, Fragmentation Threshold and RTS/CTS Threshold. Auto: Select Auto for the USB adapter to select the Authentication type automatically depending on the Access Point Authentication type. Submit Click Submit to save the changes.
interoperation with the current 1Mbits/sec and 2Mbit/sec DSS (Direct Sequence Spread Spectrum) specification. Short: The optional "Short preamble and header" is intended for applications where maximum throughput is desired and interoperability with legacy and non-short preamble capable equipment is not a consideration. Version You can view basic information about the Utility like the Driver, Firmware and Application Version. Use the Exit button to exit the application.
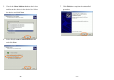
Configuration for Windows XP 1. Go to Start Control Panel Network Connections. 2. In Network right-click the Connections Wireless window, Network Connections icon, and select Properties. 3. In Wireless Network Connection Properties window, select the Wireless Networks tab. Note: Double-click the Wireless Network Connection icon and you can see the status of the wireless PC Card as described below.
Configure Click the button to set up a new network or WEP configuration as illustrated as below. Use Windows to configure… Check the box to enable windows configuration. Note: Once you enable windows configuration, there will be only two tabs, Status and About, left in the Configuration Utility. You cannot use this utility to configure the wireless settings. Available networks Refresh Click the button to refresh and search for all available networks. Preferred networks Displays all available networks.
From available network(s) listed above, you can Properties select preferred one(s) in an order that you can Highlight the network listed in the above arrange. Preferred networks box, and click the button to The marked one is the currently used network. display its properties. Move up Move the selected network forward one position. Once network configuration is done, make sure to Move down click OK.
2. Firmware Upgrade Utility Press the "Upgrade" button in order for a file selection window to appear. Browse for the Note: Please DO NOT use this utility unless you have got new binary files from the vendor. Otherwise, you may damage your xxx.rom file that contains the new firmware. card. The Firmware Upgrade Utility allows you to upgrade the firmware of your card while your card is running.
Specifications Standards Media Access CSMA/CA (Collision Avoidance) Protocol with ACK IEEE 802.11b, Wi-Fi compliant Supported OS Windows 98/ ME/ 2000/XP Host Interface USB 1.1 Weight: 50 g Physical Antenna Dimension: 110(L) x 60 (W) x 2.