802.
REGULATORY STATEMENTS FCC Certification The United States Federal Communication Commission (FCC) and the Canadian Department of Communications have established certain rules governing the use of electronic equipment. Part15, Class B This device complies with Part 15 of FCC rules. Operation is subject to the following two conditions: 1) This device may not cause harmful interface, and 2) This device must accept any interface received, including interface that may cause undesired operation.
and best performance. In the USA and Canada, 11 channel are available. If using multiple Access Points, it is better if adjacent Access Points use different Channels to reduce interference. • In "Infrastructure" mode, Wireless Stations normally scan all Channels, looking for an Access Point. If more than one Access Point can be used, the one with the strongest signal is used. (This can only happen within an ESS.
Table of Contents INTRODUCTION ....................................................................................................1 FEATURES..............................................................................................................1 LED INDICATORS................................................................................................... WIRELESS BASICS .................................................................................................. W IRELESS NETWORK OPTIONS...
BASIC OPERATION................................................................................................. SETTING UP A WIRELESS INFRASTRUCTURE NETWORK SETTING UP A WIRELESS A D-HOC (PEER-T O-PEER) NETWORK ..................... UNINSTALLATION.................................................................................................. UNINSTALL THE UTILITY...................................................................................... UNINSTALL THE DRIVER...................................
I N T RODU CT I ON The 802.11g Wireless LAN USB Adapter is designed for a USB type A port of a laptop or desktop computer for creating a wireless workstation. This 802.11g Wireless LAN USB Adapter is USB 2.0 compliant which connects to any available USB port on a notebook or desktop computer. The 802.11g Wireless LAN USB Adapter complies with IEEE 802.11g standard that offers a data rate up to 54Mbps in a wireless LAN environment.
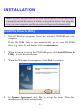
I N ST ALLAT I ON Note: For users who purchased the auto-install model, it is not necessary to manually install the driver & utility as described below. Just plug the device to your computer and the program will proceed automatically. Install the Driver & Utility 1. Exit all Windows programs. Insert the included CD-ROM into your computer. If the CD-ROM fails to run automatically, go to your CD-ROM drive (e.g. drive D) and double-click on autorun.exe. 2.
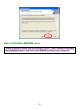
Note for Windows 98SE/ME users When Windows finish the installation, select “Yes, I want to restart my computer now.” and then click Finish to reboot your computer.
Install the Device Note: For the auto-install model users, before you plug the Wireless USB Adapter into your PC’s USB port, please make sure to turn the switch right to have the program automatically proceed. Switch right to turn on the auto-installation. 1. 2. Once the device has been inserted to your computer, Windows will detect the new hardware. Refer to the following section according to your operating system for important notice. Note for Windows 98SE users: 1.
Note for Windows ME users: After installing the device, the system will finish the process of the installation automatically.
Note for Windows 2000 users: When the “Digital Signature Not Found” screen appears, click “Yes” to continue. Note for Windows XP users: 1. Select Install the software automatically (Recommended) and click Next.
2. Click Continue Anyway. 3. Click Finish to complete the installation.
Verify To verify if the device exists in your computer and is enabled, go to Start à Settings à Control Panel à Syste m (à Hardware) à Device Manager. Expand the Network Adapters category. If the USB 2.0 Wireless Network Adapter is listed here, it means that your device is properly installed and enabled.
N ET WORK CON N ECT I ON Once the device driver is well installed, a network setting described in the following should be also established. In Windows 98SE/ME 1. 2. Go to Start à Settings à Control Panel à Network. Make sure that the following components are installed. § USB 2.
If any components are missing, click on the Add button to add them in. All the protocols and clients required and listed above are provided by Microsoft. 3. After clicking Add, highlight the component you need, click Add. 4. Highlight Microsoft, and then double click on the item you want to add. Click OK. 5. For making your computer visible on the network, enable the File and Print Sharing.
6. Click the Identification tab. Make up a name that is unique from the other computers' names on the network. Type the name of your workgroup, which should be the same used by all of the other PCs on the network. 7. Click the Access Control tab. Make sure that “Share-level access control” is selected. If connecting to a Netware server, share level can be set to “User-level access control.
8. When finished, restart your computer to activate the new device. 9. Once the computer has restarted and Windows has booted up, a Logon window will appear and require you to enter a username and password. Make up a username and password and click OK. Do not click the Cancel button, or you won’ t be able to log onto the network. 10. Double-click the Network Neighborhood icon on the windows desktop, and you should see the names of the other PCs on the network.
In Windows 2000/XP 1. (In Windows 2000) Go to Startà Settings à Control Panel à Network and Dial-up Connections à Local Area Connection à Properties. (In Windows XP) Go to Start à Control Panel à Network Connections à Wireless Network Connection Enabled USB Wireless Network Adapter à Properties.
2. Make sure that you have all the following components installed. § Client for Microsoft Networks § File and Printer Sharing for Microsoft Networks § Internet Protocol (TCP/IP) 3. If any components are missing, click on the Install… button to select the Client/Service/Protocol required. After selecting the component you need, click Add… to add it in.
4. 5. For making your computer visible on the network, make sure you have installed File and Printer Sharing for Microsoft Networks. When finished, restart your computer to complete the installation.
IP Address Note: When assigning IP Addresses to the computers on the network, remember to have the IP address for each computer set on the same subnet mask. If your Broadband Router use DHCP technology, however, it won’t be necessary for you to assign Static IP Address for your computer. To configure a dynamic IP address (i.e. if your broadband Router has the DHCP technology), check the Obtain an IP Address Automatically option.