Steam Iron User guide Model No: GSI101R For Customer Services & Spare Parts please call 0845 209 7461 Opening times: Monday - Friday 8am – 6pm & Saturday 9am – 1pm Or visit us at www.productcareuk.
Contents Page Safety Instructions …………………………….…. 3 Steam Iron Overview ………………………………… 6 Before Use ………………………………… 7 Using Your Steam Iron ………………………………… 8 Cleaning and Maintenance ………………………………… 15 Guarantee ………………………………… 16 Customer Support ………………………………… 17 Connection to the Mains Supply ………………………………… 18 Thank you for purchasing your Abode Steam Iron. To get the best from your new iron, take a few moments to read these instructions, and keep them in a safe place for future reference.
Safety Instructions IMPORTANT SAFETY INSTRUCTIONS READ CAREFULLY AND KEEP FOR FUTURE REFERENCE WARNING: When using the electrical appliance, the below basic safety precautions should be followed: • Read all instructions. • The appliance must not be left unattended while it is connected to the mains supply. • Do not touch hot surfaces. Use the handle or the switch. • To protect against electrical shock do not immerse cord, plug, or appliance in water or other liquid.
Safety Instructions • Never remove parts from the appliance, such as the feet, screws and so on. • Avoid contact with steam from the Steam Iron while in use or just after it has switched off. • Never overfill the Steam Iron. If overfilled, water may leak. Always take care to pour the water slowly and carefully when filling. • This product is only intended for ironing fabrics. • Do not operate this appliance for anything other than its intended use. • This product is intended for household use only.
Safety Instructions • This appliance is not intended for use by persons (including children) with reduced physical, sensory or mental capabilities, or lack of experience and knowledge, unless they have been given supervision or instruction concerning use of the appliance by a person responsible for their safety. Children should be supervised to make sure that they do not play with the appliance. • Always disconnect iron from electrical outlet when filling with water or emptying and when not in use.
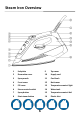
Steam Iron Overview 1 Soleplate 9 Top cover 2 Decorative cover 10 Supply cord 3 Spray nozzle 11 Cord bush 4 Front cover 12 Back cover 5 Fill cover 13 Temperature control light 6 Steam control switch 14 Water tank 7 Spray button 15 Temperature control dial 8 Shot-steam button 16 Plastic skirt 6
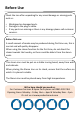
Before Use Check the iron after unpacking for any visual damage or missing parts such as: • • • Misaligned or damaged parts. Damage to the plug or cable. If any parts are missing or there is any damage please call customer services. Before first use: A small amount of smoke may be produced during first time use, this is normal and will quickly disappear. When using the steam function for the first time, do not direct the steam towards the laundry, as there could be debris from the steam vents.
Using Your Steam Iron ANTI-CALC SYSTEM A special resin filter inside the water reservoir softens the water and prevents scale build-up in the plate. The resin filter is permanent and does not need replacing. Please note: Use tap water only. Distilled and/demineralised water makes the “Zero-Calc” anti-calc system ineffective by altering its physicochemical characteristics. Do not use chemical additives, scented substances or decalcifiers.
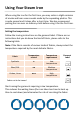
Using Your Steam Iron When using the iron for the first time, you may notice a slight emission of smoke and hear some sounds made by the expanding plastics. This is quite normal and it stops after a short time. We also recommend passing the iron over an ordinary cloth before using it for the first time. Setting the temperature Follow the ironing instructions on the garment label. If there are no instructions but you do know the kind of fabric, please refer to the following table.
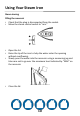
Using Your Steam Iron Steam ironing Filling the reservoir • • Check that the plug is disconnected from the socket. Move the steam control switch to “min.” • • Open the lid. Raise the tip of the iron to help the water enter the opening without overflowing. Slowly pour the water into the reservoir using a measuring jug and take care not to go over the maximum level indicated by “MAX” on the reservoir. • • Close the lid.
Using Your Steam Iron Steam ironing Selecting the temperature • • • Put the iron in a vertical position. Put the plug in the socket. Adjust the temperature dial according to the international symbol on the garment label. • The plate temperature control light indicates that the iron is heating up. Wait until the plate temperature control light goes off before ironing.
Using Your Steam Iron Selecting the steam The quantity of steam is regulated by the steam control switch. Move the steam selector to a position between minimum and maximum depending on the quantity of steam required and the temperature selected. Warning: The iron gives off steam continuously only if you hold the iron horizontally. You can stop the continuous steam by placing the iron in a vertical position or by moving the steam selector to “min”.
Using Your Steam Iron Dry ironing To iron without steam, follow the instructions in section “steam ironing”, leaving the steam control switch on “min”. Spraying Note: For delicate fabrics, we recommend moistening the fabric beforehand using the spray function, or putting a damp cloth between the iron and the fabric. To avoid staining, do not use the spray on silk or synthetic fabrics.
Using Your Steam Iron Ironing Tips • • • • • • • • • • It is recommended to use the lowest temperatures with fabrics that have unusual finishes (sequins, embroidery, flush, etc.) If the fabric is mixed (e.g. 40% cotton 60% synthetics), set the thermostat to the temperature of the fibre requiring the lower temperature. If you don’t know the composition of the fabric, determine the suitable temperature by testing on a hidden corner of the garment.
Cleaning and Maintenance Storing After using, lift the iron with the filling hole downwards to empty the remaining water from the water tank. Insert the plug into the socket, and set the temperature control dial to ‘maximum’ for 1-2 minutes to evaporate the remaining water, and then unplug the iron and let it cool down before storing. WARNING: Electrical Shock Hazard. Do not immerse cord, plug or appliance in any liquid or allow moisture to come into contact with electrical parts.
Guarantee This product is guaranteed for 12 months from the date of the original purchase. If any defect arises due to faulty materials or workmanship the faulty product must be returned to the place of purchase. Refund or replacement is at the discretion of the retailer. The following conditions apply: • The product must be returned to the retailer with the original proof of purchase.
Customer Support You can attach your receipt to this page for proof of purchase. We’re here should you need us For Customer Services & Spare Parts please call 0845 209 7461 Opening times: Monday - Friday 8am – 6pm & Saturday 9am – 1pm Or visit us at www.productcareuk.com Produced for: Asda stores Ltd. Leeds LS11 5AD Disposal information This symbol is known as the 'Crossed-out wheelie bin Symbol'.
Connection to the Mains Supply WARNING- THIS APPLIANCE MUST BE EARTHED This appliance is designed to operate from a mains supply of AC230V 240V ~ 50/60HZ. Check that the voltage marked on the product corresponds with your supply voltage. This product is fitted with a 13A plug complying with BS1363.
Connection to the Mains Supply For UK use only – Plug fitting details (where applicable): As the colours of the wires in the mains lead of this appliance may not correspond with the coloured markings identifying the terminals in your plug, proceed as follows: The GREEN/YELLOW wire is the EARTH and must be connected to the terminal which is marked with the letter E or by the earth symbol or coloured GREEN or GREEN/YELLOW.
Model number: GSI101R Site code: 15A.09.14.