
Installation Instructions


1/4"
1-1/2"
weather-resistant barrier
3/4"
3/4"
weather-resistant barrier
splice
1"
1"
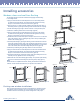
Outside corner
splicing detail
Inside corner
splicing detail
Starter trim installation
Starter trim at corners
Starter trim and outside corner post
Starter trim and inside corner post
Installing accessories
Before the siding itself can be hung, a number of accessories must be installed first, including starter strips,
corner posts, window flashing, trim, and J-channels over the roof lines.
Starter trim
● In order for the siding to be installed properly in a level fashion, the starter strip at the bottom
of the wall must be level.
● Determine the lowest point of the wall that will be sided; from that point, measure up 1/4” less
than the width of the starter trim and partially drive a nail at one corner.
● Attach a chalkline; go to the next corner and pull the line taut.
● Make sure the line is level by using a line level or a 4’ level.
● Snap the chalkline and repeat the procedure around the entire house.
● Optional method to determining the position of the starter trim in new construction and some
residing applications: Measure down from the soffit at one corner of the house to the top of
the foundation and subtract 1/4” less than the width of the starter strip. Make a mark on the
wall and record the measurement. Transfer the measurement to the other corner of the wall.
Snap a chalk line in between the corners at the marks. Repeat the procedure around the
entire house.
● Using the chalkline as a guide, install the top edge of the starter strip along the bottom of the
chalkline, nailing at 10” intervals. Allow space for the corner posts, J-channels, etc.
● Keep the ends of starter trims at least 1/4” apart to allow for expansion
● Nail in the center of the starter strip nailing slots.
Notes:
When using insulation/backerboard, fur the starter trim, if necessary, to accommodate thickness.
For a vertical siding starter strip, see vertical siding section. In certain situations, it may be nec-
essary to use J-channel as a starter strip; remember to drill minimum 1/8” diameter weep holes
no more than 24” apart.
Outside and inside corner posts
● A water resistant material should be used to flash the inside and outside corners a
minimum of 10” on each side before installation of the corner.
● Place the corner post in position, allowing a 1/4” gap between the top of the post and
the eave or soffit.
● Position a nail at the top of the upper slot on both sides of the corner post, leaving a
1/32” gap between the nail heads and the corner posts. The corner post hangs from
these nails.
● The balance of the nailing should be in the center of the slot, 8” to 12” apart, again
leaving 1/32” between the nail head and the corner post. This allows for the expansion
and contraction to occur at the bottom.
● The corner post should extend 3/4” below the starter strip. Make sure the posts are
plumb (i.e., vertically straight).
● If more than one length of corner post is
required, overlap the upper piece over the
lower piece by cutting away 1” of the nailing
flange on the top piece. Overlap 3/4”, allowing
1/4” for expansion. This method will produce
a visible joint between the two posts, but will
allow water to flow over the joint, reducing the
chance of water infiltration
.
Installing Accessories 1