
Installation Instructions


j-channel with
mitered corner
weather-resistant
barrier
completed
corner
insert rain tab
into notch
3/4" tab
remove 3/4"
deep section
of receiving pocket
remove corner
at 45° angle
rain tab
complete
d
corner
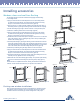
Corner detail A - Square corner
Corner detail B - Mitered corner
J-channel
weather proof barrier
roof flashing J-channel
1/2”
mi
n gap
Window detail
Installation over roof line
Installation in a gable
Installing accessories
J-channel installation
J-channel is used around windows and doors to receive the siding.
Follow the steps below when applying trim.
● Cut and bend the tab of the top piece of J-channel down to provide flashing over
the side J-channel.
● Fold the bottom end of the side piece of J-channel inward at the bottom of the win-
dow, to fit over the existing J-channel to prevent water from entering under the sill.
● Cut the side J-channel members longer than the height of the window or door, and
notch the channel at the top.
● Miter cut the free flange at a 45° angle and bend the tab down to provide flashing
over the side members. A similar miter and tab may be provided at the bottom of
the window, depending on the sill’s condition. The J-channel should fit snug to the
window.
● To trim the bottom of windows, and at the eave, J-channel can be used with the
undersill molding inside the J-channel. The J-channel and undersill combination will
secure the cut siding panel and help to keep the alignment straight. Dual undersill
molding combines both functions into one part. Cut and secure dual undersill simi-
larly to using J-channels.
J-channel over roof lines
Install the flashing before the J-channel to prevent water infiltration along the
intersection of a roof and wall.
● Keep the J-channel approximately 1/2” from the roof line. Chalk a straight line up
the roof flashing to guide J-channel installation. Tip: You can use another J-channel
laid over the shingles as a spacer to create the straight line desired.
● Overlap the J-channel (lapping the upper piece over the lower piece) if it is
necessary to use more than one piece.
● Extend the J-channel past the edge of the roof, channeling water into the gutter,
in order to ensure proper runoff.
● With dark shingles, or a south or west exposure, it is recommended to either use a
metal J-channel or to install the vinyl J-channel as far away from the roofing as is
aesthetically acceptable, having first ensured that there is sufficient flashing behind
the J-channel to prevent water infiltration.
● Fasten the nail, screw, or staple that is closest to the roof line at the far end of the
nail hem slot, to ensure that siding will expand away from the J-channel.
Note:
Vinyl J-channels should not be in direct contact with roofing shingles, since the
shingles may transfer enough heat to the vinyl J-channel to cause its distortion.
J-channel installation in a gable
Before applying siding to the gables, the J-channel should be installed to receive
the siding at the gable ends:
● Where the left and right sections meet at the gable peak, let one of the sections
butt into the peak with the other section overlapping.
● A miter cut should be made on the face flange of this piece for better appearance.
● Fasten the J-channel every 8” to 12”.
● If more than one length of J-channel is
required to span a wall surface, be sure
to overlap the J-channels by 3/4”.
Installing Accessories 3