
Installation Instructions


snap into starter trim
and slide into accessory
receiving pocket
weather-resistant barrier
1/4"
factory notches
1"
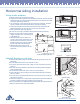
Installing the first panel
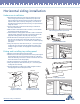
Siding panel overlap
J-channel detail
Triming pieces for faucet
Horizontal siding installation
Installing panels
● The first course (row of panels) should be placed in the starter trim
and securely locked along the entire length of the siding panel. Make
sure the panel is securely locked before fastening.
● Fasten the panels in the center of the nailing slots. Allowance should
be made for expansion and contraction by leaving a 1/4” gap between
the siding and all corner posts and channels (increase to 3/8” when
installing in temperatures below 40° F. If the panels are 20 feet or
longer, increase the gap to 3/8”.
● Do not drive the head of the fastener tightly against the nail slot.
Leave 1/32” between the fastener head and the vinyl (about the
thickness of a dime).
● Do not force the panels up or down when fastening. Panel locks
should be fully engaged; however, the panels should not be under
vertical tension or compression when they are fastened.
● Since vinyl siding moves as the temperature changes, make certain
that the vinyl panels can move freely in a side-to-side direction once
fastened.
● Check every fifth or sixth course for horizontal alignment. Also check
siding alignment with adjoining walls.
● When panels overlap, make sure they overlap by one half the length of the
notch at the end of the panel, or approximately 1”.
● Stagger the siding end laps so that no two courses (rows of panels) are aligned
vertically, unless separated by at least three courses (rows of panels).
● Always overlap joints away from entrances and away from the point of greatest
traffic. This will improve the overall appearance of the installation.
Fitting siding around fixtures
Use a commercially available trim ring to fit siding to a penetration such as a faucet
or railing attachment, following the manufacturer’s installation instructions. If a com
-
mercial trim ring is not available for the application, refer to the figure below, which
illustrates how to fit the siding to the penetration. In addition, the following tips are
suggested:
● If hand-fitting to the fixture, always begin a new course of siding at the fixture
to avoid excess lap joints.
● Cut an opening 1/4” bigger than the fixture or the trim ring.
● When cutting, match the shape and contour of the obstruction.
Horizontal Siding Installation 1