ISDN-Modul ISDN Module Module ISDN Modulo ISDN ISDN-module ISDN-modul Moduł ISDN 12244797 FU8020 1
Vorwort Sehr geehrte Kundin, sehr geehrter Kunde, wir bedanken uns für den Kauf dieses ISDN-Moduls. Mit diesem Gerät haben Sie ein Produkt erworben, das nach dem heutigen Stand der Technik gebaut wurde. Dieses Produkt erfüllt die Anforderungen der geltenden europäischen und nationalen Richtlinien. Die Konformität wurde nachgewiesen, die entsprechenden Erklärungen und Unterlagen sind beim Hersteller hinterlegt.
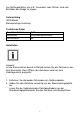
von Rettungskräften, wie z.B.: Feuerwehr oder Polizei, sind vom Betreiber der Anlage zu tragen. Lieferumfang ISDN-Modul Mehrsprachige Anleitung Technische Daten Anschlussbuchse Anschluss Schnittstelle RJ45 ISDN-Basisanschluss S0 Installation Hinweis: Ist die Alarmzentrale bereits in Betrieb setzen Sie die Zentrale in den Errichtermodus. Beim Öffnen des Gehäuses wird nun kein Sabotagealarm ausgelöst. 1. Entfernen Sie die beiden Schrauben am Gehäuseboden. 2.
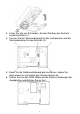
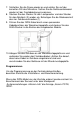
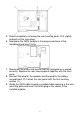
3. Lösen Sie alle vier Schrauben, die das Gehäuse der Zentrale zusammenhalten (1). 4. Trennen Sie die Steckverbindung für den Lautsprecher und die Steckverbindung für das Akkufach (2). 5. Bevor Sie die Gehäuserückwand ganz entfernen, heben Sie diese etwas an und ziehen den Sirenenstecker ab. 6. Setzen Sie nun das ISDN-Modul auf die Steckver-bindungen der Hauptplatine und drücken Sie es fest.
7. Schließen Sie die Sirene wieder an und achten Sie auf den korrekten Sitz des Mikrofons. Setzen Sie die Gehäuserückwand wieder mit der Frontabdeckung zusammen. 8. Stecken Sie den Stecker für den Lautsprecher und den Stecker für das Akkufach (2) wieder ein. Befestigen Sie die Rückwand mit den vier Gehäuseschrauben (1). 9. Führen Sie das ISDN-Kabel durch einen passenden Kabeldurchlass der Wandmontageplatte und stecken Sie den RJ45-Stecker in die Buchse des eingebauten Moduls. 10.
Dieses Gerät erfüllt die Anforderungen der EU-Richtlinie 1999/5/EG des Europäischen Parlaments und des Rates vom 9. März 1999 über Funkanlagen und Telekommunikationsendeinrichtungen und die gegenseitige Anerkennung ihrer Konformität. Die Konformitätserklärung ist zu beziehen unter: ABUS Security-Center GmbH & Co. KG 86444 Affing GERMANY www.abus-sc.eu info@abus-sc.
Preface Dear customers, Many thanks for your purchase of this ISDN module. In choosing our product, you now have a piece of equipment that is built according to state-of-the-art technology. This product complies with current domestic and European regulations. Conformity has been proven, and all related certifications are available from the manufacturer on request.
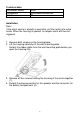
Technical data Connector socket Connection Interface RJ45 ISDN Basic connection S0 Installation Note: If the alarm centre is already in operation, put the centre into setup mode. When the housing is opened, no tamper alarm will then be triggered. 1. Remove both screws on the housing base. 2. Lift the housing carefully off the wall mounting plate. Detach the ribbon cable from the wall mounting plate before you open the housing fully. 3.
5. Before completely removing the rear housing panel, lift it slightly and pull out the siren plug. 6. Now place the ISDN module in the plug connections of the mainboard and insert firmly. 7. Reconnect the sirens and ensure that the microphone is seated correctly. Replace the rear housing panel together with the front cover. 8. Reinsert the plug for the speaker and the plug for the battery compartment (2). Fasten the rear panel with the four housing screws (1). 9.
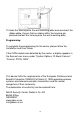
. Hook the housing onto the wall mounting plate and reconnect the ribbon cable. Ensure that no cables within the housing are pinched and bolt the housing onto the wall mounting plate. Programming To complete the programming for the centre, please follow the Installation and User Guide. If the ISDN module was detected by the centre, a display appears in the Secvest user menu under “System Options About Comms”: “Comms: PSTN, ISDN”.
Préface Chère cliente, cher client, nous vous remercions d’avoir porté votre choix sur ce module ISDN. Par l’achat de ce produit, vous disposez maintenant d’un appareil faisant appel à une technologie de pointe. Ce produit est conforme aux exigences des directives européennes et nationales en vigueur. La conformité de ce produit a été prouvée. Les déclarations et documents correspondants ont été déposés chez le fabricant.
Livraison Module ISDN Notice en plusieurs langues Fiche technique Connecteur femelle Connecteur Interface RJ45 Accès de base ISDN S0 Installation Remarque : Si la centrale d'alarme est déjà en service, la basculer en mode Installateur. Lors de l'ouverture du boîtier, aucune alarme antisabotage n'est déclenchée. 1. Retirer les deux vis de l'embase du boîtier. 2. Soulever prudemment le boîtier de la plaque de montage murale.
5. Avant de retirer complètement le panneau arrière du boîtier, le soulever légèrement et déconnecter la sirène. 6. Placer alors le module ISDN sur les connexions de la platine principale et l'enfoncer. 7. Reconnecter la sirène et veiller à ce que le microphone soit bien en place. Remonter le panneau arrière du boîtier avec le panneau avant. 8. Rebrancher le connecteur pour le haut-parleur et celui pour la batterie (2). Fixer le panneau arrière avec les quatre vis du boîtier (1). 9.
10. Accrocher le boîtier sur la plaque de montage murale et relier à nouveau le câble en nappe. Veiller à ce que aucun câble ne soit bloqué dans le boîtier et visser le boîtier avec la plaque de montage murale. Programmation Afin de procéder à la programmation au niveau de la centrale, tenir compte du guide d'installation et utilisateur.
Prefazione Gentile cliente, La ringraziamo per aver acquistato questo modulo ISDN. Con questo apparecchio ha acquistato un prodotto progettato in base agli standard tecnologici più avanzati. Tale prodotto risponde ai requisiti richiesti dalle direttive europee e nazionali vigenti. La conformità è stata comprovata e le dichiarazioni e la documentazione corrispondenti sono depositate presso la ditta produttrice.
Componenti forniti Modulo ISDN Istruzioni in diverse lingue Dati tecnici Presa di collegamento RJ45 Collegamento Collegamento base ISDN Interfaccia S0 Installazione Nota: Se la centrale di allarme è già in funzione, posizionare la centrale nella modalità installatore. In questo modo all'apertura dell'alloggiamento non viene emesso un segnale di allarme antisabotaggio. 1. Rimuovere entrambe le viti sul fondo dell'alloggiamento. 2. Rimuovere attentamente l'alloggiamento dalla piastra di montaggio a parete.
5. Prima di rimuovere completamente il retro dell’alloggiamento, sollevarlo leggermente e staccare il connettore sirena. 6. Posizionare ora il modulo ISDN sul collegamento a spina della scheda principale e premere. 7. Collegare nuovamente la sirena e rispettare la corretta sede del microfono. Rimontare il retro dell'alloggiamento assieme alla copertura frontale. 8. Inserire nuovamente il connettore per l'altoparlante e il connettore per il vano batterie (2).
10. Applicare l'alloggiamento sulla piastra di montaggio a parete e collegare nuovamente la piattina multipolare. Fare attenzione a non bloccare nessun cavo nell'alloggiamento e avvitare quest'ultimo alla piastra di montaggio a parete. Programmazione Per concludere la programmazione sulla centrale, prestare attenzione alle istruzioni per l'installazione e al manuale dell'utente.
Voorwoord Geachte klant, we bedanken u voor de aankoop van deze ISDNmodule. Met dit toestel heeft u een product gekocht dat met de allernieuwste techniek tot stand is gebracht. Dit product voldoet aan de eisen van de geldende Europese en nationale richtlijnen. De conformiteit werd aangetoond, de overeenkomstige verklaringen en documenten zijn bij de fabrikant gedeponeerd.
Technische gegevens Aansluitbus Aansluiting Interface RJ45 ISDN-basisaansluiting S0 Installatie Opmerking: Is de alarmcentrale in gebruik, brengt de centrale dan in de programmeermodus. Bij het openen van de behuizing wordt nu geen sabotagealarm geactiveerd. 1. Verwijder de beide schroeven aan de bodem van de behuizing. 2. Til de behuizing voorzichtig van de wandmontageplaat. Los de verbinding van de lintkabel van de wandmontageplaat voor u de behuizing volledig opent. 3.
5. Voor u de behuizingsachterwand helemaal verwijdert, tilt u die een beetje op en trekt u de sirenestekker eraf. 6. Plaats nu de ISDN-module op de steekverbinding van de hoofdprintplaat en druk de module vast. 7. Sluit de sirene opnieuw aan en zorg ervoor dat de microfoon correct is aangebracht. Maak de behuizingsachterwand opnieuw aan de frontafdekking vast. 8. Steek de stekker voor de luidspreker en de stekker voor het accuvak (2) er opnieuw in.
10. Hang de behuizing in de wandmontageplaat en verbind de lintkabel opnieuw. Zorg ervoor dat er geen kabels in de behuizing ingeklemd zijn en schroef de behuizing aan de wandmontageplaat vast. Programmeren Om de programmering aan de centrale af te sluiten, gelieve rekening te houden met de installatie- en bedieningshandleiding. Als de ISDN-module door de centrale herkend werd, verschijnt in het gebruikersmenu van de Secvest onder het menupunt „Systeemopties Comm. info” „Communicatie: PSTN, ISDN”.
Forord Kære kunde. Tak, fordi du har valgt at købe dette ISDN-modul. Dette apparat er et produkt, som er bygget iht. den nyeste tekniske udvikling. Produktet opfylder kravene i de gældende europæiske og nationale retningslinjer. Overensstemmelsen er dokumenteret, de pågældende erklæringer og dokumenter befinder sig hos producenten.
Tekniske data Tilslutningsbøsning Tilslutning Interface RJ45 ISDN-basistilslutning S0 Installation Henvisning: Hvis alarmcentralen allerede er i drift, skal centralen sættes på programmeringsmenuen. Når huset nu åbnes, udløses der ingen sabotagealarm. 1. Fjern begge skruer på husets bund. 2. Løft huset forsigtigt af vægmonteringspladen. Løsn fladbåndkablets forbindelse fra vægmonteringspladen, inden du løfter huset helt af. 3. Løsn alle fire skruer, som holder centralens hus sammen (1). 4.
5. Inden husbagsiden fjernes helt, skal den løftes lidt og sirenestikket trækkes ud. 6. Sæt nu ISDN-modulet på stikforbindelserne til hovedprintkortet, og tryk det fast. 7. Tilslut sirenen igen, og vær opmærksom på, om mikrofonen sidder korrekt. Sæt husbagsiden sammen med frontafdækningen igen. 8. Sæt stikforbindelsen til højttaleren og stikforbindelsen til batterirummet (2) i igen. Fastgør bagsiden med de fire husskruer (1). 9.
10. Hægt huset på vægmonteringspladen, og forbind fladbåndkablet igen. Pas på, at der ikke sidder kabler i klemme i huset, og skru huset sammen med vægmonteringspladen. Programmering For at afslutte programmeringen på centralen skal du læse installations- og betjeningsvejledningen. Når ISDN-modulet er blevet registreret af centralen, vises der i Secvets brugermenu under menupunktet „Systemopsætning Komm.-info“ visningen „Komm.: PSTN, ISDN“.
Wstęp Szanowna Klientko, Szanowny Kliencie, dziękujemy za zakup modułu ISDN. Kupiłeś produkt wykonany zgodnie z najnowszym stanem techniki. Produkt ten spełnia wymagania obowiązujących norm europejskich i krajowych. Zgodność została udokumentowana, odpowiednie deklaracje i dokumenty są dostępne u producenta. Aby zachować ten stan i zapewnić bezpieczną eksploatację, użytkownik musi przestrzegać niniejszej instrukcji obsługi! Z pytaniami proszę zwracać się do specjalistycznego sprzedawcy.
Zakres dostawy Moduł ISDN Wielojęzyczna instrukcja Dane techniczne Gniazdo przyłączeniowe Złącze Interfejs RJ45 Złącze bazowe ISDN S0 Instalacja Wskazówka: jeżeli centrala alarmowa już pracuje, ustaw ją na tryb instalatora. Otwarcie obudowy nie spowoduje alarmu sabotażowego. 3. Wyjmij obie śruby z dna obudowy. 4. Unieś ostrożnie obudowę z płyty do montażu naściennego. Przed całkowitym otwarciem obudowy odłącz kabel taśmowy od płyty do montażu naściennego.
5. Poluzuj wszystkie cztery wkręty, mocujące obudowę centrali (1). 6. Rozłącz złącze wtykowe do głośników i złącze wtykowe do pojemnika na akumulatory (2). 7. Przed całkowitym zdjęciem tylnej ściany obudowy unieś ją trochę i ściągnij wtyczkę syreny. 8. Ustaw moduł ISDN na złączach wtykowych płyty głównej i mocno do wciśnij. 11. Podłącz z powrotem syrenę i upewnij się, czy mikrofon jest dobrze zamocowany. Złóż tylną ścianę obudowy z osłoną czołową. 12.
13. Wprowadź kabel ISDN przez odpowiedni wpust kablowy płyty do montażu naściennego i włóż wtyczkę RJ45 do gniazda zamontowanego modułu. 14. Zawieś obudowę na płycie do montażu naściennego i podłącz z powrotem kabel taśmowy. Sprawdź, czy żaden kabel nie został zaciśnięty w obudowie i skręć obudowę z płytą do montażu naściennego. Programowanie Aby zakończyć programowanie w centrali, postępuj zgodnie z instrukcją instalacji i instrukcją użytkownika.
To urządzenie spełnia wymagania dyrektywy WE 1999/5/WE des Parlamentu Europejskiego i Rady z dnia 9 marca 1999 r. o instalacjach radiowych i telekomunikacyjnych urządzeniach nadawczych oraz o wzajemnym uznawaniu ich zgodności. Deklarację zgodności można otrzymać pod adresem: ABUS Security-Center GmbH & Co. KG 86444 Affing NIEMCY www.abus-sc.eu info@abus-sc.