
User manual

8
10
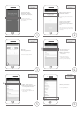
1. Wähle „Einlernen“
2. Ziehe danach die Plastikfolie
vom Batteriefach ab
1. Select „Pair“
2. Remove the plastic tab from
the Battery-case
Montage
Installation
Einlernen
Pair
7
1. Gib einen Namen ein.
2. Wähle den Raum, in dem
sich der Funk-Taster befindet.
3. Wähle „Weiter“.
1. Enter a name.
2. Select the room in which the
RF-Button is installed.
3. Select „Next”.
Name
Name
1
2
3
9
Verbindung wird hergestellt
und die Komponentenansicht
wird angezeigt.
Connection is initiated and the
component screen is displayed.
Verbindung
Connection
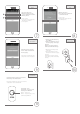
1. Befestige die Wandhalterung
an die Wand.
2. Hänge den Funktaster ein, bis
die Verriegelung einschnappt.
Optional:
Montage per Klebepad (ebene
Flächen) ohne Wandhalterung!
1. Attach the mounting bracket
to the wall.
2. Insert the RF-button on the
bracket until the latch engages.
Optional:
mounting via adhesive pad (on
even surfaces, without mounting
bracket)
11
Montage
Installation
Die Tastenbelegung erfolgt in den Szenario-
Einstellungen der Smartvest APP
The button-assignment is done in the scenario-
conguration of the Smartvest APP
Tastendruck – kurz:
Tastendruck – lang (ca. 5 Sek)
Bestätigt durch LED-Flash
Button – short-press
Button – long-press (app. 5 sec)
Conrmed by LED-ash