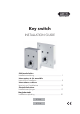
Schlüsselschalter INSTALLATIONSANLEITUNG Key switch Installation Guide ........................................................... 5 Interrupteur à clé amovible Instructions d’installation ................................................. 9 Interruttore a chiave Istruzioni per l’installazione ............................................ 13 Sleutelschakelaar Installatieaanwijzingen................................................... 17 Nøglekontakt Installationsvejledning ....................................
Vorwort Sehr geehrte Kundin, sehr geehrter Kunde, wir bedanken uns für den Kauf dieses Aufputz-, bzw. UnterputzSchlüsselschalters. Mit diesem Gerät haben Sie ein Produkt erworben, das nach dem heutigen Stand der Technik gebaut wurde. Dieses Produkt erfüllt die Anforderungen der geltenden europäischen und nationalen Richtlinien. Die Konformität wurde nachgewiesen, die entsprechenden Erklärungen und Unterlagen sind beim Hersteller hinterlegt.
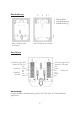
Beschreibung 1 2 3 2 1 1 Platinenhalter 2 Wandbefestigung 3 Kabeleinführung 2 2 Abb.1 Gehäuse offen (mit Platine) Abb.2 Gehäuse ohne Platine Anschlüsse 12V Spannung für LED Masse für LED (gelb) 12V Spannung für LED Masse für LED (rot ) NO Schalter S1 COM Sabotagekontakte S1 S2 NC NC NO COM NO COM NC NO COM NC Schalter S2 Anmerkung: Die beschriebene Schalterstellung gilt für den Fall, dass der Gehäusedeckel geöffnet ist.
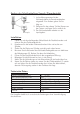
Ändern des Schaltverhaltens (Impuls-/Dauerkontakt) Dauer Impuls 1. Im Auslieferungszustand ist der Schlüsselschalter als Dauerkontaktgeber eingestellt. Zum Ändern gehen Sie wie folgt vor: 2. Entfernen Sie den oberen Teil der Klemme an den Tastern und legen Sie ihn seitlich ab. 3. Der Schlüsselschalter arbeitet nun als Impulsgeber. Installation 1. 2. 3. 4. 5. 6. 7. 8. Öffnen Sie mit dem beiliegenden Stiftschlüssel die Deckelschrauben und nehmen Sie den Gehäusedeckel ab.
Key switch INSTALLATION GUIDE Schlüsselschalter Installationsanleitung....................................................... 1 Interrupteur à clé amovible Instructions d’installation ................................................. 9 Interruttore a chiave Istruzioni per l’installazione ............................................ 13 Sleutelschakelaar Installatieaanwijzingen................................................... 17 Nøglekontakt Installationsvejledning .........................................
Preface Dear Customer, Thank you for purchasing this surface-fitted/flush-fitting key switch. You made the right decision in choosing this state-of-the-art technology, which complies with the current standards of domestic and European regulations. The CE has been proven and all related certifications are available from the manufacturer upon request. To maintain this status and to guarantee safe operation, it is your obligation to observe these operating instructions.
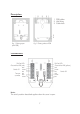
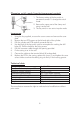
Description 1 2 3 2 1 1 PCB holder 2 Wall fixing 3 Cable hole 2 2 Fig. 1 Casing open Fig. 2 Casing without PCB (with PCB) Connections 12V for LED Ground for LED (yellow) 12V for LED Ground for LED (red ) Switch S1 Tamper contacts NO COM NC NC NO COM S1 S2 NO COM NC NO COM NC Note: The switch position described applies when the cover is open.
Changing switch mode (impulse/permanent contact) 1. The factory setting of the key switch is permanent contact. To change the switch mode: Permanent 2. Remove the upper part of the clamp and swing it to the side. 3. The key switch is now set to impulse mode. Impulse Installation 1. 2. 3. 4. 5. 6. 7. 8. Using the key supplied, unscrew the cover screws and remove the cover plate. Remove the two PCB screws on the left and right of the cylinder. Pull the cylinder and PCB carefully upwards and out.
Interrupteur à clé amovible INSTRUCTIONS D’INSTALLATION Schlüsselschalter Installationsanleitung....................................................... 1 Key switch Installation Guide ........................................................... 5 Interruttore a chiave Istruzioni per l’installazione ............................................ 13 Sleutelschakelaar Installatieaanwijzingen................................................... 17 Nøglekontakt Installationsvejledning ...............................
Préface Chère cliente, cher client, Nous vous remercions d’avoir porté votre choix sur cet interrupteur à clé amovible destiné à un montage apparent ou encastré. Par l’achat de ce produit, vous disposez maintenant d’un appareil faisant appel à une technologie de pointe. Ce produit est conforme aux exigences des directives européennes et nationales en vigueur. La conformité de ce produit a été prouvée. Les déclarations et documents correspondants ont été déposés chez le fabricant.
Description 1 2 3 2 1 1 Porte-platine 2 Fixation murale 3 Entrée de câble 2 2 Fig. 1 Boîtier ouvert Fig. 2 Boîtier sans platine (avec platine) Tension de 12 V pour DEL Neutre de DEL (jaune) Tension de 12 V pour DEL Neutre de DEL (rouge) Commutateur S1 Contacts antisabotage NO COM NC NC NO COM S1 S2 NO COM NC NO COM NC Commutateur S2 Remarque : La position de l’interrupteur décrite est celle lorsque le couvercle du boîtier est ouverte.
RaccordementsModification du comportement de commutation (contact impulsionnel/permanent) Perm. Impulsion. 1. A la livraison, l’interrupteur à clé amovible est réglé en tant que contacteur permanent. Pour modifier ce réglage procéder comme suit : 2. Retirer la partie supérieure de la pince au niveau des poussoirs et la mettre de côté. 3. A présent, l’interrupteur à clé amovible fonctionne en tant que contacteur impulsionnel. Installation 1. 2. 3. 4. 5. 6. 7. 8.
Interruttore a chiave ISTRUZIONI PER L'INSTALLAZIONE Schlüsselschalter Installationsanleitung....................................................... 1 Key switch Installation Guide ........................................................... 5 Interrupteur à clé amovible Instructions d’installation.................................................. 9 Sleutelschakelaar Installatieaanwijzingen................................................... 17 Nøglekontakt Installationsvejledning ...........................
Prefazione Egregio Cliente, La ringraziamo per aver acquistato questo interruttore a chiave per montaggio incassato e non. In questo modo Lei ha acquistato un prodotto realizzato secondo l'attuale stato della tecnica. Questo prodotto risponde ai requisiti richiesti dalle vigenti direttive europee e nazionali. La conformità è stata comprovata e le dichiarazioni e la documentazione relative sono depositate presso la ditta produttrice.
Descrizione 1 2 3 2 1 1 2 3 Supporto piastra Fissaggio a parete Ingresso cavi 2 2 Fig.1 Alloggiamento aperto Fig.2 Alloggiamento senza piastra (con piastra) Collegamenti 12V tensione LED Massa LED (giallo) 12V tensione LED Massa LED (rosso) Interruttore S1 contatto antisabotaggio NO COM NC NC NO COM S1 S2 NO COM NC NO COM NC Interruttore S2 Nota: L'impostazione dell'interruttore descritta vale ad alloggiamento dischiuso.
Modifica del rapporto di commutazione (Impuli/continuo) Continuo Impulsi 1. Al momento della consegna l'interruttore a chiave è impostato sul funzionamento continuo. Per modificare l'impostazione procedere come segue: 2. Rimuovere la parte superiore del morsetto sul tasto e metterla da parte. 3. L'interruttore a chiave funziona solo come trasduttore ad impulsi. Installazione 1. 2. 3. 4. 5. 6. 7. 8. Svitare con la chiave esagonale in dotazione le viti e rimuovere il coperchio dell'alloggiamento.
Sleutelschakelaar INSTALLATIEAANWIJZINGEN Schlüsselschalter Installationsanleitung....................................................... 1 Key switch Installation Guide ........................................................... 5 Interrupteur à clé amovible Instructions d’installation ................................................. 9 Interruttore a chiave Istruzioni per l’installazione ............................................ 13 Nøglekontakt Installationsvejledning .................................
Voorwoord Geachte klant, Wij bedanken u voor de aankoop van deze opbouw- of inbouwsleutelschakelaar. Met dit toestel heeft u een product gekocht, dat met de allernieuwste techniek werd gebouwd. Dit product voldoet aan de eisen van de geldende Europese en nationale richtlijnen. De overeenstemming werd aangetoond, de overeenkomstige verklaringen en documenten zijn bij de fabrikant gedeponeerd.
Beschrijving 1 2 3 2 1 1 printplaathouder 2 wandbevestiging 3 kabelinvoer 2 2 Afb. 1 huis open (met printplaat) Afb. 2 huis zonder printplaat 12V spanning voor LED Massa voor LED (geel) 12V spanning voor LED Massa voor LED (rood) Schakelaar S1 Sabotagecontacten NO COM NC NC NO COM S1 S2 NO COM NC NO COM NC Schakelaar S2 Opmerking: De beschreven schakelaarstand geldt voor het geval dat het deksel van het huis open is.
AansluitingenVeranderen van het schakelgedrag (impuls/doorlopend contact) 1. Bij levering is de sleutelschakelaar als doorlopend-contactgever ingesteld. Voor het veranderen gaat u als volgt te werk: doorlopend 2. Verwijder het bovenste deel van de klem op de toetsen en leg dit aan de zijkant neer. 3. De sleutelschakelaar werkt nu als impuls impulsgever. Installatie 1. 2. 3. 4. 5. 6. 7. 8. Draai met de bijgevoegde stiftsleutel de schroeven voor het deksel eruit en haal het deksel van het huis eraf.
Nøglekontakt INSTALLATIONSVEJLEDNING Schlüsselschalter Installationsanleitung .......................................................1 Key switch Installation Guide............................................................5 Interrupteur à clé amovible Instructions d’installation ..................................................9 Interruttore a chiave Istruzioni per l’installazione.............................................13 Sleutelschakelaar Installatieaanwijzingen ...................................
Forord Kære kunde, tak fordi du har valgt at købe denne nøglekontakt til montage på væg eller indbygning i væg. Dette apparat er et produkt, som er bygget iht. den nyeste tekniske udvikling. Produktet opfylder kravene i de gældende europæiske og nationale retningslinjer. Produktet er i overensstemmelse med gældende bestemmelser, hvilket er dokumenteret i erklæringer og materiale, der opbevares hos fabrikanten.
Beskrivelse 1 2 3 2 1 1 Printkortholder 2 Vægbefæstigelse 3 Kabelindføring 2 2 Tilslutninger 12V spænding til LED Stel til LED (gul) 12V spænding til LED Stel til LED (rød) NO Kontakt S1 COM Sabotage kontakter S1 S2 NC NC NO COM NO COM NC NO COM NC Kontakt S2 Anmærkning: Den beskrevne kontaktstilling gælder for det tilfælde at husets dæksel er åbent.
Ændring af koblingsadfærden (impuls-/konstant kontakt) 1. Ved levering er nøglekontakten indstillet til konstant kontaktsignal. For at ændre dette skal du gå frem på følgende måde: Konstant 2. Fjern den øverste del af klemmen på kontaktfladerne og drej den til siden. 3. Nu arbejder nøglekontakten som Impuls impulsgiver. Installation 1. 2. 3. 4. 5. 6. 7. 8. Løsn dækselskruerne med den medfølgende tapnøgle og tag husets dæksel af. Fjern de to printkortskruer til venstre og højre for cylinderen.