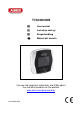
TVAC80000B User manual Instrukcja obsługi Brugerhåndbog E Manual del usuario You can find important information and FAQs about this and other products on the website www.abus.
This user guide contains important information on starting operation and using the device. Make sure that this user guide is handed over when the product is given to other persons. Keep this user guide to consult later! For a list of contents with the corresponding page numbers, see page 4. Niniejsza instrukcja obsługi zawiera ważne wskazówki dotyczące uruchamiania i obsługi. Pamiętaj o tym, także przekazując produkt osobie trzeciej.
TVAC80000B User manual Version 04/2013 Original user guide in English. Retain for future reference.
English Introduction Dear customer, Thank you for purchasing this product. This device complies with the requirements of the applicable EU directives. The declaration of conformity can be ordered from: ABUS Security-Center GmbH & Co. KG Linker Kreuthweg 5 86444 Affing GERMANY To maintain this status and to guarantee safe operation, it is your obligation to observe this user guide.
English Explanation of symbols The triangular warning symbol indicates important notes in this user guide which must be observed. This symbol indicates special tips and notes on the operation of the unit. Important safety information All guarantee claims are invalid in the event of damage caused by non-compliance with this user guide. We cannot be held liable for resulting damage.
English Contents 1. Intended use ............................................................................................................................................... 5 2. Scope of delivery ........................................................................................................................................ 5 3. Features and functions .............................................................................................................................. 5 4.
English 1. Intended use The digital door viewer is a modern enhancement of the classic door viewer model. It is easily fitted to the existing 12 to 14 mm door viewer. Alternatively, a 14 mm door viewer is also supplied which is suitable for all doors with a thickness of between 35 and 53 mm. At just the press of a button, you can see who is at your door and what is going on there at a viewing angle of approximately 180 degrees.
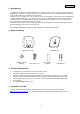
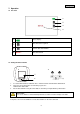
English 5. Device description Power LED ◄► Power button Device status display Light, illumination Device switched on No light Device switched off Navigate between recordings Zoom function Switch on monitor Micro SD card slot Slot for using a micro SD card with a max. capacity of 32 GB Battery compartment 2 AA batteries 6. Installation 6.1 Inserting a micro SD card 1. 2. Open the rubber cover. Insert a micro SD card. 6.2 Inserting the batteries 1. 2. 3.
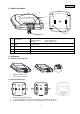
English 6.3 Installation Remove your existing door peephole from the peephole bore or drill a new hole if required. The included peephole requires a 14 mm hole. Please note: According to DIN 68706, the standard height for a peephole (spy hole) in apartment doors is 1,400 mm (measured from the bottom edge of the door leaf). Then insert the door peephole lens from the outside.
English 7. Operation 7.1 Live view Battery display Micro SD card recognized No micro SD card available SD Full… Micro SD card full 7.2 Setting the date and time 1. 2. 3. To set the date and time, hold down the “>” button for three seconds when switched off. Then press the power button as well until you get to the “Date & Time” menu item. Set the date and time using the arrow buttons. Confirm your input with the power button.
English 7.3 Zooming Press the “>” button if you want to zoom closer into the photo. 7.4 Taking photos on the micro SD card Three photos are taken every time you press the power button. Please note: This feature only works if a micro SD card is inserted. Please note: The microSD card cannot be formatted on the device. You need to delete the files on your PC. 7.
English 8. Maintenance and cleaning 8.1 Maintenance Regularly check the technical safety of the product, e.g. check the housing for damage. If it seems that it may no longer be possible to operate the device safely, stop using the product and protect it from unintentional use. It is likely that safe operation is no longer possible in the event that: The device shows signs of visible damage. The device no longer works correctly. Please note: You do not need to perform any maintenance on this product.
English 10. Tips for troubleshooting No. Question Answer 1 What resolution is the display? The resolution is 320 x 240 pixels. 2 When does the image appear on the display after pressing the power button? The image appears on the display around 4 seconds after you press the power button. 3 Does the door viewer record continuously? This product does not record continuously. Three images are recorded after the power button is activated.
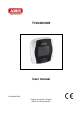
TVAC80000B Instrukcja obsługi Wersja 04/2013 Instrukcja obsługi przetłumaczona z języka niemieckiego.
Polski Wprowadzenie Szanowna Klientko, Szanowny Kliencie. Dziękujemy za zakup naszego produktu. To urządzenie spełnia wymogi obowiązujących dyrektyw UE. Deklarację zgodności można otrzymać pod adresem: ABUS Security-Center GmbH & Co.
Polski Objaśnienie symboli Wykrzyknik w trójkącie oznacza w niniejszej instrukcji obsługi ważne wskazówki, które muszą być bezwzględnie przestrzegane. Tym symbolem oznaczane są specjalne rady i wskazówki dotyczące obsługi. Ważne zasady bezpieczeństwa Szkody spowodowane nieprzestrzeganiem niniejszej instrukcji obsługi powodują wygaśnięcie roszczeń gwarancyjnych.
Polski Spis treści 1. Użycie zgodne z przeznaczeniem ........................................................................................................... 16 2. Zakres dostawy ........................................................................................................................................ 16 3. Cechy i funkcje ......................................................................................................................................... 16 4.
Polski 1. Użycie zgodne z przeznaczeniem Cyfrowy wizjer do drzwi to nowoczesne rozszerzenie klasycznego wizjera. W łatwy i prosty sposób nakłada się go na istniejący wizjer 12-14 mm. Alternatywnie dołączany jest także wizjer 14 mm, nadający się do wszystkich drzwi o grubości 35-53 mm. Wystarczy naciśnięcie guzika, aby zobaczyć z kątem widzenia ok. 180 stopni, kto stoi pod drzwiami i co się tam dzieje.
Polski 5. Opis urządzenia Dioda zasilania LED ◄► Przycisk Power Wyświetlanie stanu urządzenia Światło Urządzenie włączone Brak światła Urządzenie wyłączone Przełączanie pomiędzy zdjęciami Funkcja Zoom Włączanie monitora Gniazdo karty micro SD Gniazdo umożliwiające użycie karty micro SD do maks. 32 GB Pojemniki na baterie 2 x bateria AA 6. Instalacja 6.1 Zakładanie karty micro SD 1. 2. Otwórz gumowaną osłonę. Włóż kartę micro SD. 6.2 Zakładanie baterii 1. 2.
Polski 6.3 Montaż Wyjmij istniejący wizjer drzwiowy z otworu lub w razie potrzeby wywierć nowy otwór. Do dostarczonego w komplecie wizjera potrzebny jest otwór 14 mm. Pamiętaj: wg DIN 68706 normatywna wysokość otworu wizjera w drzwiach mieszkania wynosi 1400 mm (mierzone od dolnej krawędzi skrzydła drzwi). Włóż od zewnątrz soczewkę wizjera. Do otworów 14 mm Włóż cylinder wizjera w uchwyt a następnie w otwór po wewnętrznej stronie drzwi. Dokręć wizjer palcami.
Polski 7. Obsługa 7.1 Widok na żywo Wyświetlacz stanu baterii Została wykryta karta micro SD Brak karty micro SD SD Full… Karta micro SD pełna 7.2 Ustawianie daty i czasu 1. 2. 3. Aby ustawić datę i czas, przytrzymaj wciśnięty przycisk „>“ w stanie wyłączonym przez trzy sekundy. Następnie naciśnij dodatkowo przycisk Power aż do automatycznego wejścia do punktu menu „Date & Time“. Ustaw datę i czas przyciskami strzałkowymi. Potwierdź wprowadzone dane przyciskiem Power.
Polski 7.3 Funkcja Zoom Naciśnij przycisk ">" aby uzyskać większe powiększenie. 7.4 Zapis zdjęć na karcie micro SD Po przyciśnięciu przycisku Power wykonywane są zawsze 3 zdjęcia. Pamiętaj! Ta funkcja działa tylko, gdy jest włożona karta micro SD. Pamiętaj! W urządzeniu nie można formatować karty micro SD. Kasowanie plików należy przeprowadzić na komputerze PC. 7.
Polski 8. Konserwacja i czyszczenie 8.1 Konserwacja Sprawdzaj regularnie bezpieczeństwo techniczne produktu, np. czy obudowa nie jest uszkodzona. Jeżeli są powody do przypuszczenia, że bezpieczna eksploatacja jest niemożliwa, należy wycofać produkt z eksploatacji i zabezpieczyć przed przypadkowym uruchomieniem. Należy przyjąć, że bezpieczna eksploatacja nie jest możliwa, jeżeli: urządzenie ma widoczne uszkodzenia, urządzenie nie działa. Pamiętaj! Produkt nie wymaga konserwacji.
Polski 10. Wskazówki dotyczące usuwania błędów No. Pytania Odpowiedź 1 Jaką rozdzielczość ma wyświetlacz? Rozdzielczość wynosi 320 x 240 piksele. 2 Kiedy pojawia się obraz na wyświetlaczu po naciśnięciu przycisku zasilania? Obraz pojawia się na wyświetlaczu po ok. 4 sekundach, od momentu naciśnięcia przycisku zasilania. 3 Czy wizjer rejestruje obraz w sposób ciągły? Ten produkt nie rejestruje obrazu w sposób ciagły. Po aktywacji przycisku zasilania zapisywane są trzy obrazy.
TVAC80000B Betjeningsvejledning Version 04/2013 Original betjeningsvejledning på tysk.
Dansk Indledning Kære kunde. Tak, fordi du har valgt at købe dette produkt. Dette apparat opfylder kravene i gældende EU-direktiver. Overensstemmelseserklæringen kan rekvireres hos: ABUS Security-Center GmbH & Co.
Dansk Symbolforklaring Et udråbstegn, der befinder sig i trekanten, gør opmærksom på vigtige henvisninger i betjeningsvejledningen, som ubetinget skal overholdes. Dette symbol vises, når du skal have særlige tips og henvisninger vedr. betjeningen. Vigtige sikkerhedshenvisninger Ved skader, der skyldes manglende overholdelse af denne betjeningsvejledning, bortfalder garantien.
Dansk Indholdsfortegnelse 1. Korrekt anvendelse .................................................................................................................................. 27 2. Leveringsomfang ..................................................................................................................................... 27 3. Særlige kendetegn og funktioner ........................................................................................................... 27 4.
Dansk 1. Korrekt anvendelse Den digitale dørspion er en moderne udvidelse af den klassiske dørspion. Den sættes enkelt og ukompliceret på den eksisterende 12-14 mm dørspion. Som alternativ er der også vedlagt en 14 mm dørspion, der er egnet til alle døre med en dørtykkelse på 35-53 mm. Et tryk på en knap er tilstrækkeligt, og du ser med en synsvinkel på ca. 180 grader, hvem der står foran dine døre, og hvad der sker.
Dansk 5. Apparatbeskrivelse Power LED ◄► Power-tast Visning af apparatstatus Lys Apparat tændt Intet lys Apparat slukket Skift mellem optagelserne Zoom-funktion Tænder monitoren Micro-SD-kort-slot Slot til anvendelse af et micro-SD-kort indtil maks. 32 GB Batterirum 2 x AA-batterier 6. Installation 6.1 Isættelse af micro SD-kort 1. 2. Åbn den gummibelagte afdækning. Før et micro-SD-kort ind. 6.2 Isættelse af batterier 1. 2. Fjern først batteriafdækningerne.
Dansk 6.3 Montering Tag din eksisterende dørspion ud af dørspionboringen, eller bor evt. et nyt hul. Til den vedlagte dørspion er en 14 mm boring nødvendig. Vær opmærksom på: Iht. DIN 68706 er standardhøjden for kikhul (dørspion) i lejlighedsdøre 1400 mm (målt fra dørpladens nederste kant). Sæt derefter dørspionlinsen i udefra. Ved 14 mm boringer: Stik dørspioncylinderen gennem holderen og derefter gennem hullet på dørenes inderside. Spænd dørspionen manuelt fast.
Dansk 7. Betjening 7.1 Live-visning Batterivisning Micro-SD-kort registreret Der findes ikke et micro-SD-kort SD Full… Micro-SD-kort fuldt 7.2 Indstilling af dato og klokkeslæt 1. 2. 3. For at kunne indstille dato og klokkeslæt skal du holde tasten „>“ trykket i tre sekunder i slukket tilstand. Tryk derefter også på power-tasten, indtil du automatisk kommer til menupunktet „Date & Time“. Indstil datoen og klokkeslættet ved hjælp af piletasterne.
Dansk 7.3 Zoom Tryk ">" tasten, hvis du vil zoome ind på billedet. 7.4 Optagelser på micro-SD-kort Der laves altid tre optagelser, når der trykkes på power-tasten. Vær opmærksom på: Denne funktion fungerer kun, når der er sat et micro-SD-kort i. Vær opmærksom på: Micro SD-kortet kan ikke formateres på apparatet. Du skal slette filerne på din pc. 7.
Dansk 8. Vedligeholdelse og rengøring 8.1 Vedligeholdelse Kontrollér regelmæssigt produktets tekniske sikkerhed, f.eks. beskadigelse af huset. Hvis det antages, at drift ikke længere er mulig uden farer, skal produktet tages ud af drift og sikres mod utilsigtet drift. Det antages, at drift ikke længere er mulig uden fare, hvis apparatet har synlige beskadigelser apparatet ikke længere fungerer Vær opmærksom på: Produktet er vedligeholdelsesfrit for dig.
Dansk 10. Tips vedrørende fejlafhjælpning Nr. Spørgsmål Svar 1 Hvilken opløsning har displayet? Opløsningen er 320 x 240 pixel 2 Hvornår vises billedet på displayet, når der trykkes på Power-knappen? Billedet på displayet vises efter ca. 4 sekunder, så snart du har trykket på Power-knappen. 3 Optager dørspionen konstant? Dette produkt optager ikke konstant. Efter aktivering af Power-knappen optages der tre billeder.
TVAC80000B Manual de instrucciones Versión 04/2013 Manual de instrucciones original en alemán. Guardar para futuras consultas.
Español Introducción Estimado cliente: Le agradecemos la compra de este artículo. Este aparato cumple los requisitos establecidos en las directivas vigentes de la UE. Si desea solicitar la declaración de conformidad, diríjase a: ABUS Security-Center GmbH & Co. KG Linker Kreuthweg 5 86444 Affing GERMANY Para conservar este estado y garantizar un funcionamiento exento de peligros, debe tener en cuenta lo expuesto en este manual de instrucciones.
Español Explicación de los símbolos Un signo de admiración dentro de un triángulo señaliza una indicación importante del manual de instrucciones, la cual es imprescindible tener en cuenta. Este símbolo señaliza consejos e indicaciones útiles para la utilización. Indicaciones importantes de seguridad En el caso de daños provocados por no haber respetado las indicaciones expuestas en el manual de instrucciones, se extingue el derecho de garantía. No nos hacemos responsables de los daños resultantes.
Español Índice 1. Uso adecuado ........................................................................................................................................... 38 2. Volumen de entrega ................................................................................................................................. 38 3. Características y funciones..................................................................................................................... 38 4. Indicaciones y FAQs ..
Español 1. Uso adecuado La mirilla digital es una ampliación moderna de la mirilla clásica. Se inserta sencillamente y sin complicaciones en la mirilla de 12-14 mm existente. Alternativamente también hay disponible una mirilla de 14 mm, adecuada para todas las puertas con un grosor de 35-53 mm. Pulse el botón y verá en un ángulo de aprox. 180 grados quién está delante de la puerta y lo que pasa delante de esta.
Español 5. Descripción del aparato LED de encendido ◄► Tecla Power Ranura para tarjetas micro SD Compartimentos de pilas Muestra el estado del aparato Luz Aparato conectado Sin luz Aparato desconectado Cambiar entre las grabaciones Función zoom Encender el monitor Ranura para utilizar una tarjeta de memoria SD de hasta 32 GB 2 pilas AA 6. Instalación 6.1 Inserción de la tarjeta micro SD 1. Abra la cubierta de goma. 2. Introduzca una tarjeta micro SD. 6.
Español 6.3 Montaje Retire la mirilla existente del agujero de la misma o realice un agujero nuevo si fuera necesario. La mirilla adjunta requiere un agujero de 14 mm. Tenga en cuenta lo siguiente: Según DIN 68706, la altura estándar de una mirilla en puertas de apartamentos es de 1400 mm (medida desde el canto inferior de la hoja de la puerta). Seguidamente, inserte la lente de la mirilla desde el exterior.
Español 7. Utilización 7.1 Imagen en directo Estado de la batería Tarjeta micro SD reconocida Ninguna tarjeta micro SD disponible SD Full… Tarjeta micro SD llena 7.2 Ajuste de fecha y hora 1. Para poder ajustar la fecha y la hora, mantenga la tecla ">" pulsada durante tres segundos en estado desconectado. 2. Seguidamente, pulse también la tecla Power hasta que acceda automáticamente al punto de menú "Date & Time". 3.
Español 7.3 Zoom Vuelva a pulsar la tecla ">", si desea aumentar más el zoom. 7.4 Grabaciones en la tarjeta micro SD Después de accionar la tecla Power se realizan siempre tres grabaciones. Tenga en cuenta lo siguiente: Esta función solo funciona cuando hay una tarjeta micro SD insertada. Tenga en cuenta lo siguiente: La tarjeta Micro SD no puede formatearse en el aparato. Si desea eliminar archivos deberá hacerlo en su PC. 7.
Español 8. Mantenimiento y limpieza 8.1 Mantenimiento Compruebe regularmente la seguridad técnica del producto, por ejemplo, si está dañada la carcasa. Cuando no esté garantizado un funcionamiento seguro, ponga fuera de funcionamiento el aparato y evite que pueda ponerse en marcha de nuevo involuntariamente. El funcionamiento seguro no está garantizado si: el aparato muestra daños visibles. El aparato no funciona. Tenga en cuenta lo siguiente: El producto no requiere ningún mantenimiento por su parte.
Español 10. Consejos para la solución de averías N.° Pregunta Respuesta 1 ¿Qué resolución tiene la mirilla? La resolución es de 320 x 240 píxeles. 2 ¿Cuándo aparece la imagen en el monitor de la mirilla una vez pulsada la tecla de encendido y apagado? La imagen en el display aparece pasados unos 4 segundos, siempre que mantenga pulsada la tecla de encendido y apagado. 3 ¿La mirilla graba constantemente? Este producto no graba constantemente.
Imprint These operating instructions are published by ABUS Security-Center GmbH & Co.KG, Linker Kreuthweg 5, 86444 Affing, Germany. No reproduction (including translation) is permitted in whole or part e.g. photocopy, microfilming or storage in electronic data processing equipment, without the express written consent of the publisher. The operating instructions reflect the current technical specifications at the time of print. We reserve the right to change the technical or physical specifications.