
User manual


25
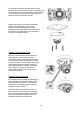
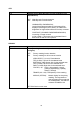
For this camera type the camera module can be
removed, and it is fixed by two fixing screws. Base part
of the camera and camera module are connected by a
15 pin D-Sub joint. Unscrew the fixing screws, and
carefully remove the camera module.
Place the base part to the desired installation
position, mark the holes for fixing on the
surface, and drill the fixing holes. Use the
supplied screws and pegs to fix the base part on
the surface. The cable rounting can be done to
the side or throught the base.
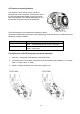
Installation of the camera module
Bring the camera module close to the base
part so that the 15 pin socket and plug
position will match. At the opposite side of the
15 pin joint the module will be hold in position
by two fixing bars. In case socket and plug will
match please press the camera module on
both outside handles in direction of the base
part, until the 15 pin joint is fully latched.
Please screw the two fixing screws for the
camera module back.
Installation of the dome head
First please perfom the steps of adjustment of
viewing angle of the camera module as well
as the adjustment of the lens. Take out the
silica gel out of the plastic bag, and place it
under the camera module.
The dome head will be fixed on the dome
base by three screws. Please take care that
the dome head will placed even to the dome
base. The dome head ring will be fixed by
clockwise rotation to the dome head.