
User manual


20
English
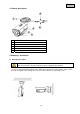
5.2 Aligning the camera
The camera can be aligned in 3 axes.
1. Rotation: 0°–360°
Loosen the rotary knob (1) in order to adjust the angle of rotation.
2. Inclination: 0°–90°
Loosen the screw (2) in order to adjust the inclination.
3. Angle of view: 0°–360°
Loosen the screw (3) in order to adjust the angle of view.
Do not forget to resecure the screws and rotary knob!
5.3 Power supply
IMPORTANT!
Before starting installation, ensure that the power supply system voltage and the rated
voltage of the camera are identical.
(1) Video signal (BNC)
(2) Power supply
12 V DC (5.5 x 2.1 mm)
The cameras have a 12 V DC power supply. Ensure correct polarity when connecting. A plug-in power
supply unit (round plug, 5.5 mm x 2.1 mm) is provided for the connection.
5.4 Installing the video cable
In order to transmit the video signal to a converter, monitor, or recorder, a coaxial cable of type RG59
with BNC plug (male) must be connected to the “Video OUT” connection. The cable length to the next
device may not exceed 150 meters. Suitable signal amplifiers can be installed to increase the range.
1
2