
User manual

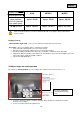
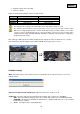
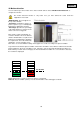
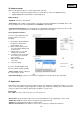
Table Of Contents
- Bestimmungsgemäße Verwendung
- Lieferumfang
- Montage
- Stromversorgung
- Objektivmontage
- Montieren der Netzwerkkamera
- Beschreibung der Netzwerkkamera
- Vorderansicht/Rückansicht:
- Alarmeingänge und Relaisausgänge
- Videoausgang und DIP Schalter
- Schaltein-/ausgang und Statusanzeige
- Erstinbetriebnahme
- Erster Zugang zur Kamera
- Zugriff auf die Kamera mittels Web-Browser
- Active-X Plugin installieren
- Sicherheitseinstellungen anpassen
- Passwortabfrage
- Zugriff auf die Kamera mittels RTSP Player
- Zugriff auf die Kamera mittels Mobilfunktelefon
- Zugriff auf die Kamera mittels eytron VMS Express
- Benutzerfunktionen
- Audio/Video-Steuerung
- Kunden-Einstellungen
- Administratoreinstellungen
- System
- Sicherheit
- HTTPS
- SNMP
- Netzwerk
- Netzwerkeinstellungen
- IEEE 802.1x
- HTTP
- FTP
- HTTPS
- Zwei Wege Audio
- RTSP Übertragung
- Multicast Übertragung
- DDNS
- DDNS Konto einrichten
- DDNS Zugriff über Router
- Zugangsliste
- Audio und Video
- Bildeinstellungen
- /Privatzonenmaskierung
- Belichtungseinstellungen
- Grundeinstellung:
- Bildbereiche und Bildgrößen anpassen
- Audio Einstellungen
- Bewegungserkennung
- Kamera Sabotageerkennung
- Kamerasteuerung
- Anwendung
- Auslöser Einstellungen
- Serverkonfiguration
- Medien Einstellungen
- Aktion
- Anwendungsübersicht
- Aufnahme
- Lokaler Speicher
- Logdatei
- Parameterliste
- Verwaltung
- Wartung und Reinigung
- Funktionstest
- Reinigung
- Entsorgung
- Technische Daten
- URL Kommandos
- GPL Lizenzhinweise
- Technologie Lizenzhinweise
- Intended use
- Scope of delivery
- Installation
- Power supply
- Mounting the lens
- Installing the camera
- Camera description
- Front view/Rear view
- Alarm inputs and digital outputs
- Video output and DIP switches
- Gate input / output and status display
- Initial start-up
- First camera access
- Connecting to the camera by using a web browser
- Installing the Active-X plug-in
- Adjusting the security settings
- Password authentication
- Connecting to the camera by using a RTSP player
- Connecting to the network camera by using a mobile phone
- Connecting to the camera by using eytron VMS Express
- User functions
- Audio / video control
- Client settings
- Administrator Settings
- System
- Security
- HTTPS
- SNMP
- Network
- Network settings
- IEEE 802.1x
- HTTP
- FTP
- HTTPS
- Two-way audio
- RTSP transmission
- Multicast transmission
- DDNS
- Setting up a DDNS account
- DDNS access via a router
- Access list
- Audio and Video
- Image Settings
- Privacy masking zones
- /Exposure Settings
- Basic setting:
- Adjust image and viewing window
- Audio settings
- Motion detection
- Camera tampering detection
- Camera control
- Application
- Trigger settings
- Server configuration
- Media settings
- Action
- Application overview
- Recording
- Local memory
- Log file
- Parameter list
- Management
- Maintenance and Cleaning
- Function Test
- Cleaning
- Disposal
- Technical data
- URL Commands
- License information
- Technologie Lizenzhinweise
- Usage
- Éléments fournis
- Installation
- Alimentation électrique
- Montage de l’objectif
- Installation de la caméra
- Description de la caméra réseau
- Vue de face/ Vue de dos
- /
- Entrée d’alarme et sorties numériques
- Sortie vidéo et commutateurs DIP
- Entrée-sortie de porte logique et affichage d’état
- Première mise en route
- Premier accès à la caméra réseau
- Connexion à la caméra réseau à l’aide d’un navigateur web
- Installation du module d’extension ActiveX
- Réglage des paramètres de sécurité
- Authentification par mot de passe
- Connexion à la caméra réseau à l’aide d’un lecteur RTSP
- Connexion à la caméra réseau à l’aide d’un téléphone mobile
- Connexion à la caméra réseau à l’aide d’eytron VMS Express
- Fonctions d’utilisateur
- Commande audio/vidéo
- Réglages client
- Réglages administrateur
- Système
- Sécurité
- HTTPS
- SNMP
- Réseau
- Réglages du réseau
- IEEE 802.1x
- HTTP
- FTP
- HTTPS
- Audio bidirectionnel
- Transfert RTSP
- Multidiffusion
- DDNS
- Création d’un compte DDNS
- Accès DDNS par routeur
- Liste d’accès
- Audio et vidéo
- /Réglages de l’image
- Masquage de zones privées
- Réglages de l’exposition
- Réglage de base
- Réglage de l’image et de la fenêtre de visionnage
- Réglages audio
- Détection de mouvement
- Détection de falsification de la caméra
- Commande de caméra
- Application
- Réglages déclenchement
- Configuration du serveur
- Réglages médium
- Action
- Aperçu de l’applicatio
- Enregistrement
- Mémoire locale
- Log de système
- Liste des paramètres
- Gestion
- Maintenance et nettoyage
- Test de fonctionnement
- Nettoyage
- Elimination
- Fiche technique
- Commandes URL
- Informations relatives aux licences
- Avis concernant les licences technologiques
- Bedoeld gebruik
- Leveringsomvang
- Installatie
- Voeding
- Bevestigen van het objectief
- Bevestigen van de camera
- Beschrijving van de netwerkcamera
- Vooraanzicht/ Achteraanzicht
- /
- Alarmingangen en digitale uitgangen
- Video output en DIP switches
- Gate ingang / uitgang en status display
- Eerste keer opstarten
- Eerste netwerktoegang naar de netwerkcamera
- Via een browser verbinding maken met de netwerkcamera
- Installatie van de Active-X invoegtoepassing
- Aanpassen van de beveiligingsinstellingen
- Identificatie met een wachtwoord
- Via een RTSP speler verbinding maken met de netwerkcamera
- Via een mobiele telefoon verbinding maken met de netwerkcamera
- Via eytron VMS Express verbinding maken met de netwerkcamera
- Gebruikersfuncties
- Audio/videobesturing
- Klantinstellingen
- Administratorinstellingen
- Systeem
- Veiligheid
- HTTPS
- SNMP
- Netwerk
- Netwerkinstellingen
- IEEE 802.1x
- HTTP
- FTP
- HTTPS
- Tweewegaudio
- RTSP overdracht
- Multicast-overdracht
- DDNS
- DDNS account installeren
- DDNS-toegang via router
- Toegangslijst
- Audio en video
- Beeldinstellingen
- / Maskeren van privézones
- Exposure Settings
- Basisinstelling:
- Beeld en weergavevenster aanpassen
- Audio-instellingen
- Bewegingsherkenning
- Camera sabotageherkenning
- Camerabesturing
- Toepassing
- Instellingen activering
- Serverconfiguratie
- Media-instellingen
- Actie
- Toepassingsoverzicht
- Opname
- Lokaal geheugen
- Logbestand
- Parameterlijst
- Beheer
- Onderhoud en reiniging
- Werkingstest
- Reiniging
- Afvalverwijdering
- Technische gegevens
- URL opdrachten
- Licentie informatie
- Verwijzingen technologische licenties
- Korrekt anvendelse
- Leveringsomfang
- Montering
- Strømforsyning
- Montering af objektiv
- Montering af kameraet
- Beskrivelse af netværkskameraet
- Frontvisning / Bagsidevisning
- /
- Alarmindgange og relæudgange
- Videoudgang og DIP-kontakter
- Kontaktind-/udgang og statusvisning
- Første ibrugtagning
- Første adgang til netværkskameraet
- Adgang til netværkskameraet via webbrowser
- Installer ActiveX-plugin
- Tilpasse sikkerhedsindstillinger
- Passwordforespørgsel
- Adgang til netværkskameraet via RTSP-player
- Adgang til netværkskameraet via mobiltelefon
- Adgang til netværkskameraet via eytron VMS Express
- Brugerfunktioner
- Audio/video-styring
- Kundeindstillinger
- Administratorindstillinger
- System
- Sikkerhed
- HTTPS
- SNMP
- Netværk
- Netværksindstillinger
- IEEE 802.1x
- HTTP
- FTP
- HTTPS
- Tovejs-audio
- RTSP-overførsel
- Multicast-overførsel
- DDNS
- Indstilling af DDNS-konto
- DDNS-adgang via router
- Adgangsliste
- Audio og video
- Billedindstillinger
- / Privatzonemaskering
- Eksponeringsindstillinger
- Grundindstilling
- Tilpas billedområder og billedstørrelser
- Audio-indstillinger
- Bevægelsesgenkendelse
- Kamera sabotageregistrering
- Kamerastyring
- Anvendelse
- Indstillinger for udløser
- Serverkonfigurering
- Medieindstillinger
- Handling
- Anvendelsesoversigt
- Optagelse
- Lokalt lager
- Log-fil
- Parameterliste
- Forvaltning
- Vedligeholdelse og rengøring
- Funktionstest
- Rengøring
- Bortskaffelse
- Tekniske data
- URL-kommandoer
- GPL-licensoplysninger
- Teknologi-licensoplysninger
- Appendix
- HTTP/CGI Command
98
English
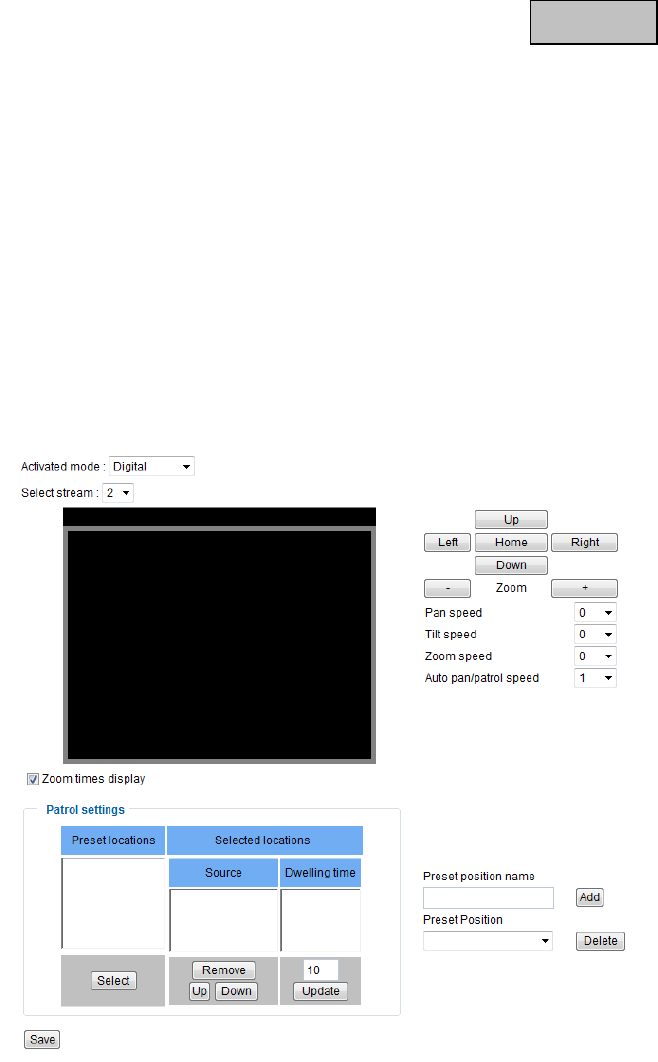
12. Camera control
There are two different options to control PTZ network cameras:
• Mechanical: Connect the Network Camera to a PTZ driver or scanner via RS485 interface.
• Digital: Digital PTZ (e-PTZ) within a certain image area.
RS485 Settings
„Disabled“: Function is deactivated.
„PTZ camera“: This setting is required when connecting a motorized pan/tilt driver via RS485. Choose the
corresponding protocol: Pelco-D, DynaDome/SmartDOME, Lilin PIH-7x00.
„Transparent HTTP Tunnel“: If your PTZ device accepts RS485 commands via network you can use this
option. The necessary parameters you will find in the manual of the PTZ device.
Preset positions and tours
You can set up a maximum of 20
preset positions. Proceed as
following:
1. By using the direction buttons
position the camera tot he
desired image area.
2. Enter a name for this preset.
The name will be displayed in
the preset list.
3. Repeat steps 1 to 3 to add
further preset positions
4. To add presets to a tour mark
these in the preset list and
press „Select“.
5. Adjust the dwell time if
necessary.
6. Save the settings.
If you are using the digital control
there are further settings available:
„Select stream“: Adjust settings for
the selected video stream.
„Zoom times display“: Here you can choose if to display the zoom ratio into the live view image.
13. Application
This allows you to automate tasks in the network camera. The application configuration comprises 3 sections:
event, server and medium. A typical application example may look like the following: due to motion detection
(event), an email (server) with an alarm picture (medium) is sent to a user.
Event setup
Click “Add” to create a new event. Up to 3 events can be set.
“Event name” Assign a unique name to the event, under which the event configuration is to be saved
“Enable this event” Select this option to activate the programmed result.
“Priority” Events with higher priority are completed first
“Detect next event after” Time between events to be executed (e.g.: with motion detection)