
Body Repair Manual


Front Side Outrigger/Front Side Extension
Replacement (cont'd)
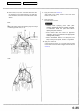
3.2TL:
FRONT SIDE
FRAME
FRONT SIDE
EXTENSION
FLOOR FRAME
Level off and finish the burrs of the pried off spot
welds with a disc sander.
To prevent eye injury, wear goggles
or safety glasses whenever sanding, cutting or
grinding.
5. Mold the related parts.
Reshape the lower dashboard, front side frame, front
floor, inside sill and side sill inner joint using a hammer
and dolly.
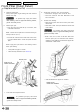
2.5TL:
Remove the remains of
the front side outrigger.
FRONT SIDE FRAME
6. Set the new front side outrigger.
• Remove the undercoat from both sides of the areas
to be spot welded with a sander to expose the steel
plate.
• Clamp the weld flanges with the side sill using the
vise-grip pliers. Set the front side outrigger on the
side frame using a jack.
• Drill 3 mm (0.12 in) holes, and screw 5 mm self-
tapping screws into the drilled holes at the areas
where the front side outrigger does not fit closely.
• Even out the welded flange and damaged area with
a hammer and dolly.
7. Perform the main welding.
To prevent eye injury and burns
when welding, wear an approved welding helmet,
gloves and safety shoes.
• From the passenger compartment side, weld the
holes in the lower dashboard, front floor and floor
frame with a MIG welder.
• Weld the front side frame and front side outrigger
using MIG welds.
2.5TL:
Main Menu
Table of Contents