
Body Repair Manual


Front Pillar (Outer Panel)
Replacement (cont'd)
5. Mold the related parts.
Fill any holes by MIG or gas welding, and even out with a
hammer and dolly.
To prevent eye injury and burns
when welding, wear an approved welding helmet,
gloves and safety shoes.
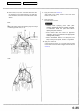
6. Set the repair part
• Align the repair part with the top cut section, then
cut it with a handsaw.
NOTE: Cut the side sill joint with a handsaw leaving an
overlap of 30 mm (1.2 in).
• Remove the undercoat from both sides of the areas
to be spot welded with a sander to expose the steel
plate.
NOTE: Apply the spot sealer to the welding surface
when spot welding.
• Clamp with vise-grips as shown.
• Check the body dimensions (see section 6).
REPAIR PART
FRONT PILLAR
LOWER STIFFENER
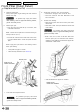
7. Tack welds the clamped sections.
To prevent eye injury and burns
when welding, wear an approved welding helmet,
gloves and safety shoes.
8. Temporarily mount the door and front fender.
• Remove the vise-grips, then mount the door.
• Check the clearance and level differences of the
door and fender.
9. Perform main welding.
• Weld the front pillar and side sill outer joints with a
MIG welder.
• Make 20% to 30% more spot welds than there were
holes drilled.
To prevent eye injury and burns
when welding, wear an approved welding helmet,
gloves and safety shoes.
• Make 5 mm (0.2 in) holes in the MIG weld holes
with the repair part, and weld the lower stiffener
extension, lower stiffener and dashboard upper side
member with a MIG welder.
• Weld the wheelhouse upper rear member.
WHEELHOUSE
UPPER REAR MEMBER
Main Menu
Table of Contents