
Body Repair Manual


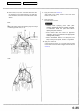


LOWER SUPPORT
A/C DUCT
SHELTER
DASHBOARD
UPPER SIDE
BULKHEAD
CENTER
DEFROSTER
DUCT
DASHBOARD UPPER
3. Set the new windshield lower.
• Apply an undercoat and body paint to the inside.
• Ventilate when spraying paint. Most paint
contains substances that are harmful if inhaled
or swallowed. Read the paint label before
opening the paint container.
• Avoid contact with skin. Wear an approved
respirator, gloves, eye protection and appropriate
clothing when painting.
• Paint is flammable. Store it in a safe place, and
keep it away from sparks, flames or cigarettes.
• Sand off the undercoat down to the metal from both
flanges to be welded.
• Clamp the new windshield lower in place with vise-
grips and squill vises.
NOTE: Apply the spot sealer to the welding surface
when spot welding.
• Install the new windshield and check for proper
installation and alignment.
4. Tack weld the new windshield lower.
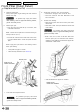
To prevent eye injury and burns
when welding, wear an approved welding helmet,
gloves and safety shoes.
• Remove the vise-grips and install the fender and
hood. Check for differences in level and clearance.
5. Perform the main welding.
• Make 20% to 30% more spot welds than there were
holes drilled.
To prevent eye injury and burns
when welding, wear an approved welding helmet,
gloves and safety shoes.
6. Finish the welding section.
Smooth the mating surface with the windshield with a
hammer and dolly.
7. Apply the sealer (see section 5).
Apply sealer to the upper dashboard, pillars, etc.
8. Install the front fender and hood.
Check the front fender and hood for differences in level
and clearance.
9. Apply the paint.
See Paint Repair section.
• Ventilate when spraying paint. Most paint
contains substances that are harmful if inhaled
or swallowed. Read the paint label before
opening the paint container.
• Avoid contact with skin. Wear an approved
respirator, gloves, eye protection and appropriate
clothing when painting.
• Paint is flammable. Store it in a safe place, and
keep it away from sparks, flames or cigarettes.
10. Apply anti-rust agent to the inside of the windshield
lower and dashboard upper (see section 7).
11. Install the related parts.
Install in the reverse order of removal.
NOTE: Take care not damage the windshield and the
paint finishes.
12. Inspect and clean.
• Check the windshield for water leaks.
• After installing the dashboard, check the lights,
gauges, etc. for proper operation.
• Clean the interior.
Main Menu
Table of Contents