
Body Repair Manual

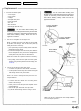

7. Perform main welding.
To prevent eye injury and burns
when welding, wear an approved welding helmet,
gloves and safety shoes.
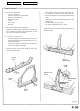
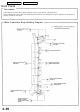
• Weld the side sill and rear side outer joints with a MIG
welder.
• Spot weld the side sill flanges.
• Make 20% to 30% more spot welds than there were
holes drilled.
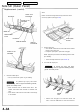
• Make 5 mm (0.2 in) holes in the MIG weld holes with
the repair part, and weld the center pillar stiffener and
wheel arch extension with a MIG welder.
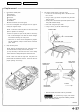
• Level the weld beads at the front and rear with a disc
sander. Hammer down the projections, then fill with
solder or putty to finish it.
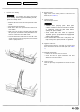
8. Apply the sealer.
Apply sealer to the mating surfaces of the floor and
inside sill (see section 5).
9. Apply the paint.
See Paint Repair section.
• Ventilate when spraying paint. Most paint
contains substances that are harmful if inhaled
or swallowed. Read the paint label before
opening the paint container.
• Avoid contact with skin. Wear an approved
respirator, gloves, eye protection and appropriate
clothing when painting.
• Paint is flammable. Store it in a safe place, and
keep it away from sparks, flames or cigarettes.
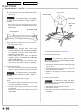
10. Apply the undercoat.
Undercoat the front floor, and apply an anti-rust agent
to the inside of the side sill and center pillar (see section
7).
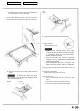
11. Install the related parts.
• Install in the reverse order of removal.
• Check the door for proper installation and level
differences from the fenders.
12. Clean and check.
Clean the passenger compartment and check for water
leaks.
Main Menu
Table of Contents