
Body Repair Manual


Rear Panel
Replacement
1. Remove the related parts.
• Rear bumper
• Rear bumper upper beam
• Trunk lid lock and its attachments
• Other related parts
• Rear and side trim panels
• Taillights
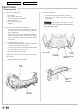
2. Pull out and straighten the damaged area.
• Pull out the related rear side inner panel, rear floor,
rear
side frame
and
other
damaged
parts
with
the
frame straightener.
• Attach the car to the frame straightener by tighten-
ing the underbody clamps located at the jack-up
points on the bottom of the side sill and the side sill
side flanges.
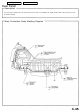
3. Cut and pry off the rear panel.
• Cut along the bold line shown with a gas cutter or an
air chisel and remove the rear panel.
• Center punch around the spot weld imprints with the
rear side outer panel and rear floor.
• Drill holes using the spot cutter.
NOTE: Be careful not to let holes penetrate through to
the rear floor.
• Remove weld flange with a chisel.
REAR
PANEL
JACK-UP
STIFFENER
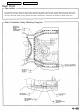
4. Mold the related parts.
• Repair the rear floor upper stiffener if necessary.
• Repair all cracks, holes or other defects by MIG or
gas welding.
To prevent eye injury and burns
when welding, wear an approved welding helmet,
gloves and safety shoes.
REAR FLOOR
JACK-UP
STIFFENER
REAR
FRAME
SILENCER MOUNT
BRACKET
REAR FLOOR
UPPER
STIFFENER
Main Menu
Table of Contents