
Body Repair Manual

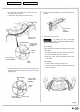


Rear Floor Cross Member
Replacement
1. See Rear Floor Replacement for removal of related
parts.
2. Peel off the undercoat.
Heat the undercoat at the weld areas of the rear floor
and rear frame with a gas torch, and peel off the
undercoat with a metal spatula.
CAUTION: Be careful not to burn the fittings inside
the trunk compartment when heating.
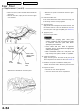
3. Remove the rear floor cross member.
To prevent eye injury, wear goggles
or safety glasses whenever sanding, cutting or
grinding.
• Center punch around the spot weld imprints on the
rear floor cross member from under the rear floor.
• Drill holes with a spot cutter at the area joined to the
rear floor cross member and rear floor.
NOTE: When drilling holes be careful not to drill down to
the rear floor upper cross member.
• Center punch around the spot weld imprints on the
rear frame.
• Drill holes with a spot cutter.
• Be careful not to let them penetrate through to the
rear frame.
• Pry off the part with a chisel.
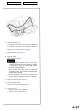
4. Set the new rear floor cross member.
• Sand off undercoat from both sides of the areas to
be welded to expose the steel plate.
To prevent eye injury, wear goggles
or safety glasses whenever sanding, cutting or
grinding.
• Make 5 mm (0.2 in) holes in the MIG weld holes with
the new rear floor cross member.
• Set the new rear floor cross member in the original
position properly and place a jack under the rear
floor cross member for support.
• Refer to the set position body dimensional drawings
(see section 6) for proper positioning of the rear floor
cross member.
• Temporarily weld the mating surfaces with the rear
frame.
To prevent eye injury and burns
when welding, wear an approved welding helmet,
gloves and safety shoes.
• Check the rear floor cross member in its correct
position with the fuel tank installed.
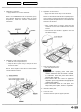
5. Perform the main welding.
To prevent eye injury and burns
when welding, wear an approved welding helmet,
gloves and safety shoes.
• MIG weld the rear floor cross member from under the
rear floor.
Main Menu
Table of Contents