
Body Repair Manual


Honeycomb Floors (2.5TL)
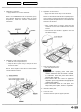
NOTE: What is known as "honeycomb" construction is employed for the front floor. Properly designed and applied, it plays an
important role in maintaining the structural rigidity of that section of the car's floor. The honeycomb floor is installed with an epoxy
resin adhesive. Care must be exercised when installing a new honeycomb floor as seepage of water into the honeycomb
construction will adversely affect its performance.
Replacement
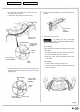
1. Remove the related parts.
• Front and rear seats.
• Carpet, others
2. Removal of honeycomb floors.
• Scrape off the dust sealer all the way around the
floor.
• Separate the floor from the body by using a pair of
pliers.
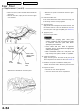
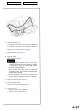
3. Flattening of melt-sheet
• Heat the surface of the melt-sheet with a torch or heat
gun until it becomes soft and pliable.
• Finish the surface smooth and flat with a steel spatula.
NOTE: In order to take full advantage of the honeycomb
floor, its face must contact the base fully.
CAUTION: Be careful not to burn the fittings inside
the passenger compartment when heating.
Main Menu
Table of Contents