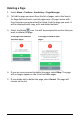
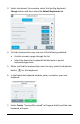
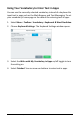
Deleting a Page 1. Select Menu > Toolbox > Vocabulary > Page Manager. 2. To find the page you want from the list of pages, select the Search for Page field and enter a partial page name. All page names with the characters you entered will be listed. Find the page you want. It will be displayed with copy, edit, and delete buttons. 3. Select the Delete icon. You will be prompted to confirm that you want to delete the page.
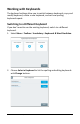
Working with Keyboards The keyboard settings allow you to switch between keyboards, copy and modify keyboard, create a new keyboard, and set how spelling keyboards speak. Switching to a Different Keyboard If you don’t want to use the existing keyboard, switch to a different keyboard. 1. Select Menu > Toolbox > Vocabulary > Keyboards & Word Prediction. 2. Choose Select a Keyboard to list the spelling and editing keyboards with Change buttons.
. Select Change for the keyboard you want to replace. A window lists available keyboards under Default Keyboards and My Keyboards tabs. Note: To make a copy of a keyboard, see “Copying and Editing a Keyboard”. 4. If you haven’t created your own keyboards, select the Default Keyboards tab. To find the keyboard you want, use one of the following methods: • Use the arrows to page through the list • Select the Search for keyboard field and enter a partial keyboard page name 5.
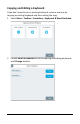
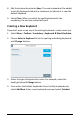
Copying and Editing a Keyboard If you don’t want to use an existing keyboard, create a new one by copying an existing keyboard and then editing the copy. 1. Select Menu > Toolbox > Vocabulary > Keyboards & Word Prediction. 2. Choose Select a Keyboard to list the spelling and editing keyboards with Change buttons.
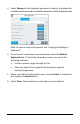
3. Select a keyboard. For example, select the Spelling Keyboard Change button and then select the Default Keyboards tab. 4. To find a keyboard to copy, use one of the following methods: • Use the arrows to page through the list • Select the Search for keyboard field and enter a partial keyboard page name. 5. When you find the keyboard you want to copy, select the duplicate button for that keyboard. 6. In the Duplicate Keyboard window, enter a name for your new keyboard. 7. Select Create.
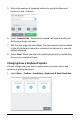
8. Edit the keyboard and select Save. The new keyboard will be added to the My Keyboards tab with a checkmark to indicate it is now the default keyboard. 9. Select Close. When you select the spelling keyboard in the vocabulary, the one you created will open. Creating a New Keyboard If you don’t want to use any of the existing keyboards, create a new one. 1. Select Menu > Toolbox > Vocabulary > Keyboards & Word Prediction. 2.
5. Define the number of keyboard buttons by using the Rows and Columns + and – buttons. 6. Select Create & Edit. “Successfully created” will appear briefly and the keyboard page will open. 7. Edit the new page and select Save. The new keyboard will be added to the My Keyboards tab with a checkmark to indicate it is now the default keyboard. 8. Select Close. When you select the spelling keyboard in a vocabulary, the one you created will open.
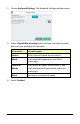
2. Choose Keyboard Settings. The Keyboard Settings window opens. 3. Select a Speak When Spelling tab to set how your device speaks when you are spelling on a keyboard. If you select … This will happen Letters Each letter will speak as you enter it Word Each word will speak when you finish entering it Letters & Words Each letter will speak as you enter it, and each the word will speak when you finish entering it. None No letters or words will speak 4. Select Finished.
Using Your Vocabulary to Enter Text in Apps You can use the currently selected vocabulary instead of a keyboard to input text in apps such as the Web Browser and Text Messaging. To set your vocabulary’s home page as the default for entering text in apps: 1. Select Menu > Toolbox > Vocabulary > Keyboards & Word Prediction. 2. Choose Keyboard Settings. The Keyboard Settings window opens. 3. Select the Write with My Vocabulary in Apps on/off toggle to turn the setting on. 4. Select Finished.
Using Word Prediction Word prediction helps improve a person's ability to communicate by reducing the amount of time spent in spelling out long and/or seldom used words. The system predicts words based on how often (frequency) or how recently (recency) you have used the word or based on words that are most likely to follow the word you just entered. The system also prioritizes the words used most recently.
Adding Words that You Want Predicted 1. Select Menu > Toolbox > Vocabulary > Keyboards & Word Prediction > Word Prediction. The Word Prediction window opens to the Settings tab. 2. Select the My Predictions tab. 3. Select the Enter a Word field, use the keyboard to enter a word that you want predicted, and select Finished. 4. Select Add. A message will confirm that the word was added, and the word will appear on your prediction list.
Note: To delete a word from your word prediction list, select the delete button . A message will confirm that the word was deleted. 5. Add words to your word prediction list as needed. When you finish, select Close. Specifying Words that You Don’t Want Predicted 1. Select Menu > Toolbox > Vocabulary > Keyboards & Word Prediction > Word Prediction. The Word Prediction window opens to the Settings tab. Select the Excluded Words tab. 2.
3. Select Add. A message will confirm that the word was added, and the word will appear on your exclusion list. Note: To delete a word from your exclusion list, select the delete button . A message will confirm that the word was deleted. 4. Add words to your exclusion list as needed. When you finish, select Close.
Analyzing Language Development Use the data logging capabilities of your device to collect data on what was said and when. To help analyze an individual’s vocabulary and language development, you can upload the collected data to the Realize Language™ website for analysis. Using the Realize Language Website The Realize Language online service is subscription-based.
Turning Data Logging on Data Logging allows your device to collect data on what was said and when. Select Menu > Toolbox > Vocabulary > Data Logging to open the Data Logging window Select the on/off toggle to turn data logging on.
Exporting and Uploading Collected Data After you turn data logging on, your device will start collecting data on what was said and when. When you want to measure how the individual is progressing, you can export the collected data to a text (.txt) file and upload it to the Realize Language website for analysis. 1. Plug a USB flash drive into the device. 2. From the Data Logging window, select the Export Data Log Select Folder button.
Clearing Usage Data After you export usage data and upload it to the Realize Language website for analysis, you can clear the data log. From the Data Logging window, select Clear Data. A message will warn that all logged data will be deleted. Select OK to clear the data. If you want to start a new data log, leave Data Logging turned on. If you don’t want to start a new log at this time, turn Data Logging off. Select Close.
Changing System Settings The system settings allow you to • mute all sounds, adjust speaker and headphones volume, allow prompts to be heard through the device’s speakers as well as headphones, and turn the device’s volume button on or off • connect other devices and accessories to your device • back up and restore the contents of your device • export and import users, vocabularies, and pages.
Adjusting Sound and Volume To prevent possible hearing damage, do not listen to headphones at high volume levels for long periods. Select Menu > Toolbox > System Settings > Volume Settings. From the Volume Settings window you can use the device volume button to adjust volume, adjust device volume, and allow prompts to be heard through the device’s speakers as well as headphones.
Adjusting Device Volume Adjust the Device Volume setting by moving the slider button until the number you want is displayed or by selecting the + and – buttons to change the number one digit at a time. Settings range from 1 to 20. To mute the device speakers, select the mute speakers button. The button turns blue when selected. In this example, the button is blue, indicating that the speakers are muted.
Adjusting Device and Headphones Volume using the Volume Shortcut You can also configure device and headphones volume from the Quick Menu volume shortcut. 1. Select Menu to display the Quick Menu. 2. Select the Volume shortcut. Device volume and headphones volume options are displayed. Adjusting Device Volume Adjust the device volume setting by moving the slider button until the number you want is displayed or by selecting the + and – buttons to change the number one digit at a time.
Setting Up a Wi-Fi Connection 1. Select Menu > Toolbox > System Settings > Devices & Connections. The Devices & Connections window opens to the Wi-Fi tab. 2. Select the Wi-Fi Connection Choose button. The Windows Wi-Fi Manager lists available wireless networks. 3. Select the network you want to connect to. 4. Select Connect, enter the network password, and select Next. 5. When the connection is made, select Close to close the Devices & Connection window. 6.
Setting Up a Bluetooth Audio Connection 1. Select Menu > Toolbox > System Settings > Devices & Connections. 2. Select the Bluetooth Audio tab. 3. Select the Pair Device button. Available Bluetooth audio devices will be listed. 4. Select the Pair button for the device you want. 5. When the device is paired, a Connect button will appear. 6. Select Connect to connect the device. 7. Select Close. To disconnect the device: When the device is connected, a Disconnect button is displayed.
Connecting Your Device to a Switch Use the Switches tab to connect your device to an AeroSwitch® or Freedom Switch™, depending on which Accent model you have. 1. Select Menu > Toolbox > System Settings > Devices & Connections. 2. Select the Switches tab. 3. Turn the switch on. 4. Select the “Connect Switch” Connect button. A message will prompt you to press the switch to pair it. 5. Within 10 seconds, press the switch.
Viewing Empower Update Notifications When an Empower software update is available, the “update available” icon will appear in the multi-bar status area. When you select Menu > Toolbox > System Settings, the update icon will also appear in the System Settings tab. In addition, the Updates tile will display “Update is Available”. To update your software, see the next section, “Updating the Device Software using a Wi-Fi Connection”.
Updating the Device Software using a Wi-Fi Connection Important! Some updates will take longer than others. You won’t know how long the update will take, so we recommend that you plan downloads for when you will not need to use your device and can keep an eye on the download progress. Step 1: Connect your device to Wi-Fi If you need to set up a Wi-Fi connection, see “Setting Up a Wi-Fi Connection” on page 214. Step 2: Plug in the battery charger Step 3: Update the Software 1.
3. Select Download. The following message will appear. • If you select Yes, the Empower software closes and the update proceeds. • If you select No, the update process closes and Empower reopens. • If you don’t select Yes or No within one minute, the message disappears, the update process closes, and Empower reopens. 4. If you select Yes, “Downloading” will be displayed. When the download finishes, you will see “Download completed. Would you like to install updates now?”. 5. Select Install.
Updating the Device Software using a USB Flash Drive Important! Some updates will take longer than others. You won’t know how long the update will take, so we recommend that you plan downloads for when you will not need to use your device and can keep an eye on the download progress. Step 1: Download the update file to your computer and copy it to a USB flash drive 1. Insert your USB flash drive into the computer to which you will download the software update. 2. Go to the PRC products website www.
Step 3: Update your device 1. Make sure the USB flash drive containing the update file is plugged into your device. 2. Select Menu > Toolbox > System Settings > Updates. The updates window allows you to choose how to update your device. 3. Select Check for Updates to the right of Update Using a USB Flash Drive. When an update is available, the Update Available window appears.
4. Select Download. The following message will appear. • If you select Yes, the Empower software closes and the update proceeds. • If you select No, the update process closes and Empower reopens. • If you don’t select Yes or No within one minute, the message disappears, the update process closes, and Empower reopens. 5. If you select Yes, “Downloading” will be displayed. When the download finishes, you will see “Download completed. Would you like to install updates now?”. 6. Select Install.
Backing Up and Exporting Files You can back up and export files on your device by using the features available in the Export & Import window. Select Menu > Toolbox > System Settings > Export & Import. The Export & Import window opens to the Export tab. Feature Description Export a User Export the settings and vocabularies created for a particular user as a backup or to transfer to another device.
Exporting a User’s Vocabularies and Settings Exporting a user creates a copy of the vocabularies and settings saved for that user. 1. Plug a USB flash drive into the device. 2. Select Menu > Toolbox > System Settings > Export & Import. 3. From the Export & Import window, select the Export tab. 4. Select Choose files to the right of Export a User. The Export a User window opens. All users are listed with Export buttons. Note: If necessary, use the arrows to page to the user you want to export. 5.
Exporting a Customized Vocabulary File or Keyboard Exporting a customized vocabulary file creates a backup/copy of it. 1. Plug a USB flash drive into the device. 2. Select Menu > Toolbox > System Settings > Export & Import. 3. From the Export & Import window, select the Export tab. 4. Select Choose files to the right of Export a Vocabulary or Keyboard. The current user’s customized vocabularies and keyboards are listed with Export buttons.
9. “Export Succeeded” will be displayed and the file will be saved to the USB flash drive with the name you entered. You can keep this file as a backup or transfer it to another device. Exporting Vocabulary Pages Exporting vocabulary pages creates backups/copies of them. 1. Plug a USB flash drive into the device. 2. Select Menu > Toolbox > System Settings > Export & Import. 3. From the Export & Import window, select the Export tab. 4. Select Choose files to the right of Export Pages.
8. Select Export selected and navigate to the USB flash drive. Note: When necessary, use the Up One Level button to the flash drive. to navigate 9. If necessary, rename the pages. 10. Select Save. “Export Succeeded” will be displayed and the page(s) will be saved to the USB flash drive with the name you entered. You can keep this file as a backup or transfer it to another device.
Importing and Restoring Files You can import files and restore backed-up files to your device by using the features available in the Export & Import window. Select Menu > Toolbox > System Settings > Export & Import. Select the Import tab. Feature Description Import a User Import a user to appear on the Sign In screen. Import a Vocabulary or Keyboard Import an Empower vocabulary file to appear in My Vocabularies or a keyboard to appear in My Keyboards.
Importing Users, Vocabularies, Keyboards, and Pages To import a user, vocabulary file, keyboard, or one or more pages: 1. Select Menu > Toolbox > System Settings > Export & Import. 2. From the Export & Import window, select the Import tab. 3. Select Choose files to the right of Import a User, Import a Vocabulary or Keyboard, or Import Pages. The Import window lists available folders. 4. Select the folder that contains the file(s) you want. 5. Select the file. “Import Succeeded” will be displayed. 6.
Importing Message Banking Messages The PRC-Saltillo message banking website and myMessageBanking.com allow you to combine multiple recorded messages into a .zip file and download the file to your device. When you use the Import Message Banking Zip File feature, the messages will appear automatically on pages in your Essence 60 or Essence 84 vocabulary. 1. Select Menu > Toolbox > System Settings > Export & Import. 2. From the Export & Import window, select the Import tab. 3.
Setting the Date and Time 1. Select Menu > Toolbox > System Settings > Date & Time. The Windows Date and Time window opens. 2. Select Change date and time, make the necessary changes, and select OK to close the Date and Time Settings window. 3. Select OK to close the Date and Time window.
Configuring Device Power Settings The power settings allow you to • restart the device from the software • shut down the device from the software • set the device power button to shut down the device or put the device into sleep mode • temporarily put the device into sleep mode • set the device to enter sleep mode automatically • adjust screen brightness to save power Restarting and Shutting Down the Device The power settings allow you to put the device to sleep, restart or shut down the device,
To put the device to sleep: To temporarily put the device to sleep, select Sleep Now. The device will go into sleep mode immediately. To restart the device: To turn the device off and back on, select Restart Device. A confirmation prompt will appear. Select Yes, restart device. To shut down the device: To shut the device off, select Shut Down Device. A confirmation prompt will appear. Select Yes, shut down.
Configuring the Device Power Button using the Power Settings From the Power Settings window, select a Device Power Button option to configure the operation of the device power button. The options operate as follows when the device is already turned on. Sleep The device will enter sleep mode when you press the device power button. Shut Down The device will shut down when you press the device power button. No Action Nothing will happen when you press the device power button.
Saving Battery Power The power settings allow you to put the device to sleep, restart or shut down the device, and configure settings to save battery power. Select Menu > Toolbox > System Settings > Power Settings. Select the Battery Saving tab.
Auto-Brightness To allow the device to automatically adjust to the amount of light in the user’s environment, select the on/off toggle: = screen brightness will automatically adjust to the amount of light in the user’s environment; = Use the Screen Brightness option to manually set the brightness of the screen. Note: Auto-Brightness is not available on all Accent models. It is grayed out if not available. Use Screen Brightness to manually set the brightness of the screen.
Using the System Options Select Menu > Toolbox > System Settings > System Options & Support. The System Options & Support window opens to the System Options tab. Switching Your Device to Integrated Device Mode (non-dedicated) Important! Most funding sources require that an Accent® device be shipped as a dedicated communication device. This means that access to some of the extended features is limited.
Switching from Empower to NuVoice Software If you want to switch your device from Empower software to NuVoice software, select Launch NuVoice. Upgrading the Empower Software using a USB Flash Drive To upgrade Empower software features, insert the USB flash drive that contains the extended features and select Upgrade. Changing Permission for Anonymous Data Sharing When you first installed the Empower software, you were given the choice to share or not share software usage data with developers.
Using the Support Options Select Menu > Toolbox > System Settings > System Options & Support. Select the Support tab. Restoring Empower and Windows Software Factory Settings Important! If you perform a system restore, you will lose all your user settings and data. Before starting the process, follow the procedures under “Backing Up and Exporting Files” on page 223 and “Importing and Restoring Files” on page 228. Note: The restore process can take up to an hour to complete. 1.
2. Select Troubleshoot. 3. Select Restore Device. 4. You will be prompted to confirm that you want to continue. Select Yes.
5. After the restore is complete, select OK to reboot. You will be asked a series of questions to set up Windows. We suggest the following answers: • Region = United States • Keyboard = US • Second keyboard = skip 6. Once Empower launches, you will see the following: 7. Check both boxes and then select Allow Access. 8. Follow the prompts to get started in Empower. Check to see if a software update is available (select Menu > Toolbox > System Settings > Updates).
Reactivating Windows after a System Restore After you restore your Empower and Windows software to their factory settings, you will need to reactivate Windows on the device. Select Activate. Viewing Hardware Version Information To view hardware version information for your device, select Hardware Versions. Getting Remote Assistance from Technical Support If you contact technical support and they need access to your device, they will give you a session ID.
Opening Additional Apps on Your Device To open other apps on your device, select Menu > Toolbox > Applications. The Applications screen lists additional apps that are available on your device. Select the app you want to use. To return to the Empower software from an app: Each app allows you to return to where you were before opening the app. Select Exit App at the top right corner of the screen, below the Menu button. You will return to the Empower software screen you came from.
Finding Additional Information More specific information on using access methods and vocabularies is available in the manuals and instructions included with your PRC communication device and accessories. For information on using an Accent 800 device with NuVoice software, view or download the Accent 800 User’s Guide for NuVoice from https://www.prentrom.com/support/accent. In addition, a wide variety of documentation, tutorials, videos, and training is available from the PRC website: https://www.prentrom.
Troubleshooting Information appears in the wrong language The wrong language may be selected for either the Toolbox language or the language used with vocabularies. Option #1: Change the Toolbox language 1. Select Menu > Toolbox > User Settings > Toolbox Language. The Toolbox Language window shows the language currently selected for the Toolbox. 2. Select the Current Language Change button. The available languages are displayed. 3. Select the Choose button for the language you want. 4. Select Close.
The display loses colors, is black and white only 1. In the Empower software. select Toolbox > System Settings > Devices & Connections > Wi-Fi Connection Choose. The Windows Wi-Fi window lists available wireless networks. 2. From the Windows desktop, close the Wi-Fi window. 3. Select the Windows key and then select the Settings key. 4. Select Ease of Access and select Color Filters. 5. Set “Turn on color filers” to Off. 6. If "Allow the shortcut key to toggle filter on or off" is an option, uncheck It 7.
A “Hardware Communication Failure” message appears on startup This message indicates that the Empower software is unable to communicate with the custom PRC hardware inside the device. Possible causes: The background software may have crashed; there may be a hardware or firmware problem; the Empower software has become corrupted. Option #1: Reset the device. 1. Use a paper clip to press the recessed reset button on the back of the device. Note: You only need press the button for 3 to 5 seconds. 2.
Appendix A: Using the Empower Accessible Web Browser The Empower Accessible Web Browser was specifically designed for use with head tracking and eye tracking. It is a familiar, simple, and easy-touse browser. Important! To enable streaming in websites such as Netflix®, please update your software to version 1.13 and then connect to the internet before starting the Web Browser app. The device battery will deplete more quickly when streaming content.
The Home Screen When you select Web Browser, the home screen appears. At the top, two rows of buttons help you use the Web Browser. The remaining portion of the screen is the Web Browser window. Note: Your web browsing experience will be affected by the speed of your internet connection. You need to make sure the webpage is fully loaded before you try to interact with it.
Using the Web Browser Buttons The Web Browser buttons operate as follows. Button What it does Prev Page Navigates back one webpage in your browsing history. Next Page Navigates forward one webpage in your browsing history. Refresh Refreshes your current webpage. URL Address Bar Allows you to go to a different website. You can enter a specific URL address or a search term. Select Go to perform the search. My Favorites Store favorite websites.
Button What it does Read Mode Turn Read Mode ON when you want to view or read a website and you don’t want to make accidental clicks in the Web Browser window. When Read Mode is ON the button will turn blue and you will not be able to click in the Web Browser window; however, you can still select the buttons in the top two rows and use scroll. Page Scroll When a webpage has only one scroll bar, use Page Scroll.
Storing Favorite Websites When you select the My Favorites button, the My Favorites page opens. Here you can Add and Delete favorite websites. In addition, you can navigate to additional pages of favorite websites using the Prev Page and Next Page buttons. To add a favorite website: 1. Using the URL Address Bar, go to the website you want to add as a favorite. Wait until the page fully loads. 2. Select the My Favorites button. 3. Select Add Favorite. 4. Select an empty button. 5.
Creating a Shortcut to the Web Browser in Your Vocabulary To link directly to the Web Browser from your vocabulary: 1. Select Menu and then select Editor. 2. Navigate to the button on which you want to create the shortcut, but do not select it. 3. Select Edit and then select the button you want to edit. 4. Select Label and type Web Browser, then select Finished. 5. Suggested symbols will appear. Select one you like or select the Symbol tab. You can Search, Browse, or Import symbols or select Camera. 6.
Hint: When searching for something on the web (in YouTube, on Amazon, in Google etc.) use the Go button on the keyboard (see the image below) and it will automatically trigger the search (it is the equivalent of pressing enter on your keyboard). If you simply want to enter text and then close the keyboard, select Finished instead. Disclaimer: Given the infinite number and types of websites, we cannot guarantee our current tools will work with all websites.
Returning to the Empower Software from the Web Browser The Web Browser app allows you to return to where you were before opening the app. Select Exit App at the top right corner of the screen, below the Menu button. You will return to the Empower software screen you came from.
Appendix B: Setting up and Using Empower Text Messaging This appendix explains how to download the AeroText™ app, pair an Android® phone to your Accent device with Empower software, and use text messaging. Downloading and Installing the AeroText App onto Your Android Phone Texting requires an Android phone with the PRC-Saltillo AeroText app installed. To install the app, type the following address into the browser on your phone or point your phone’s camera at the QR code below. https://prc-saltillo.
Pairing Your Phone to Your Accent Device with Empower 1. 2. 3. 4. 5. 6. 7. 8. 9. Select Menu. Select Toolbox. Select System Settings. Select Devices & Connections. Select Bluetooth Phone. Select Pair Device. Once your phone appears in the list, select Pair. Select Close and exit from the Toolbox. You will see a Phone icon in the multi-bar status area of your vocabulary to indicate that your device is connected. Texting from Empower 1. 2. 3. 4. Select Menu. Select Toolbox. Select Applications.
To respond to a message, select the Enter Text button and then compose your message. Select Finished when your message is complete. 4. Select Send. 5. If you cannot read an entire message from the home screen view, select See Entire Message. Then select the message you would like to view. This function will stay on, until you select See Entire Message again. 3. Sending a Message to an Existing Contact 1. 2. 3. 4. 5. 6. Select Contacts. Search for and find the contact you want to send a message to.
Appendix C: Setting up and using IR Remote Controls You can use the IR Remote Controls app in Empower to control an IR device such as a TV. Gaining Access to the IR Remote Controls App To gain access to the IR Remote Controls app, select Menu > Toolbox > Applications. Then select IR Remote Controls. If you do not see IR Remote Controls, you will need to update your software to version 1.09 or later.
Gathering What You Need To set up and use the IR Remote Controls app in Empower, you will need the following: The device you want to control, such as your TV. The IR Remote control for the device you want to control, such as your TV’s remote control. Make sure the remote has fresh batteries. • Your Accent device running Empower version 1.09 or greater communication software. Make sure the back of the Accent device is pointed directly at the device you want to control, such as your TV.
7. In the Find My Remote tab you will see a list of remotes that match your device type and manufacturer. Select Test to see if the buttons on the remote page control your device. Make sure the back of your Accent is pointed directly at the device you want to control. There can be nothing between your Accent and the device you want to control. Choose a remote that best controls your device. Select Finished. Using IR Remote Controls 1. Select the tile that leads to your new remote control. 2.
Fixing or Adding a Signal Sometimes you will find that one of the buttons on your remote control page is not working. 1. 2. 3. 4. 5. 6. 7. 8. 9. Select Edit IR Remote. Choose the remote you want to edit. Select Learn IR Signal. Select the button that is not working. Point the remote control at the top back of your Accent. Select Learn Signal Now. You will have 10 seconds to teach Empower the signal. Press and release the button on the remote control that you want to learn.
Appendix D: Creating a List-O-Matic Button Action A List-O-Matic button action allows you to play a list of items in the order you specify or in a random order with the press of a button in your vocabulary. Each time you select the button, the next item will play. Use List-O-Matic to tell a joke, play bingo, roll dice, etc. 1. Go to the vocabulary page that includes the button you want to use. 2. Select Menu > Editor. Select Edit and choose the button to which you want to add the action. 3.
5. Select the List-O-Matic Choose button. The List-O-Matic window will open. 6. Select the order in which you want the items to play: In Order, Random, or Random No Repeats. In Order: Items on the list will play in order and appear in the message window. One item will play at a time when you select the button. The list will start over when you get to the end if playing sequentially. If you select another button and then select this button again, the list will start over.
9. Repeat steps 7 and 8 for each item you want to add. • • • The listed items will be stored within the List-O-Matic button action. To delete an item from the list, select . To go back to the category folders, select Back. Important! If you select Back, the items will not be saved. 10. Select Save to save the items to the List-O-Matic action. The Save button appears when the list has at least one item.
Add Action To add another action, select Add Action. Note: You can add a List-O-Matic button action to a button multiple times. For each instance of the action, only one item from each list will be generated (in the order of the button action list). If you add more than one action to the button, use the up arrow to move the action higher in the list so it will play before one or more of the other actions.
Appendix E: Compliance Information Federal Communications Commission (FCC) Warning This device complies with Part 15 of the FCC Rules. Operation is subject to two conditions: (1) this device may not cause harmful interference, and (2) this device must accept any interference received, including interference that may cause undesired operation. Changes or modifications to this product which are not authorized by PRC-Saltillo could exceed FCC limits and negate your authority to use this product.
Industry Canada (IC) Warning This device complies with Industry Canada license-exempt RSS standard(s). Operation is subject to the following two conditions: (1) This device may not cause interference, and (2) This device must accept any interference, including interference that may cause undesired operation of the device. Le présent appareil est conforme aux CNR d'Industrie Canada applicables aux appareils radio exempts de licence.
Existing Application Risks No existing application risks are known. Expected Service Life The expected service life of the device, battery charger, and accessories is five years. If you dispose of your device, battery charger, or accessories, please dispose of them in accordance with your local, state, and/or country electronic recycling laws.
Explanation of Symbols This section explains the symbols that appear on Accent 800 devices, accessories, or packaging. Symbol Explanation The device is Federal Communications Commission (FCC)-compliant. Recycle electronic equipment. Do not throw the device in the trash. The device conforms to European Union health, safety, and environmental standards. The device conforms to the requirements of the UK MDR 2002.
Charger The following charger is compatible with the device: Megmeet MANGO60S-18BB-PRC (available from PRC). Only use this charger to charge the device. Classifications Protection against electrical shock Class II / internally powered Protection against harmful ingress of water and particulate matter IP22 Mode of operation Continuous Type of applied part BF Specifications Weight 2.2 lbs. with battery Dimensions 9 in. x 5.8 in. X 1.4 in. Display 8 in.
Operating Environment Ambient temperature 0°C to 40°C (32°F to 104°F) Relative humidity 10% to 90% Atmospheric pressure 80 kPa to 106 kPa The device needs to be protected from moisture during use. Transport and Storage Environment While in transport or storage, the range of temperatures to which the device can be exposed is 25°C (-13°F) without relative humidity control to 70°C (158°F) at a relative humidity up to 93%, non-condensing, with an atmospheric pressure range of 70 kPa to 106 kPa.
Index A Access method Choosing, 71 Setting up eye tracking, 74 Setting up head tracking, 74 Setting up touch access, 72 Actions Adding a delay between button actions, 172 Adding an action to a button, 170 Creating a List-O-Matic button action, 263 Empty button action, 137 Activating Windows, 242 Activities Changing the page a button navigates to, 161 Activity window Changing an activity window button’s navigation, 168 Changing the basic background color, 140 Choosing the More button location, 146 Customizin
Configuring, 79 B Back arrow Returning to previous screen, 60 Backing up information Device contents, 223 Backup Exporting a customized vocabulary file or keyboard, 225 Exporting a user’s vocabularies and settings, 224 Exporting vocabulary pages, 226 Basic features Activity window, 48 Core vocabulary, 48 Message window, 48 Multi-bar, 48 Batteries Disposing of the batteries, 18 Battery Charging the battery, 17 Battery power Adjusting screen brightness, 235 Changing battery power settings, 235 Using Auto-Bri
Resetting a button to factory defaults, 187 Resizing, 185 Saving a message to a button, 178 Searching for symbols, 154 Selected when released, 72 Selected when touched, 72 Selecting the button selection type for touch access, 72 Setting up a button to navigate to a website, 163 Setting up a button to navigate to a Windows application, 165 Swapping, 184 Taking a picture to use on a button, 152, 157 Temporarily enlarging a button in Vocabulary Builder, 131 Turning access to the Menu buttons on or off, 55 Usin
Core vocabulary Description, 49 Cursor Changing the cursor’s basic color, 104 Configuring the cursor, 103 Customizing the cursor’s color, 105 Customer support Getting remote assistance, 242 License key, 238, 242 Realize Language, 206 Sending a diagnostics log to service, 242 System ID, 238, 242 D Data collection Clearing a data log, 209 Collecting data to analyze language development, 206 Exorting a data log to a file, 208 Turning on data logging, 207 Uploading a file for analysis, 208 Data logging Clearin
Customizing colors, 110 Selecting a pointer, 107 Selecting colors, 112 Selecting the dwell or scan feedback type, 108 Settings, 107 E Editing Using Editor buttons, 148 Editing keyboard Copying and editing a keyboard, 196 Creating a new keyboard, 198 Switching keyboards, 194 Using an editing keyboard for text entry fields, 61 Editor Accessing from the Quick Menu in Empower, 52 Adding or modifying prompts for a customized scan pattern, 83 Basic features, 147 Changing the font and font size, 139 Copying butto
Changing selection feedback basic colors, 114 Changing the cursor’s basic color, 104 Configuring cursor, dwell, and selection feedback, 102 Configuring the cursor, 103 Customizing dwell feedback colors, 110 Customizing selection feedback colors, 115 Dwell feedback settings, 107 Selecting a dwell feedback pointer, 107 Selecting dwell feedback colors, 112 Selecting the dwell or scan feedback type, 108 Selection feedback beep, 113 Selection feedback beep volume, 113 Selection feedback settings, 113 Selection f
Setting the prompt voice to be heard through device speakers or headphones, 212 Home page Changing, 143 I Icons Keyboard icon in text entry fields in edit mode, 60 Multi-bar status area icons, 50 IFP, 237, 248, 269 Importing Importing a message banking .zip file, 230 Importing symbols, 156 Importing users, vocabularies, keyboards, and pages, 229 Importing/restoring files, 228 Infrared Mounting the IR reflector, 26 Setting up and using the IR remote controls app, 259 Insertable tools.
Look Setting up eye tracking, 74 M Main voice Changing pronunciations, 87 Changing the voice, 85 Setting main voice to be heard through device speakers or headphones, 212 Settings, 85 Menu button Description, 48 Turning access to the Menu buttons on or off, 55 Using the Menu button and Quick Menu Access Bar in apps, 54 Using the Menu button and Quick Menu Access Bar in the Web Browser, 251 Using the Menu button and Quick Menu in Empower, 52 Message banking Importing a message banking .
Adjusting touch access next button selection delay, 73 Configuring scan timing, 77 NuPoint Mounting a NuPoint module, 43 Setting up head tracking, 74 NuVoice Switching from Empower, 238 O On/off toggle button, 59 On-screen keyboard Using an editing keyboard, 61 P Padding Changing empty space around buttons, 138 Page Manager Using, 189 Pages Changing the home page, 143 Changing the page a button navigates to, 161 Copying, 191 Creating, 190 Creating, copying, modifying, and deleting, 189 Deleting, 193 Expor
Adding or modifying prompts for a customized scan pattern, 83 Changing pronunciations, 87 Changing text spoken, 174 Changing the voice, 85 Prompt voice settings, 85 Pronunciation Changing pronunciation of button messages, 174 Main voice, 87 Prompt voice, 87 Punctuation Turning message window auto spacing and capitalization on or off, 94 Q QRM mounting plate Attaching a QRM mounting plate, 42 Quick Menu Adding a shortcut, 64 Adding the Save Message shortcut to the Quick Menu, 177 Adding the speech shortcut,
Restarting the device Turning the device off and back on, 232 Restarts Setting up automatic scanning restarts, 79 Restoring device to factory settings, 239 Restoring information Importing/restoring files, 228 Restrictions Restricting access to the Toolbox, 117 Return arrow Returning to previous screen, 60 Row/Column scanning, 76 S Safety Information, 10 Saving changes Leaving a screen without saving changes, 62 Scan speed Configuring scan timing, 77 Scanning Adding or modifying prompts for a customized sca
Exporting a user’s vocabularies and settings, 224 Message window, 88 Restoring Empower and Windows software to factory settings, 239 Restricting access to the Toolbox, 117 Shortcuts Adding a shortcut, 64 Adding the Save Message shortcut to the Quick Menu, 177 Adding the speech shortcut to the Quick Menu, 96 Adding, Removing, and Rearranging Quick Menu shortcuts, 63 Adjusting device and headphones volume from a shortcut, 213 Descriptions of the shortcuts, 67 Rearranging shortcuts, 66 Removing a shortcut, 65
Description and location of multibar status area, 49 Multi-bar status area icons, 50 Step scanning, 76 Strap Attaching a carry strap, 37 Strap handle Attaching a strap handle, 40 Support Finding additional information, 244 Getting remote assistance, 242 License key, 238, 242 Sending a diagnostics log to service, 242 System ID, 238, 242 Troubleshooting, 245 Support options Restoring the software to factory defaults, reactivating Windows, and viewing hardware versions and the system ID, 239 Swapping buttons,
Time and date Setting, 231 Timing Configuring scan speed, selection time, delay, automatic reset, and reset time, 77 Toggling settings on and off, 59 Toolbox Accessing from the Quick Menu in Empower, 52 Changing the Toolbox language, 58 Features, 57 Restricting access to the Toolbox, 117 Turning access to the Menu buttons on or off, 55 User Settings, 69 Using the Toolbox, 56 Tools.
Deleting users, 101 Exporting a user’s vocabularies and settings, 224 Importing users, vocabularies, keyboards, and pages, 229 Managing users, 99 Signing a user in, 99 Signing a user out, 99, 101 Switching between users, 99 V Version Viewing hardware version information, 242 Vocabularies Changing the current language used with vocabularies, 144 Creating, 121 Creating a user and selecting a vocabulary, 45 Customized Vocabularies, 120 Deleting, 121 Description of core vocabulary, 49 Displaying a vocabulary f
Setting your preferences for a specific vocabulary, 136 Vocabulary Builder, 123 Vocabulary button preferences, 136 Word prediction, 202 Voice Changing the voice, 85 Main voice, 85, 87 Prompt voice, 85, 87 Setting the main voice to be heard through device speakers or headphones, 212 Setting the prompt voice to be heard through device speakers or headphones, 212 Volume Activating the device volume button, 211 Adjusting device and headphones volume from a shortcut, 213 Adjusting device volume, 212 Adjusting de