
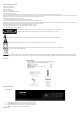
User manual


(b) Restore Factory Default
Reset you STB to the Default Factory Settings.
In Main Menu select [Restore Factory Default] using the RIGHT/LEFT keys and press OK or RIGHT to select. Enter your password or the default password ‘0000’ and press
OK to confirm. This option will delete all preset channels and settings. The master unlock password is ‘8888’
(c) Information
View model, hardware and software information
(d) Start Time
This is the time that the unit will scan for software updates
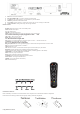
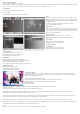
USB
To access the Menu, Press MENU then select [USB] using the
RIGHT/LEFT keys. The Menu provides options to playback Music
,Photo and Multimedia files .It can support AVI, MP3,WMA,JPEG
and BMP formats.
The unit will only support USB device with FAT32 file system.
It will not support NTFS file system.
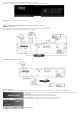
Multimedia:
When a USB device is attached you can select from the Music, Photo,
Movie or PVR options in this menu using the RIGHT/LEFT keys and
OK to select. If a USB device is not connected ,the warning message ‘no
USB device is found’ will appear.
(b) Photo configure:
-Slide Time: adjust slide show interval to 1~8 seconds.
-Slide Mode: adjust slide show effect as mode 0~59 or random.
-Aspect Ratio:
[Keep]: Play picture in its original aspect.
[Discard]: Play picture in full screen mode.
(c) Movie Configure:
- Aspect Ratio:
[Keep]: Play movie in its original aspect.
[Discard]: Play movie in full screen mode.
- Subtitle Specific:
[Small]: Displays the subtitle as small mode.
[Normal]: Displays the subtitle as normal mode.
[Big]: Displays the subtitle as big mode.
- Subtitle BG:
[White]: Displays the subtitle in white background.
[Transparent]: Displays the subtitle in transparent background.
[Grey]: Displays the subtitle in grey background.
[Yellowgreen]: Displays the subtitle in yellowgreen background.
- Subtitle Font Color:
[Red]: Displays Subtitle in red font.
[Blue]: Displays Subtitle in blue font.
[Green]: Displays Subtitle in green font.
(d) USB PVR Configure:
The most unique feature on your is its ability to record live TV. There is two ways you can go about this the first is to
simply connect a USB storage device to your and press the record button on the remote. The other way is to schedule a
program to record using the blue button.
To schedule a recording follow the below steps:
Press “timer” button enter into “schedule” menu, then press the red button start to edit.
Highlight the yellow you wish to setting start-time, end-time, channel No.
Press the OK button
Press the EXIT button
The schedule window will be displayed with a number of options. You will be able to select from the following two options:
Mode: View or Record
Once you have made your selections press the enter key to confirm the recording time slot.
If at anytime you wish to delete a Scheduled recording event, you can press the blue button to view the list of scheduled events. Use the arrow keys on the remote to
highlight the event you wish to delete then press the blue button to delete it.
The recording files can be deleted on this unit, you can go to the PVR, and press yellow bottun to delete it. The program is recorded to file at. PVR format, which can be
played back on this unit and PC using a suitable player, but can not be played back on DVD or PDVD
For recording the high definition TV programs, the version of usb device should be 2.0 or above, otherwise the unit may can not record the hd programs correctly.
When recording to usb stick or external hard disc on this model, you have to wait a few seconds before pushing rec. after inserting the media. Otherwise the unit can freeze
in the signal. If that happens, then please take off power and connect again to fix this.
Note:
Scheduled recording only works when the unit power is on,it can not work when the unit is standby.