Contents Introduction ........................................................................................................................................................................ 4 Controllers ........................................................................................................................................................................... 4 Requirements ........................................................................................................................
To export the configuration ............................................................................................................................................... 18 To import a saved configuration ........................................................................................................................................ 19 To print configurations to a printer ................................................................................................................................
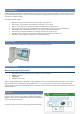
Introduction Irrigation Manager™ Software is an advanced software package designed for professional irrigators. It allows remote monitoring and control of multiple irrigation controllers from a central location. Anything that can be done directly on a controller can be done with the software remotely.
Serial Port – This requires a standard serial cable or USB-to-serial cable. The cables are not included. Telephone/Modem – This requires an analog phone line. Internet/Ethernet – This requires an ethernet adapter which is not included. You may add as many controller connections as you wish. Each connection is saved and is easily accessible at any time from the Connection list. However, only one controller can be connected at a time.
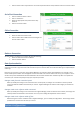
7. Click the “Save” button if you want the user name and password to be saved, otherwise click the “Connect” button. Serial Port Connection 1. 2. 3. 4. Click the “New Connection” button. Click on “Serial Port”. Select the appropriate serial port from the dropdown list. Click the “Connect” button. Edit a Connection You can edit any of the connection properties at any time. 1. 2. Select the desired controller to edit. Click the “Edit” button. Make the desired changes and click the “Save” button.
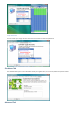
The controller must be configured before it can be used. Configuration involves setting up devices such as moisture sensors, flow meters, zone adapters and water sources, and assigning these devices to zones. In order to properly configure the system, you must first configure the devices and then configure the zones by assigning the devices to zones. Controller Configuration Configuring the controller allows you to edit general controller settings.
Controller Time Tab The functions within the controllers are monitored by an internal clock. This screen allows for adjustment of the controller's internal clock as well as synchronization between your computer's clock and the controller's clock. The controller’s clock can be set in two different ways 1. 2.
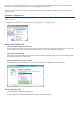
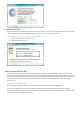
Login Accounts You can create up to 3 login accounts. Each account consists of a name and password. Site Name Tab This window allows you to enter information about you irrigation site, such as name, address and phone number.
The advanced screen is for factory use only. You should not make any adjustments to any of the information on this screen. These setting should not be modified unless directed by an Acclima technician. Configure Devices All devices installed on the system are displayed by category. This includes moisture sensors, zone adapters, flow meters, pressure meters, and water sources. After a device is configured it can be assigned to a zone. You may Add, Remove and Replace devices from this menu.
To remove a device 1. 2. 3. Select the device in the “Configure Devices” screen. Click the “Remove System Devices” button. The system device options are listed along with all other devices that are connected to the selected device. Click the “Remove Device” button. To replace a device 1. 2. 3. Select the desired device to be replaced. Click the “Replace Device” button. Enter the serial number of the newly installed device and click the “Replace Device” button.
1. 2. 3. In the “Configure Devices” screen, select the zone to rename. Enter a descriptive name for the zone in the “Zone Name” box. Select a zone type from the “Zone Type” drop-down list. The configuration options are dependent on the zone type. There are three zone types. Sensor Zone A Sensor Zone is a zone that is controlled entirely by a moisture sensor. a. Select a sensor from the “Moisture Sensor” drop down list to link the zone with its respective sensor. b.
5. 6. 7. 8. a. Enter “Water-On Duration”: This is the number of minutes the zone will water before waiting to soak. b. Enter “Soak Duration”: This is the number of minutes the zone will soak before watering continues. Select the appropriate water source from the “Water Source" drop-down list. If your system has only one water source and is using the default water source, "" will be displayed. Select the appropriate watering restriction from the “Watering Restriction” list.
Rain / Freeze Sensor A Rain / Freeze sensor detects freezing temperatures and suspends watering. A separate rain sensor or wind sensor can also be connected, allowing irrigation control due to current rain and wind conditions. To configure rain / freeze sensor 1. 2. 3. 4. Select the “Configure>Controller Configuration…” menu. Select the “Operational Settings” tab. Select the “Flags” tab. Enable or disable the switches by clicking on “Enable Freeze Sensor” and “Enable Rain Sensor”. 5. 6.
8. 9. Select the “Switch Type” tab. a. Select the appropriate switch type. If “Pump Switch” is selected and the pump supports a backflush switch, check the “Supports Backflush Switch” box To save the configuration, click the “Apply Changes” button. Configure Zones Irrigation systems are grouped into zones controlled by valves. Irrigation Manager allows you to view and manage all the zones in one easy to use screen. Each zone may be configured or updated as desired.
To assign watering restrictions 1. Select the zone in the “Configure Zones” screen. 2. Select the appropriate watering restriction from the “Watering Restriction” drop-down list. This enables the zone to operate independently of the system. You may modify the restriction by clicking on the "Edit..." button. Click the “Apply Changes” button. 3. Select a Flow Rate If your system has a flow meter is will automatically assign flow rates to each zone as it waters.
3. 4. 5. 6. Select the desired action in the “Step Action” list either “Pause Watering” or “Water Zone“. Select the zone to water by clicking on the arrows to cycle through zone numbers. Or click on the "..." button to display a list of zones to choose from. The zone name is displayed in red. Enter a “Step Duration” using the up/down arrows. Click “Save” to save changes. Copy/Paste Manual Program Steps To speed up the creation of a manual program, you can copy and paste existing steps.
3. 4. 5. 6. Specify the “Water-Off Time” by entering the hour, minute and AM/PM. This can also be done with the up/down arrows. Specify the duration in the “Pause System Watering” section by entering the days, hours and minutes or by using the up/down arrows. The pause and resume dates and times are displayed in orange. Enter a descriptive name in the “Event Description” box to distinguish the event from other events. Click “Save” to save and close Water-Off Event window. Delete Scheduled Events 1. 2. 3.
To import a saved configuration 1. Select the “Import Saved Configuration” screen. 2. Specify the location of the configuration to be imported. To print configurations to a printer 1. Select the “Print Configuration” menu followed by the “To Printer” menu. To print configurations to a file 1. Select the “Print Configuration” menu followed by the “To File” menu.
You can import any jpeg or bitmap image file into the map view. The default map is shown above. NOTE: Once your replace the default map with your image the default map cannot be recovered. Import a Map NOTE: Changing the map image deletes the default image making the imported image permanent. You can move the “Map Controls” box around the screen by clicking the blue bar and dragging the box. 1. 2. 3. 4. Maximize the “Map Controls” menu by clicking on the square at the top right hand corner of the window.
To manage zones from the map view, simply double click on the zone's icon. The “Zone Information Side Panel” will open, allowing you to manage the zone's information. A similar panel is also used when configuring zones. You can adjust the zone's configuration from within “Map View”, “Configure Zones”, “Configure Devices” or “System View”. System View The system may be viewed and monitored from the “System View” screen. This allows you to see the system's current status to be viewed at a quick glance.
Reports Watering information is recorded and stored in the controller and transferred to any PC that connects to it. The information collected from the controller is vital to efficient management your irrigation system. This information may be accessed through the “Reports” screen. Total water, water cycles and manual watering information is available for each zone.
To re-center data, click the button. To display controller initiated watering cycles, click initiated watering cycles, click the and to display manually button. The blue dots on the graph indicate a controller initiated watering cycle. To view details about the watering, cycle place the mouse arrow over the blue dot. A yellow box appears displaying the start time and duration of the watering cycle. View Temperature and Soil Conductivity Press the button to view the temperature graph.
The controller stores the raw data from sensors, flow meters, pressure meters, and other installed devices. It also stores system error information and watering cycle information. The logs are viewed by selecting the “View > Controller Logs…” menu. Irrigation Manager displays three types of logs: 1. Sensor Logs - displays all sensor measurement readings that have been downloaded from the controller. 2. Error Logs - displays all errors that have occurred on the controller. 3.
Soil Moisture Each sensor connected to a controller regularly measures and records soil moisture based on volumetric water content (VWC). This number is represented as a percentage of total water content. A reading of 25% means that in any given volume of soil, 25% of it is water. Soil Temperature Soil temperature is measured and recorded in the system. Temperature can be displayed in degrees Celsius or degrees Fahrenheit.
Exporting Data The data collected by your controller is extremely valuable for managing your system's efficiency. You may wish to export the data into other programs allowing greater flexibility and analysis of the data. You can export all logs into other programs such as Microsoft Excel. To export data Click on the “Export Watering Logs…” button near the top of the screen. You must then specify the name and destination of the log file. All logs are exported in Comma Delimited (*.csv) format.
Irrigation Manager has two different types of diagnostics: 1. Configuration Check - check your configuration for common problems. 2. System Test - run a series of electrical diagnostic tests on the system. Configuration Check The default diagnostic is the “Configuration Check”. It appears when you click on the "Diagnostics" button, but you may also click the “Configuration Check” tab.
to it. In this mode, you may specify which devices to include in the test and what tests to run. Place a check mark next to each device filter category you would like to have access to. This adds all members of the selected category into the “Devices” list. You may further refine your filter to include only a subset of devices in the list. To do this, hold down the Control button on your keyboard and with your mouse select the devices you want to test. You may also select the types of tests to run.
Repairing the Database On rare occasions, Irrigation Manager may behave incorrectly. This might include errors during synchronization or not being able to graph data that has been downloaded. This is not a problem with the controller but is typically caused by internal database storage problems on the PC. It can often be easily fixed with no loss of data. 1. 2. 3. 4. Close Irrigation Manager. It cannot be running since it uses the database that needs to be repaired. Open the windows start menu.