Accordiva SecuExpress 2 Standard Version U User’s Guide Accordiva, Inc.
Accordiva SecuExpress User Guide – Standard Version Accordiva SecuExpress © 2005-2009 Accordiva, Inc. All rights Reserved. No part of this publication may be reproduced, distributed or transmitted in any form or by any means, electronic or mechanical, including but not limited to photocopying, recording or storing in any database or retrieval system, or translated into any language in any form without the prior written consent of Accordiva, Inc.
Accordiva SecuExpress User Guide – Standard Version Table of Contents Welcome to SecuExpress .......................................... 5 SecuExpress Watcher ................................................ 6 Overview: SecuExpress Watcher user interface.................................. 6 Setting the preferences ........................................................................ 8 Recorded storage allocation ................................................................ 8 Recording mode setup .
Accordiva SecuExpress User Guide – Standard Version Snapshot ............................................................................................ 24 Resizing the main user interface for SecuExpress Remote for PC ... 25 Hiding the menu bar and status bar ................................................... 25 Disconnecting from remote camera ................................................... 26 SecuExpress Player..................................................
Accordiva SecuExpress User Guide – Standard Version Welcome to SecuExpress Thank you for choosing Accordiva SecuExpress. SecuExpress is the quick and easy personal surveillance software that monitors and detects the intrusion for your personal properties. Installing SecuExpress on your computer equipped with a Webcam, your computer can quickly turn into a personal surveillance system.
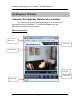
Accordiva SecuExpress User Guide – Standard Version SecuExpress Watcher Overview: SecuExpress Watcher user interface The easiest way to start learning the program is to familiarize yourself with the user interface. This section introduces you the SecuExpress Watcher user interface.
Accordiva SecuExpress User Guide – Standard Version Control Bar Search video recording in SecuExpress Player Take a Snapshot Enable/Disable video recording R di Enable/Disable motion detection Click to switch between cameras Info Bar Indicate a video device is connected Indicate an audio device is connected Indicate the SecuExpress Indicate the current Watcher is in recording state system date and time Indicate a motion event is detected System Bar Close the program Restore to original video size M
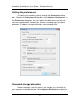
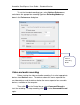
Accordiva SecuExpress User Guide – Standard Version Setting the preferences Customize the recording settings through the Preferences dialog box. To open the Preferences dialog box, select Options: Preferences. In the Preferences dialog box, you can specify the folder where you want to store the recorded data, compression scheme, recording type, password protection, IP address change notification, and recording state. Recorded storage allocation Before recording, a certain space in the storage (e.g.
Accordiva SecuExpress User Guide – Standard Version dialog box. In Record storage section, choose the folder where you want the recorded data to be stored. Check Recycle storage if you want the storage to be reused after the space is used up. Set Minimum free space to leave out some space for operating system usage. Set Record file length to break up the file length into the number of minutes you specify. Define storage for the recordings.
Accordiva SecuExpress User Guide – Standard Version To set the intended recording type, select Options:Preferences, and choose the appropriate recording type from Recording Mode drop down in the Preferences dialog box. Select a Recording Mode. Video and audio recording Before starting the video and audio recording, first select appropriate devices from Devices menu.
Accordiva SecuExpress User Guide – Standard Version You can record video only by uncheck the Record audio option in the Preferences dialog box Access control SecuExpress Watcher can be password protected so that anyone accessing SecuExpress Watcher or connecting to SecuExpress Watcher via SecuExpress Remote Viewer to view the live video is requested to enter the password. The password can be set in Options:Preferences dialog box.
Accordiva SecuExpress User Guide – Standard Version Motion detection To enable motion detection, select Command:Apply Motion Detection or press on the Control bar. You can set the motion detection options by selecting Options:Motion Detection Options. Slider of Motion Level Threshold Slider of Motion Volume Threshold In the dialog box, you can drag the slider of Motion level threshold, enter the value, or click to adjust the sensitivity of a motion.
Accordiva SecuExpress User Guide – Standard Version Sometimes, a short period of motion is detected but you do not want to treat it as an event, for example, bee flies over quickly. You can also check Ignore short motion to ignore a motion that is lasted within a period of time that you specify in the edit box of the Motion Detection Options dialog box. Defining motion detection mask You can identify a particular area within a camera view that you do not want to include in the motion detection area.
Accordiva SecuExpress User Guide – Standard Version Event notification To specify how to be notified when an event occurs, select Options:Event Notification to open the dialog box. Sound alarm: to enable the sound notification, check Sound alarm and choose a wav file by clicking . If you want it continuously play, check Loop Playback. E-mail notification: to enable the email notification, check Email Notification. Click button to specify the email settings.
Accordiva SecuExpress User Guide – Standard Version Snapshot To take a picture of current video frame, select Command:Snapshot or click on the Control bar. After taking a snapshot, the Snapshot dialog box appears. You can save the snapshot, change the font settings of the time stamp in the dialog box. Remote access settings SecuExpress Watcher allows you to connect from a remote site to view live video. To allow the remote access, select Options:Remote Access… to open the dialog box.
Accordiva SecuExpress User Guide – Standard Version 1. Check Enable Video Server checkbox. 2. Specify TCP port number (Note: SecuExpress Remote has to have the same TCP port number so that you can connect to this video server). 3. Specify the maximum number of connections for the number of simultaneous connections allowed from remote computers. To view the current remote access connections, select View:Show Remote Connections.
Accordiva SecuExpress User Guide – Standard Version Check Notify IP change by email and specify the email settings here. You will receive an email with a new IP address whenever the IP address is changed. Take the new IP address and update it in the SecuExpress Remote Connect dialog box. Please refer to SecuExpress Remote section(s) for more details.
Accordiva SecuExpress User Guide – Standard Version Playing live sound If your computer running SecuExpress Watcher is equipped with a microphone, select Command:Play Live Sound to play the sound received from the microphone. Resizing the main user interface for SecuExpress Watcher You can adjust the size of SecuExpress Watcher by dragging one of the corners of the main user interface when the menu bar is shown.
Accordiva SecuExpress User Guide – Standard Version Menu Bar and Status Bar are hidden. Last recording and detection state at the next program restart You can use the same recording and detection state at the next SecuExpress Watcher launch. Simply check Keep last recording and detection state in the Preferences dialog box to save the recording and detection state.
Accordiva SecuExpress User Guide – Standard Version SecuExpress Watcher allows you to view the live video by using Internet browser. To set the appropriate settings, select Options:Remote Access… to open the dialog box. Check Enable web server checkbox to allow viewing live video from Internet browser. Check Enable web server in the dialog box and specify the TCP port number (use 80 as default) in Remote Access dialog box. Choose the video size for transmission.
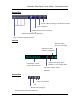
Accordiva SecuExpress User Guide – Standard Version SecuExpress Remote for PC Overview: SecuExpress Remote for PC user interface SecuExpress Remote for PC provides you with various controls to view a remote camera video in SecuExpress Watcher.
Accordiva SecuExpress User Guide – Standard Version Take a snapshot Connect/Disconnect to remote camera Info Bar Indicate video transmission from SecuExpress Watcher Indicate the speed of video streaming Indicate the current system date and time at SecuExpress Watcher Indicate a motion event is detected at SecuExpress Watcher System Bar Close the program Restore to original video size Minimize the program Show/Hide menu bar and status bar 22
Accordiva SecuExpress User Guide – Standard Version Connecting to remote camera to view live video Make sure your PCs running SecuExpress Watcher and Remote are connected to Internet. In SecuExpress Remote, click on the Control Bar or select Command:Connect to set the connection options. In the Connect dialog box, type the IP address and TCP port number of PC that SecuExpress Watcher is running. (The TCP port value is defined in the dialog box of Options:Remote Access of SecuExpress Watcher program.
Accordiva SecuExpress User Guide – Standard Version slider of Video quality to define the quality you desire. You can also choose the frame rate to be transferred through the Frame rate drop down list. When the output video size is 640 x 480 or above, you can choose Half video size to reduce data Choose frame rate of video rate (number streaming. of frames per second) here. You can also only view the live video with event detected by selecting View:Display Event Video Only on the menu bar.
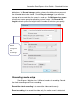
Accordiva SecuExpress User Guide – Standard Version Click Save button to Check Caption save the checkbox to snapshot as timestamp on a file the snapshot Resizing the main user interface for SecuExpress Remote for PC You can adjust the size of SecuExpress Remote by dragging one of the corners of the main user interface when the menu bar is shown.
Accordiva SecuExpress User Guide – Standard Version Disconnecting from remote camera Once you are connecting to remote camera, you can choose Command:Disconnect or click again to disconnect from the remote camera.
Accordiva SecuExpress User Guide – Standard Version SecuExpress Player Overview: SecuExpress Player user interface SecuExpress Player provides you with various controls to view a remote live video on recorded in SecuExpress Watcher.
Accordiva SecuExpress User Guide – Standard Version Select the video recording file you want to playback from the Video Record List Pane. Use the buttons on Playback Control Bar to control the playback actions. Drag Playback Slider to a snapshot with a particular time code you want to view. Event Indicator indicates a motion event in red. Green portions represent no motion event detected. Use Backward button or Forward button to jump to the nearest starting point or the ending point of a motion event.
Accordiva SecuExpress User Guide – Standard Version save a selected video recording, choose File:Save Record to from the Player’s menu bar. To open a video recording database you save previously, use File:Open.Record DB. To switch back to the current video recordings from a saved recording database, select File:Return to Main Record DB. To update the Video Record List Pane with the latest video recordings that SecuExpress Watcher is recording, select File: Update to Record DB.
Accordiva SecuExpress User Guide – Standard Version Index .
Accordiva SecuExpress User Guide – Standard Version Play Live Sound, 18 Show grids, 13 Playback, 28 Show Remote Connections, 16 Playback Control Bar, 28 Show up program, 14 Preferences, 8, 10, 11, 16, 19, 28 Snapshot, 15, 24 Sound alarm, 14 R Status Bar, 18, 25 System Bar, 7, 22 Rebuild Record DB, 29 Record, 10, 29 T Record audio, 11 Record file length, 9 TCP port number, 16, 20, 23 Record storage, 9 Transparent mask, 13 Recording Mode, 10 U Recycle storage, 9 Remote Access, 15, 20, 23 U