OfficeConnect® 11Mbps Wireless Access Point User Guide 3CRWE41196 http://www.3com.com/ Part No.
3Com Corporation 5500 Great America Parkway Santa Clara, California 95052-8145 Copyright © 2003, 3Com Corporation. All rights reserved. No part of this documentation may be reproduced in any form or by any means or used to make any derivative work (such as translation, transformation, or adaptation) without written permission from 3Com Corporation.
CONTENTS ABOUT THIS GUIDE Naming Convention 7 Conventions 8 Feedback about this User Guide Related Documentation 9 Product Registration 9 1 8 INTRODUCING THE ACCESS POINT OfficeConnect 11Mbps Wireless Access Point 12 Access Point Advantages 13 Package Contents 13 Minimum System and Component Requirements 14 Front Panel 14 Rear Panel 16 2 HARDWARE INSTALLATION Introduction 17 Safety Information 17 Positioning the Access Point 17 Using the Rubber Feet 18 Wall Mounting 18 Powering Up the Access Point 19 C
ACCESS POINT CONFIGURATION Navigating Through the Access Point Configuration Pages Main Menu 31 Option Tabs 31 Welcome Screen 32 Notice Board 32 Password 33 Wizard 33 LAN Settings 34 Unit Configuration 34 DHCP Clients List 36 Wireless Settings 37 Configuration 38 Encryption 40 Connection Control 42 Client List 45 Profile 46 System Tools 48 Restart 48 Configuration 48 Upgrade 49 Status and Logs 51 Status 52 Logs 52 Support 52 5 TROUBLESHOOTING Basic Connection Checks 53 Browsing to the Access Point Conf
A USING DISCOVERY Running the Discovery Application 59 Windows Installation (95/98/2000/Me/NT) B 59 IP ADDRESSING The Internet Protocol Suite 61 Managing the Access Point over the Network 61 IP Addresses and Subnet Masks 61 How does a Device Obtain an IP Address and Subnet Mask? DHCP Addressing 63 Static Addressing 63 Auto-IP Addressing 63 C 63 TECHNICAL SPECIFICATIONS Standards 66 D SAFETY INFORMATION E END USER SOFTWARE LICENCE AGREEMENT GLOSSARY INDEX REGULATORY NOTICES FOR THE 11MBPS WIRELES
Federal Communication Commission Interference Statement This equipment has been tested and found to comply with the limits for a Class B digital device, pursuant to Part 15 of the FCC Rules. These limits are designed to provide reasonable protection against harmful interference in a residential installation. This equipment generates, uses and can radiate radio frequency energy and, if not installed and used in accordance with the instructions, may cause harmful interference to radio communications.
ABOUT THIS GUIDE This guide describes how to install and configure the OfficeConnect 11Mbps Wireless Access Point (3CRWE41196). This guide is intended for use by those responsible for installing and setting up network equipment; consequently, it assumes a basic working knowledge of LANs (Local Area Networks). If a release note is shipped with the OfficeConnect 11Mbps Wireless Access Point and contains information that differs from the information in this guide, follow the information in the release note.
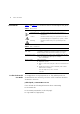
ABOUT THIS GUIDE Conventions Table 1 and Table 2 list conventions that are used throughout this guide. Table 1 Notice Icons Icon Notice Type Description Information note Information that describes important features or instructions. Caution Information that alerts you to potential loss of data or potential damage to an application, system, or device. Warning Information that alerts you to potential personal injury.
Conventions 9 Example: ■ OfficeConnect 11Mbps Wireless Access Point User Guide ■ Part Number DUA4119-6AAA01 ■ Page 24 Do not use this e-mail address for technical support questions. For information about contacting Technical Support, please refer to the Support and Safety Information sheet. Related Documentation Product Registration In addition to this guide, each Access Point document set includes one Installation Guide.
ABOUT THIS GUIDE
1 INTRODUCING THE ACCESS POINT Welcome to the world of networking with 3Com®. In the modern business environment, communication and sharing information is crucial. Computer networks have proved to be one of the fastest modes of communication but, until recently, only large businesses could afford the networking advantage. The OfficeConnect® product range from 3Com has changed all this, bringing networks to the small office.
CHAPTER 1: INTRODUCING THE ACCESS POINT OfficeConnect 11Mbps Wireless Access Point The OfficeConnect 11Mbps Wireless Access Point is designed to provide a cost-effective means of connecting wired and wireless networks. A single Access Point makes the Internet, e-mail and network resources, such as printers, available to dozens of wireless clients. Because the Access Point is a WI-FI certified device, you can be sure it will work reliably with certified equipment from other manufacturers.
Access Point Advantages Access Point Advantages Package Contents 13 The advantages of the Access Point include: ■ Cross-platform operation for compatibility with Windows, Unix and Macintosh computers ■ Easy-to-use, Web-based setup and configuration ■ Provides centralization of all network address settings (DHCP) ■ Shares network resources between both wired and wireless computers The Access Point kit includes the following items: ■ One OfficeConnect 11Mbps Wireless Access Point ■ One power ad
CHAPTER 1: INTRODUCING THE ACCESS POINT Minimum System and Component Requirements Your Access Point requires that the computer(s) and components in your network be configured with at least the following: ■ ■ An Ethernet 10Mbps or 10/100 Mbps or 10/100/1000 Mbps NIC. ■ An 802.11b wireless NIC. ■ Front Panel A computer with an operating system that supports TCP/IP networking protocols (for example Windows 95/98/NT/Me/2000/XP, Unix, Mac OS 8.5 or higher).
Front Panel 15 Flashing slowly - The Access Point has completed the Reset to Factory Defaults process, and is waiting for you to release the reset button. The Access Point will then enter the start-up sequence and resume normal operation. If you have used the reset button to reset the unit to Factory Defaults, follow steps 5 to 6 in “Forgotten Password and Reset to Factory Defaults” on page 54. Continuously on - A fault has been detected with your Access Point during the start-up process.
CHAPTER 1: INTRODUCING THE ACCESS POINT Rear Panel The rear panel (Figure 3) of the Access Point contains one LAN port, a reset button, an MDI/X switch and a power adapter socket. Figure 3 Access Point - Rear Panel 5 Wireless Antennae The antennae on the product should be placed in a ‘V’ position when initially installed. CAUTION: Do not force the antennae round further than 90 degrees in either direction. 6 Power Adapter Socket Only use the power adapter supplied with this Access Point.
2 Introduction HARDWARE INSTALLATION This chapter will guide you through a basic installation of the Access Point, including: ■ Connecting the Access Point to your network. ■ Setting up your computers for networking with the Access Point. Safety Information WARNING: Please read the “Safety Information” section in Appendix D before you start. VORSICHT: Bitte lesen Sie den Abschnitt “Wichtige Sicherheitshinweise” sorgfältig durch, bevor Sie das Gerät einschalten.
CHAPTER 2: HARDWARE INSTALLATION When positioning your Access Point, ensure: ■ ■ ■ ■ Using the Rubber Feet Wall Mounting It is out of direct sunlight and away from sources of heat. Cabling is away from power lines, fluorescent lighting fixtures, and sources of electrical noise such as radios, transmitters and broadband amplifiers. Water or moisture cannot enter the case of the unit. Air flow around the unit and through the vents in the side of the case is not restricted.
Powering Up the Access Point Powering Up the Access Point 19 To power up the Access Point: 1 Plug the power adapter into the power adapter socket located on the back panel of the Access Point. 2 Plug the power adapter into a standard electrical wall socket. Connecting the Access Point The first step for installing your Access Point is to physically connect it to a switch or hub. See Figure 4.
CHAPTER 2: HARDWARE INSTALLATION