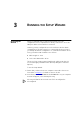
3 Accessing the Wizard RUNNING THE SETUP WIZARD 3Com recommends that you perform the initial Access Point configuration from a computer that is directly connected to one of the LAN ports and not from a wireless connection. However, you may configure the Access Point from a wireless admin computer but, note that you may lose contact with the Access Point if you change the wireless configuration.
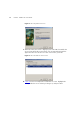
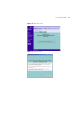
2 CHAPTER 3: RUNNING THE SETUP WIZARD Figure 5 Discovery Welcome Screen 3 When the Welcome screen is displayed, select the NIC from which the Access Point will be discovered. Then click on Next and wait until the application discovers the Access Points connected to your LAN. Figure 6 Discovered Access Point Screen 4 Figure 6 shows an example Discovered Devices screen. Highlight the 11Mbps Wireless Access Point by clicking on it, and press Next.
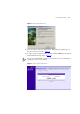
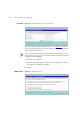
Accessing the Wizard 23 Figure 7 Discovery Finish Screen 5 Click on Finish to launch a web browser and display the login page for the Access Point as shown in Figure 8. 6 To log in, enter the password (the default setting is admin) in the System Password field and click Log in (Figure 8). Be sure to bookmark this screen for easy reference if you should want to change the Access Point settings.
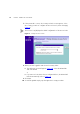
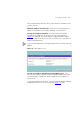
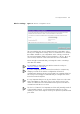
24 CHAPTER 3: RUNNING THE SETUP WIZARD 7 If the password is correct, the Country Selection screen appears. Select the country you wish to configure the Access Point for, then click Apply. (Figure 9). This screen is only displayed on initial configuration of the Access Point. Figure 9 Country Selection Screen 8 When you have logged in and selected a country either: ■ The Welcome screen will appear (Figure 10). Select the Wizard tab and click Wizard.
Accessing the Wizard Figure 10 Welcome Screen Figure 11 Wizard Screen 25
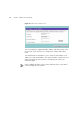
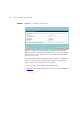
26 CHAPTER 3: RUNNING THE SETUP WIZARD Password Figure 12 Change Administration Password Screen When the Change Administration Password screen (Figure 12) appears, type the Old Password, then a new password in both the New Password and Confirm Password boxes. 3Com recommends entering a new password when setting up the Access Point for the first time. The Access Point is shipped from the factory with a default password, admin. 1. Password is case sensitive. 2.
Accessing the Wizard 27 This screen determines how the Access Point obtains its IP address. There are three options. Obtain IP Address automatically - The Access Point will obtain an IP address from a DHCP server already operating on your network. Specify an IP address manually - Select this option to manually configure the IP address of the Access Point. The screen shown in Figure 14 is displayed. This screen displays a suggested LAN IP address and subnet mask of the Access Point.
28 CHAPTER 3: RUNNING THE SETUP WIZARD Figure 15 DHCP Server Setup Screen This screen displays a suggested LAN IP address and subnet mask of the Access Point. It also allows you to change the IP address and subnet mask. Two further fields are available for you to enter the Start address of an address pool and an End address. The largest available continuous IP pool will be automatically entered; if this is not appropriate, make your required changes.
Accessing the Wizard Wireless Settings 29 Figure 16 Wireless Configuration Screen This screen displays the current Channel and Service Area Name. It also allows you to change these settings. There are a maximum of 13 channels, the number available to you is dependent on the country you reside in. The Service Area Name default for 3Com products is "3Com". Up to 32 (case sensitive) characters can be entered for the Service Area Name.
30 CHAPTER 3: RUNNING THE SETUP WIZARD Summary Figure 17 Configuration Summary Screen When you complete the Setup Wizard, a configuration summary will display. Verify the configuration information of the Access Point and then click Finish to save your settings. 3Com recommends that you print this page for your records.
4 ACCESS POINT CONFIGURATION Navigating Through the Access Point Configuration Pages Main Menu Option Tabs This chapter describes all the screens available through the Access Point configuration pages, and is provided as a reference. To get to the configuration pages, browse to the Access Point by entering the URL in the location bar of your browser. The URL is http://, for example http://192.168.1.1.
32 CHAPTER 4: ACCESS POINT CONFIGURATION Getting Help On every screen, a Help button is available which provides access to the context-sensitive online help system. Click Help for further assistance and guidance relating to the current screen. Welcome Screen Figure 18 Access Point Welcome Screen The Welcome section allows you to view the Notice board and to change your Password. You can also gain access to the Configuration Wizard. (See “Accessing the Wizard” on page 21 for details).
Welcome Screen Password 33 Figure 20 Password Screen Changing the Administration Password You can change the password to prevent unauthorized access to the Administration System. To do this: 1 Enter the current password in the Old Password field 2 Enter the new password in the New Password field 3 Enter the new password again in the Confirm Password field 4 Click Apply to save the new password The password is case sensitive. If you have forgotten your password you need to reset the Access Point.
34 CHAPTER 4: ACCESS POINT CONFIGURATION LAN Settings Unit Configuration The LAN Settings menu provides the following options: The LAN Settings screen is used to determine how the LAN IP address of your Access Point is obtained. It can be obtained automatically or you can manually configure the IP address and optionally configure the DHCP server. Figure 22 Unit Configuration Screen Dynamic IP Address 3Com recommends that you manually assign your Access Point a static IP address.
LAN Settings 35 Manually setting the IP address 3Com recommends that you assign your Access Point a static IP address. 1 Select Unit Configuration and then select Static IP Address (to be specified manually). The screen shown in Figure 23 is displayed. Figure 23 Unit Configuration Screen For Static IP Address 2 Enter the Access Point IP Address and Subnet Mask in the LAN Settings field. The default static IP address of the Access Point is 192.168.1.1.
36 CHAPTER 4: ACCESS POINT CONFIGURATION Figure 24 DHCP Server Configuration Screen 3 Clicking Auto Range automatically selects the largest range of addresses available for your network. Alternatively you can manually enter Start and End addresses for the IP address pool. THe DHCP server supports up to a maximum of 253 addresses. 4 Enter any Default Gateway and DNS (Domain Name Server) addresses if required. 5 Check your settings and click Apply.
Wireless Settings 37 The DHCP Clients List provides details on the devices that are connected to the LAN. The list is only created when the Access Point is set up as a DHCP server. For each device that is connected to the LAN, the IP address, Host Name, MAC address and Client Type of that device is displayed. As you connect more devices, the client list will grow to a maximum number of clients. The Release button allows the lease time for the IP address that has been issued to a device to be cleared.
38 CHAPTER 4: ACCESS POINT CONFIGURATION Configuration Figure 26 Configuration Screen Enable Wireless Networking Allows you to enable/disable the wireless section of your LAN. When disabled, no wireless PCs can gain access to your Wired or Wireless LAN through this Access Point. Channel Selection The Channel Selector allows you to specify which Channel the Access Point will transmit and receive on.
Wireless Settings 39 Service Area Name/SSID This allows you to name your Wireless network. The field will accept any alphanumeric string and has a maximum length of 32 characters. Your Wireless computers must be configured with exactly the same name or you will not establish a connection. The Service Area Name may also be referred to as "ESSID" depending on your networking vendor. By default the Access Point uses the name "3Com". 3Com recommends that you change the default name.
40 CHAPTER 4: ACCESS POINT CONFIGURATION Encryption Figure 27 Encryption Screen Wired Equivalent Privacy or WEP allows you to encrypt the traffic between your Wireless PC and the Access Point. It is important to remember that with WEP disabled anyone with a Wireless PC can eavesdrop on your network. 3Com recommends that you get the network working with WEP disabled first and then enable it as the last step. This will simplify setting up your network.
Wireless Settings 41 Encryption Keys Figure 28 Encryption Keys Screen A Key is a hexadecimal (0-9, A-F) number used to encrypt and decrypt the data. There can be up to 4 keys and each key can be as long as 26 digits. The Access Point also offers a number of methods for converting plain text into hex keys. The text is much easier to remember than hex keys but it relies on your wireless adapters also supporting this feature.
42 CHAPTER 4: ACCESS POINT CONFIGURATION WEP and 13 characters for 128 bit WEP. You must enter a separate string for each of the 4 Keys. You can leave a string blank provided this Key is not selected as the Active Transmit Key. ■ Passphrase - This is another common method and similar to the 3Com Encryption string. In 64 bit WEP, the passphrase will generate 4 different keys. However, in 128 bit WEP, this method only generates 1 key which is replicated for all 4 keys.
Wireless Settings 43 Figure 29 Connection Control Screen A higher level of security can be achieved for your wireless network if you use both encryption and you specify only certain wireless computers can connect to the Access Point. By default, any wireless computer that has the same Service Area Name/SSID, channel and encryption settings as the Access Point can connect to it. Select Only Authorised Wireless PCs can connect to the Access Point to enable and configure this feature.