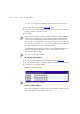
44 CHAPTER 4: ACCESS POINT CONFIGURATION To create a list of Wireless computers that can access the Access Point: 1 Press New. The screen shown in Figure 30 opens. 2 Select one or more MAC addresses of the Wireless PCs that you want to allow to connect to the Access Point. 3 Click Add. The list on the Connection Control window contains the MAC addresses of all Wireless PCs that are in range, currently operating, and have the same Service Area Name/SSID, channel and encryption settings as the Access Point.
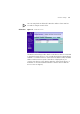
Wireless Settings 45 Once an entry has been deleted it cannot be undone. Please wait 30 seconds for changes to take effect. Client List Figure 32 Client List Screen The Wireless Client List provides details on the devices that are connected to the Wireless LAN. The list is only created when Wireless Networking is enabled. For each device that is connected to the Wireless LAN, the MAC address and Connection Speed of that device is displayed.
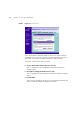
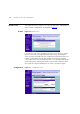
46 CHAPTER 4: ACCESS POINT CONFIGURATION Profile Figure 33 Profile Screen Some 3Com Wireless Network Adapters allow you to import Wireless configurations via a ‘profile’. The Access Point can generate a profile so that you do not need to configure your Wireless PCs manually. The profile contains three items as follows: ■ Service Area Name/SSID of the Access Point This is configured on the Configuration tab under the Wireless Settings option.
Wireless Settings 47 Saving a Profile To set up a profile (once the Service Area Name/SSID and Encryption settings have been configured in the Access Point): 1 Enter a Profile Name (up to 25 alphanumeric characters) and then click Save Profile. 2 Your browser will then prompt you to enter a file name and folder location in which to save the profile. Once the profile has been saved it can be copied on to another PC and imported into the 3Com Wireless Network Adapter.
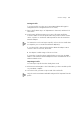
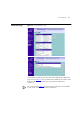
48 CHAPTER 4: ACCESS POINT CONFIGURATION System Tools The main frame of the System Tools screen includes three administration items: Restart, Configuration, and Upgrade (Figure 34). Restart Figure 34 Restart Screen If your Access Point is not operating correctly, you can choose to restart the Access Point by selecting Restart the Access Point, simulating the effect of power cycling the unit. No configuration information will be lost but the log files will be erased.
System Tools 49 Select the Configuration tab to display the Configuration screen (Figure 35). Backup Configuration Click BACKUP to save the current Access Point configuration. You will be prompted to download and save a file to disk. Restore Configuration Data If you want to reinstate the configuration settings previously saved to a file, press Browse to locate the backup file on your computer, and then click RESTORE to copy the data into the Access Point's memory. The password will remain unchanged.
50 CHAPTER 4: ACCESS POINT CONFIGURATION support web site to a folder on your computer. Once you have done this, select Browse to tell your web browser where this file is on your computer, and then click Apply. The file will be copied to the Access Point, and once this has completed, the Access Point will restart.
Status and Logs Status and Logs 51 Figure 37 Status and Logs Screen Selecting Status and Logs from the main menu displays the Status and Logs screens (Figure 37) in your Web browser window. The Status screen displays a tabular representation of your network and Internet connection. The screen shot in Figure 37 does not show a full status screen and the screen can be scrolled to view more information.
52 CHAPTER 4: ACCESS POINT CONFIGURATION Status Status displays the current unit status, including a summary of the configuration Logs Logs will allow you to view the events logged by the Access Point You may be asked to refer to the information on the Status and Logs screens if you contact your supplier for technical support.
5 Basic Connection Checks Browsing to the Access Point Configuration Screens TROUBLESHOOTING ■ Check that the Access Point is connected to your switch or hub and that all the equipment is powered on. Check that the LAN port link status LED on the Access Point are illuminated, and that any corresponding LEDs are also illuminated. ■ Ensure that the computers have completed their start-up procedure and are ready for use.
54 CHAPTER 5: TROUBLESHOOTING Forgotten Password and Reset to Factory Defaults If you can browse to the Access Point configuration screen but cannot log on because you do not know or have forgotten the password, follow the steps below to reset the Access Point to it’s factory default configuration. CAUTION: All your configuration changes will be lost, and you will need to run the configuration wizard again before you can re-establish your wireless network.
Wireless Networking 55 ■ Ensure that the Wireless Clients are using the same SSID or Service Area Name as the Access Point. The SSID is case-sensitive ■ Ensure that you are using the same level of security on all of your wireless computers (None, 40/64 or 128 bit) and that all devices are using the same keys, and the same order of keys where appropriate.
56 CHAPTER 5: TROUBLESHOOTING Access Point. In an ideal network the Access Point should be located in the centre of the network with Wireless computers distributed around it. Applications are generally available with the computer wireless card to carry out a site survey. Use this application to find the optimal siting for your wireless computer. Consult your Wireless Card documentation and vendor for more details.
Frequently Asked Questions ■ IP address: 192.168.1.2 ■ Subnet mask: 255.255.255.0 ■ Default Gateway address: 192.168.1.1 57 3 Restart the computer, and re-apply power to the Access Point. 4 Using the Web browser on the computer, enter the following URL in the location bar: http://192.168.1.1. This will connect you to the Microcode Recovery utility in the Access Point. 5 Follow the on-screen instructions. Enter the path and filename of the software image file.
58 CHAPTER 5: TROUBLESHOOTING There is a single LAN ports on the Access Point. How are additional computers connected? You can expand the number of connections available on your LAN by using hubs, switches and wireless access points connected to the Access Point. 3Com wireless access points and OfficeConnect hubs and switches provide a simple, reliable means of expanding your network; contact your supplier for more information, or visit: http://www.3com.
A Running the Discovery Application USING DISCOVERY 3Com provides a user friendly Discovery application for detecting the Access Point on the network. If you are unable to use the Discovery application, the Access Point on initial power-up will attempt to obtain an IP address from your local DHCP server. Consult your DHCP Server log to obtain the IP address that was allocated to your Access Point.
60 APPENDIX A: USING DISCOVERY 2 When the Welcome screen is displayed, select the NIC from which the Access Point will be discovered. Then click on Next and wait until the application discovers the Access Points connected to your LAN. Figure 40 Discovered Access Point Screen 3 Figure 40 shows an example Discovered Devices screen. Highlight the 11Mbps Wireless Access Point by clicking on it, and press Next.
B IP ADDRESSING The Internet Protocol Suite The Internet protocol suite consists of a well-defined set of communications protocols and several standard application protocols. Transmission Control Protocol/Internet Protocol (TCP/IP) is probably the most widely known and is a combination of two of the protocols (IP and TCP) working together.
62 APPENDIX B: IP ADDRESSING For your network to work correctly, all devices on the network must have: ■ The same sub-network address. ■ The same subnet mask. The only value that will be different is the specific host device number. This value must always be unique. An example IP address is ‘192.168.100.8’. However, the size of the network determines the structure of this IP Address. In using the Access Point, you will probably only encounter two types of IP Address and subnet mask structures.
How does a Device Obtain an IP Address and Subnet Mask? 63 This type of IP Address operates on a subnet mask of ‘255.255.0.0’. See Table 4 for an example about how a network (only four computers represented) and a Access Point might be configured. Table 4 IP Addressing and Subnet Masking How does a Device Obtain an IP Address and Subnet Mask? DHCP Addressing Device IP Address Subnet Mask PC 1 192.168.100.8 255.255.0.0 PC 2 192.168.201.30 255.255.0.0 PC 3 192.168.113.155 255.255.0.
64 APPENDIX B: IP ADDRESSING an IP address at random from the industry standard subnet of 169.254.x.x (with a subnet mask of 255.255.0.0). If two devices allocate themselves the same address, the conflict is detected and one of the devices allocates itself a new address. Automatic IP addressing support was introduced by Microsoft in the Windows 98 operating system and is also supported in Windows 2000.
C TECHNICAL SPECIFICATIONS This section lists the technical specifications for the OfficeConnect 11Mbps Wireless Access Point. 11Mbps Wireless Access Point Interfaces LAN connection - 10Mbps/100Mbps dual speed Ethernet port (10BASE-T/100BASE-TX) WLAN Interface Standard IEEE 802.11b, Direct Sequence Spread Spectrum (DSSS) Transmission rate: 11Mbps, automatic fallback to 5.5, 2 or 1Mbps Maximum channels: 13 Range up to 304.8m (1000ft) Frequency: (US/Canada/Europe) 2.400-2.4835 GHz Sensitivity: 1,2,5.
66 APPENDIX C: TECHNICAL SPECIFICATIONS Dimensions ■ Width = 220 mm (8.7 in.) ■ Depth = 135 mm (5.3 in.) ■ Height = 24 mm (1 in.) Weight Approximately 592 g (1.3 lbs) Standards Functional: ISO 8802/3 IEEE 802.3 IEEE 802.11b, WiFi Safety: UL 1950, EN 60950 CSA 22.2 #950 IEC 60950 EMC: EN 55022 Class B EN 55024 AS/NZS 3548 B FCC Part 15 Class B* ICES-003 Class B CNS 13438 Class A ETS 300-826 Radio CFR 47 FCC Part 15.207, 15.209, 15.247 and 15.249. ETS 300 328 (2.
67 ■ Windows XP ■ Mac OS 8.5 or higher ■ Unix Ethernet Performance The Access Point complies to the IEEE 802.3i, u and x specifications. Wireless Performance The Access Point complies with the IEEE 802.11b specification and conforms to the WiFi interoperability test standard. Cable Specifications The Access Point supports the following cable types and maximum lengths: ■ Category 3 (Ethernet) or Category 5 (Fast Ethernet or Dual Speed Ethernet) Twisted Pair — shielded and unshielded cable types.
68 APPENDIX C: TECHNICAL SPECIFICATIONS
D SAFETY INFORMATION Important Safety Information WARNING: Warnings contain directions that you must follow for your personal safety. Follow all directions carefully. You must read the following safety information carefully before you install or remove the unit: WARNING: The Access Point generates and uses radio frequency (rf) energy. In some environments, the use of rf energy is not permitted. The user should seek local advice on whether or not rf energy is permitted within the area of intended use.
70 APPENDIX D: SAFETY INFORMATION WARNING: Disconnect the power adapter before moving the unit. WARNING: RJ-45 ports. These are shielded RJ-45 data sockets. They cannot be used as telephone sockets. Only connect RJ-45 data connectors to these sockets. Wichtige Sicherheitshinweise VORSICHT: Warnhinweise enthalten Anweisungen, die Sie zu Ihrer eigenen Sicherheit befolgen müssen. Alle Anweisungen sind sorgfältig zu befolgen.
71 VORSICHT: Es sind keine von dem Benutzer zu ersetzende oder zu wartende Teile in dem Gerät vorhanden. Wenn Sie ein Problem mit dem Access Point haben, das nicht mittels der Fehleranalyse in dieser Anleitung behoben werden kann, setzen Sie sich mit Ihrem Lieferanten in Verbindung. VORSICHT: Vor dem Ausbau des Geräts das Netzadapterkabel herausziehen. VORSICHT: RJ-45-Anschlüsse. Dies sind abgeschirmte RJ-45-Datenbuchsen. Sie können nicht als Telefonanschlußbuchsen verwendet werden.
72 APPENDIX D: SAFETY INFORMATION AVERTISSEMENT: L’appareil fonctionne à une tension extrêmement basse de sécurité qui est conforme à la norme CEI 950. Ces conditions ne sont maintenues que si l'équipement auquel il est raccordé fonctionne dans les mêmes conditions. AVERTISSEMENT: Il n’y a pas de parties remplaceables par les utilisateurs ou entretenues par les utilisateurs à l’intérieur du moyeu.
E END USER SOFTWARE LICENCE AGREEMENT 3Com Corporation END USER SOFTWARE LICENSE AGREEMENT YOU SHOULD CAREFULLY READ THE FOLLOWING TERMS AND CONDITIONS BEFORE DOWNLOADING, INSTALLING AND USING THIS PRODUCT, THE USE OF WHICH IS LICENSED BY 3COM CORPORATION ("3COM") TO ITS CUSTOMERS FOR THEIR USE ONLY AS SET FORTH BELOW. DOWNLOADING, INSTALLING OR OTHERWISE USING ANY PART OF THE SOFTWARE OR DOCUMENTATION INDICATES THAT YOU ACCEPT THESE TERMS AND CONDITIONS.
74 APPENDIX E: END USER SOFTWARE LICENCE AGREEMENT and developed solely at private expense. The Software is delivered as "Commercial Computer Software" as defined in DFARS 252.227-7014 (June 1995) or as a commercial item as defined in FAR 2.101(a) and as such is provided with only such rights as are provided in this Agreement, which is 3Com's standard commercial license for the Software. Technical data is provided with limited rights only as provided in DFAR 252.227-7015 (Nov. 1995) or FAR 52.
GLOSSARY 802.11b 10BASE-T The IEEE standard to which the 3Com OfficeConnect 11Mpbs Wireless Access Point conforms. This standard provides for 1,2,5.5 and 11 Mbps data rates and a set of fundamental signaling methods and other services (see WECA). The IEEE specification for 10 Mbps Ethernet over Category 3, 4 or 5 twisted pair cable. 100BASE-TX The IEEE specification for 100 Mbps Fast Ethernet over Category 5 twisted-pair cable.
76 GLOSSARY 802.3 standard for Ethernet and is an operation that takes place in a few milliseconds. Bandwidth The information capacity, measured in bits per second, that a channel can transmit. The bandwidth of Ethernet is 10 Mbps, the bandwidth of Fast Ethernet is 100 Mbps. The bandwidth for 802.11b wireless is 11Mbps. Category 3 Cables One of five grades of Twisted Pair (TP) cabling defined by the EIA/TIA-586 standard.
GLOSSARY 77 your Internet browser), the user is sent to the proper IP address. The DNS server address used by the computers on your home network is the location of the DNS server your ISP has assigned. Encryption A method for providing a level of security to wireless data transmissions. The OfficeConnect 11Mbps Wireless Access Point uses two levels of encryption; 40/64 bit and 128 bit. 128 bit is a more powerful level of encryption than 40/64 bit. ESSID Extended Service Set Identifier.
78 GLOSSARY IETF Internet Engineering Task Force. An organization responsible for providing engineering solutions for TCP/IP networks. In the network management area, this group is responsible for the development of the SNMP protocol. Infra-structure mode Infra-Structure mode is the 802.11b configuration supported by the Access Point. You will need to ensure all of your clients are set up to use infra-structure mode in order for them to communicate with the Access Point.
GLOSSARY Network Network Interface Card (NIC) Protocol RJ-45 Server SSID 79 A Network is a collection of computers and other computer equipment that are connected for the purpose of exchanging information or sharing resources. Networks vary in size, some are within a single room, others span continents. A circuit board installed into a piece of computing equipment, for example, a computer, that enables you to connect it to the network. A NIC is also known as an adapter or adapter card.
80 GLOSSARY TCP/IP Transmission Control Protocol/Internet Protocol. This is the name for two of the most well-known protocols developed for the interconnection of networks. Originally a UNIX standard, TCP/IP is now supported on almost all platforms, and is the protocol of the Internet. TCP relates to the content of the data travelling through a network — ensuring that the information sent arrives in one piece when it reaches its destination.
INDEX A Access 13 Addresses IP 61 Administration Password 26, 33 Automatic Addressing 63 C Cable Specifications 67 Channels 83 Configuration backup 49 restore 49 Conventions notice icons, About This Guide 8 text, About This Guide 8 Country Selection 24 D DHCP 27, 36, 63 Discovery Application 59 F Forgotten Password 54 I Internet addresses 61 IP Address 27, 28, 34, 61 MAC Address 37 deleting 44 modifying 44 N Network addresses 61 Networking wireless 54 NIC wireless 14 P Password 23, 33 Profile 46 R
82 INDEX U Unit Configuration 34 Upgrade 49 W Wireless authorised PCs 43 channel selection 38 client list 45 configuration 38 connection control 42 encryption 40 LED 15 networking 54 NIC 14 service area name 39 settings 29, 37
REGULATORY NOTICES FOR THE 11MBPS WIRELESS ACCESS POINT Channels Use of the 11Mbps Wireless Access Point is only authorized for the channels approved by each country. For proper installation, login to the management interface and select your country from the drop down list.
84 Information to the User If this equipment does cause interference to radio or television reception, which can be determined by turning the equipment off and on, the user is encouraged to try to correct the interference by one or more of the following measures: ■ Reorient the receiving antenna. ■ Relocate the equipment with respect to the receiver. ■ Move the equipment away from the receiver.
85 Exposure to Radio Frequency Radiation: The radiated output power of the 3Com OfficeConnect 11Mbps Wireless Access Point is far below the FCC radio frequency exposure limits. Nevertheless, the 3Com OfficeConnect 11Mbps Wireless Access Point shall be used in such manner that the potential for human contact during normal operation is minimized. The distance between the antennas and the user should not be less than 20 cm.
86 RF Exposure Compliance Statement (U.S.) CAUTION: The 3Com OfficeConnect 11Mbps Wireless Access Point has been certified as a mobile computing device as per FCC Section 2.1091. In order to comply with the FCC RF exposure requirements, the 3Com OfficeConnect Wireless Cable/DSL Gateway must only be installed with approved antennas and a minimum separation distance of 20 cm (8 in) must be maintained from the antenna to any nearby persons.
3Com Corporation, Corporate Headquarters, 5500 Great America Parkway, Santa Clara, CA 95052-8145, USA. Copyright © 2003 3Com Corporation. All rights reserved. 3Com and OfficeConnect are registered trademarks of 3Com Corporation. All other company and product names may be trademarks of their respective companies. To learn more about 3Com products and services, visit our World Wide Web site at www.3com.com All specifications are subject to change without notice.