
User's Manual Part 1
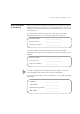
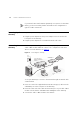


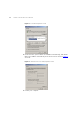

Table Of Contents
- About This Guide
- Introducing the Gateway
- Hardware Installation
- Setting Up Your Computers
- Running the Setup Wizard
- Gateway Configuration
- Troubleshooting
- Using Discovery
- IP Addressing
- Technical Specifications
- Safety Information
- End User Software License Agreement
- ISP Information
- Glossary
- 802.11b
- 802.11g
- 10BASE-T
- 100BASE-TX
- Access Point
- Ad Hoc mode
- Auto-negotiation
- Bandwidth
- Category 3 Cables
- Category 5 Cables
- Channel
- Client
- DHCP
- DNS Server Address
- DSL modem
- Encryption
- ESSID
- Ethernet
- Ethernet Address
- Fast Ethernet
- Firewall
- Full Duplex
- Gateway
- Half Duplex
- Hub
- IEEE
- IETF
- Infrastructure mode
- IP
- IP Address
- ISP
- LAN
- MAC
- MAC Address
- NAT
- Network
- Network Interface Card (NIC)
- Protocol
- PPPoE
- PPTP
- RJ-45
- Server
- SSID
- Subnet Address
- Subnet mask
- Subnets
- Switch
- TCP/IP
- Traffic
- universal plug and play
- URL Filter
- WAN
- WECA
- WEP
- Wi-Fi
- Wireless Client
- Wireless LAN Service Area
- Wizard
- WLAN
- WPA
- Glossary
- Regulatory Notices for the Wireless 11g Cable/DSL Gateway
Connecting the Gateway 23
4 Connect your computer to one of the four LAN ports on the Gateway
using a twisted pair cable. Check that the corresponding LAN status LED
on the Gateway lights.
You have now completed the hardware installation of your Gateway.
Next you need to set up your computers so that they can make use of the
Gateway to communicate with the Internet.
3Com recommends that you perform the initial Gateway configuration
from a computer that is directly connected to one of the LAN ports.
If you configure the Gateway from a wireless computer, note that you
may lose contact with the Gateway if you change the wireless
configuration.
To communicate wirelessly with your Gateway, your wireless NIC should
be set as follows:
■ Encryption — none
■ Service Area Name/SSID — 3Com
■ Channel — 11