
User's Manual Part 1


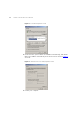
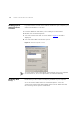

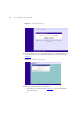
Table Of Contents
- About This Guide
- Introducing the Gateway
- Hardware Installation
- Setting Up Your Computers
- Running the Setup Wizard
- Gateway Configuration
- Troubleshooting
- Using Discovery
- IP Addressing
- Technical Specifications
- Safety Information
- End User Software License Agreement
- ISP Information
- Glossary
- 802.11b
- 802.11g
- 10BASE-T
- 100BASE-TX
- Access Point
- Ad Hoc mode
- Auto-negotiation
- Bandwidth
- Category 3 Cables
- Category 5 Cables
- Channel
- Client
- DHCP
- DNS Server Address
- DSL modem
- Encryption
- ESSID
- Ethernet
- Ethernet Address
- Fast Ethernet
- Firewall
- Full Duplex
- Gateway
- Half Duplex
- Hub
- IEEE
- IETF
- Infrastructure mode
- IP
- IP Address
- ISP
- LAN
- MAC
- MAC Address
- NAT
- Network
- Network Interface Card (NIC)
- Protocol
- PPPoE
- PPTP
- RJ-45
- Server
- SSID
- Subnet Address
- Subnet mask
- Subnets
- Switch
- TCP/IP
- Traffic
- universal plug and play
- URL Filter
- WAN
- WECA
- WEP
- Wi-Fi
- Wireless Client
- Wireless LAN Service Area
- Wizard
- WLAN
- WPA
- Glossary
- Regulatory Notices for the Wireless 11g Cable/DSL Gateway
Obtaining an IP Address Automatically 27
Windows XP
1 From the Windows Start menu, select Control Panel.
2 Click on Network and Internet Connections.
3 Click on the Network Connections icon.
4 Double click on LAN or High Speed Connection icon. A screen titled Local
Area Connection Status will appear.
5 Select Internet Protocol TCP/IP and click on Properties.
6 Ensure that the options Obtain an IP Address automatically, and Obtain
DNS servers automatically are both selected. Click OK.
7 Restart your computer.
Windows 95/98/ME
1 From the Windows Start Menu, select Settings > Control Panel.
2 Double click on Network. Select the TCP/IP item for your network card
and click on Properties.
3 In the TCP/IP dialog, select the IP Address tab, and ensure that Obtain IP
address automatically is selected. Click OK.
Macintosh If you are using a Macintosh computer, use the following procedure to
change your TCP/IP settings:
1 From the desktop, select Apple Menu, Control Panels, and TCP/IP.
2 In the TCP/IP control panel, set Connect Via: to “Ethernet”.
3 In the TCP/IP control panel, set Configure: to “Using DHCP Server.”
4 Close the TCP/IP dialog box, and save your changes.
5 Restart your computer.